
Hey! Listen! This post is part of a series on the Ubiquiti EdgeRouter Lite. Check them all out!
| Date | URL | Part |
|---|---|---|
| 2019-06-28 | Migrating away from the Ubiquiti EdgeRouter Lite | Migrated to a Netgate SG-1100 |
| 2019-02-03 | EdgeRouter CNAME records | Setup CNAME records |
| 2017-10-03 | Dyn DDNS on EdgeRouter | Setup DynDNS |
| 2017-04-25 | DuckDNS on EdgeRouter | Setup DuckDNS |
| 2017-01-08 | Ubiquiti EdgeRouter serial console settings | Serial console settings |
| 2016-11-29 | Ubiquiti UniFi controller setup on Raspberry Pi 3 | Install UniFi Controller |
| 2016-08-30 | EdgeRouter Lite Dnsmasq setup | Setup dnsmasq |
| 2016-06-13 | EdgeRouter Lite software upgrade | Firmware upgrade |
| 2016-05-12 | EdgeRouter Lite OpenVPN setup | OpenVPN server setup |
| 2016-04-29 | Ubiquiti EdgeRouter Lite setup | Initial setup |
Introduction
As you know, I love my Ubiquiti EdgeRouter Lite. Since I bought it, I’ve been wanting to purchase one of the UniFi wireless APs ever since I saw the Ars Technica review of them. I ended up picking up the UniFi AC Pro on a Black Friday deal on Jet.com.
The UniFi AP itself does not have a web interface (however, you can SSH to it). To manage the APs, you need to use the UniFi controller software. The software is only needed for the initial setup, and can then be turned off afterwards (which means you can do the setup on your laptop, then disable the software after the initial setup). However, if you want to enable statistic gathering or guest portal, the controller software needs to be running at all times. The controller software is available for Windows, Mac, Linux, which means it’s perfect to run on a small Linux server (like a Raspberry Pi 3).
Controller setup
Installation
I’m going to assume you’re running this on a Raspberry Pi 3, running Raspbian. However, any Debian-based distribution should follow the same instructions.
First, we need to add the repository to apt.
echo "deb http://www.ubnt.com/downloads/unifi/debian stable ubiquiti" | sudo tee /etc/apt/sources.list.d/100-ubnt.list
Note - You can also specify the version of UniFi to use, as commenter battlechop did, since the stable repository is still on v4. Thanks for submitting this!
Then, add the GPG key.
sudo apt-key adv --keyserver keyserver.ubuntu.com --recv C0A52C50
Next, update your repositories and install Unifi.
sudo apt-get update && sudo apt-get install unifi
Now, start Unifi.
sudo systemctl enable unifi
sudo systemctl start unifi
Finally, we need to disable MongoDB, since UniFi will run its own instance.
sudo systemctl stop mongodb
sudo systemctl disable mongodb
Package hold
If you read around r/Ubiquiti and the UniFi forums, you’ll learn that the controller releases (and AP firmware) can be hit-or-miss. Because we’ve added the UniFi repository, every time we do a sudo apt-get update && sudo apt-get upgrade, we might update the UniFi controller software, even if we don’t want it updated. To get around this, we’ll hold back the unifi package from being updated automatically.
sudo apt-mark hold unifi
To verify it is held back, use dpkg.
sudo dpkg -l | grep ^h
Here, you can see the results.
hi unifi 4.8.20-8422 all Ubiquiti UniFi server
The h as the first character means the package is held, and the i as the second character means the package is currently installed.
If you ever need to remove the hold, use the command below.
sudo apt-mark unhold unifi
Manually update
To check for a new release of the unifi package in the repository, use the command below.
sudo apt-get update && sudo apt-cache policy unifi
If there is a newer version, update to it manually.
sudo apt-get install --only-upgrade unifi
Oracle Java 8 (optional)
Oracle changed the Java licensing model (as-of January 2019) to start charging for Oracle Java. Instead, you should stick with OpenJDK as it is open-source.
OpenJDK has been known to have performance issues on the Pi, so I’m running Oracle’s Java 8 instead. You can find your current Java packages with the command below.
sudo dpkg --get-selections |grep -e "java\|jdk\|jre"
If you try to find your Java version, you’ll probably be using OpenJDK.
--> java -version
java version "1.7.0_111"
OpenJDK Runtime Environment (IcedTea 2.6.7) (7u111-2.6.7-2~deb8u1+rpi1)
OpenJDK Zero VM (build 24.111-b01, interpreted mode)
Start by installing Oracle Java 8.
sudo apt-get install oracle-java8-jdk -y
Next, update your environment to use the new Java.
sudo update-alternatives --config java
Check your Java version again to make sure you’re on Java 8.
--> java -version
java version "1.8.0_65"
Java(TM) SE Runtime Environment (build 1.8.0_65-b17)
Java HotSpot(TM) Client VM (build 25.65-b01, mixed mode)
Now, copy the systemd service file so we can edit it, then update it to point at the new Java location.
sudo cp -p /lib/systemd/system/unifi.service /etc/systemd/system
sudo sed -i '/^\[Service\]$/a Environment=JAVA_HOME=/usr/lib/jvm/jdk-8-oracle-arm32-vfp-hflt' /etc/systemd/system/unifi.service
Now, restart systemd and UniFi.
sudo systemctl daemon-reload
sudo systemctl restart unifi.service
Log rotation (optional)
Because I’m running the controller on a Raspberry Pi 3, I have limited space on the SD card. To make sure the log files don’t fill the card, I’m going to rotate them using logrotate. Credit to Kevin Burdett for this idea.
First, install logrotate.
sudo apt-get update && sudo apt-get install logrotate
Then, create the configuration file to rotate your UniFi and MongoDB logs.
sudo bash -c 'cat >> /etc/logrotate.d/unifi << EOF
/var/log/unifi/*.log {
    rotate 5
    daily
    missingok
    notifempty
    compress
    delaycompress
    copytruncate
}
EOF'
The logrotate options are explained below:
- Rotate any files ending in /var/log/unifi ending in .log
- Save 5 log files before deleting older files
- Rotate the log files daily
- If the log is missing, go onto the next one without error
- Do not rotate the log if it is empty
- Compress the log files (into gzip format)
- Delay compression until the log file is rotated (so processes won’t be trying to log to a compressed file)
- Truncate the original log file in place after creating a copy, instead of moving the old log file and optionally creating a new one
Access controller
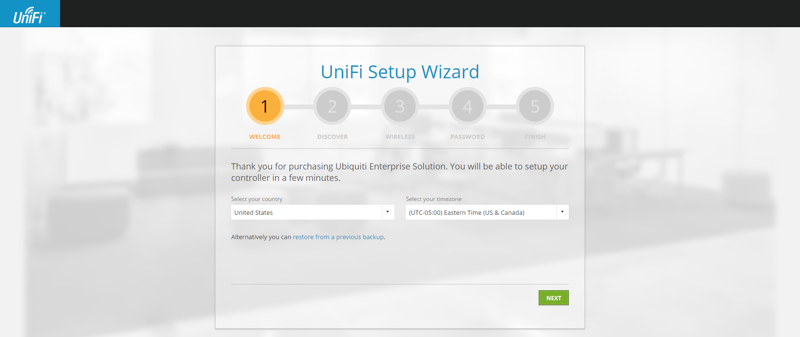
You can now access the controller by going to the IP of your device, over port 8443.
https://<device_IP_here>:8443
If everything is working, you should see the setup wizard. Since there are many different ways to do the setup, I won’t be covering that here.
Controller alternatives
There are a few alternatives to running the controller software on the Raspberry Pi on your local network:
- As mentioned earlier, run the controller software on your PC (Windows/Mac/Linux) for initial setup. You can either turn it off after the setup, or leave it running to gather statistics.
- Download the UniFi app (iOS or Android) to setup the AP. The app provides limited setup functionality, with more advanced options requiring the controller.
- Purchase the Unifi Cloud Key ($80). This device sits on your network and runs the controller software locally, but is accessible from anywhere at https://unifi.ubnt.com. Instructions are here.
- Run the controller in a VPS or AWS instance. See instructions here for installation and adoption.
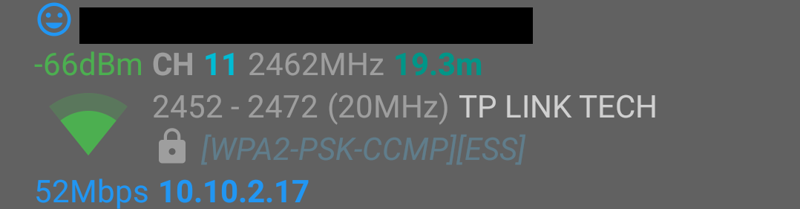
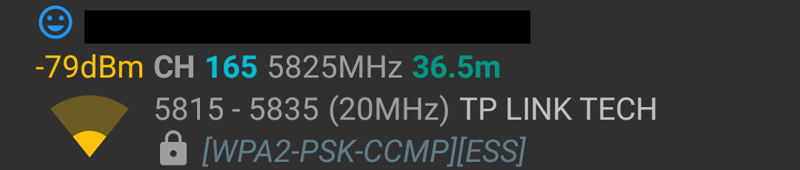
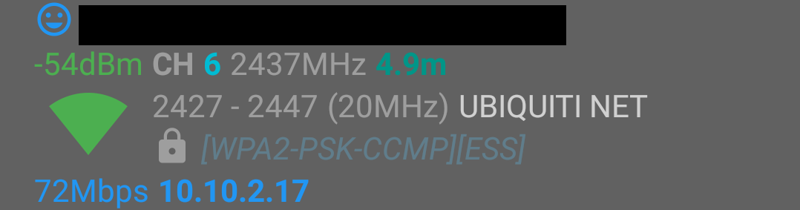
Comparison
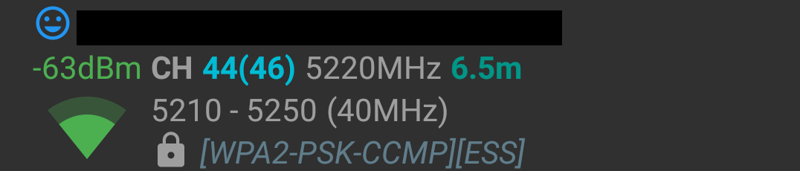
Here, you can see my signal strength on the old access point (TP-Link Archer C7 running OpenWrt Chaos Calmer) on the 2.4GHz and 5GHz networks, respectively.
Then, the same measurements with the new UniFi access point. Again, on the 2.4GHz and 5GHz networks, respectively.
Hope this helps!
-Logan
