
Hey! Listen! This post is part of a series on the Ubiquiti EdgeRouter Lite. Check them all out!
| Date | URL | Part |
|---|---|---|
| 2019-06-28 | Migrating away from the Ubiquiti EdgeRouter Lite | Migrated to a Netgate SG-1100 |
| 2019-02-03 | EdgeRouter CNAME records | Setup CNAME records |
| 2017-10-03 | Dyn DDNS on EdgeRouter | Setup DynDNS |
| 2017-04-25 | DuckDNS on EdgeRouter | Setup DuckDNS |
| 2017-01-08 | Ubiquiti EdgeRouter serial console settings | Serial console settings |
| 2016-11-29 | Ubiquiti UniFi controller setup on Raspberry Pi 3 | Install UniFi Controller |
| 2016-08-30 | EdgeRouter Lite Dnsmasq setup | Setup dnsmasq |
| 2016-06-13 | EdgeRouter Lite software upgrade | Firmware upgrade |
| 2016-05-12 | EdgeRouter Lite OpenVPN setup | OpenVPN server setup |
| 2016-04-29 | Ubiquiti EdgeRouter Lite setup | Initial setup |
Introduction
As much as I love my C7 running OpenWrt, I’ve been hearing a lot of good things about Ubiquiti devices. In particular, the EdgeRouter Lite, which is touted as being the world’s first router under $100 capable of passing one million packets per second (1Mpps). In contrast, I’ve read that the TP-Link WDR-3600 can pass about 25Kpps. This is partly due to the hardware in the WDR-3600, and partly due to the software (OpenWrt). I wanted to try out the EdgeRouter Lite (ERL) and see how it performed.
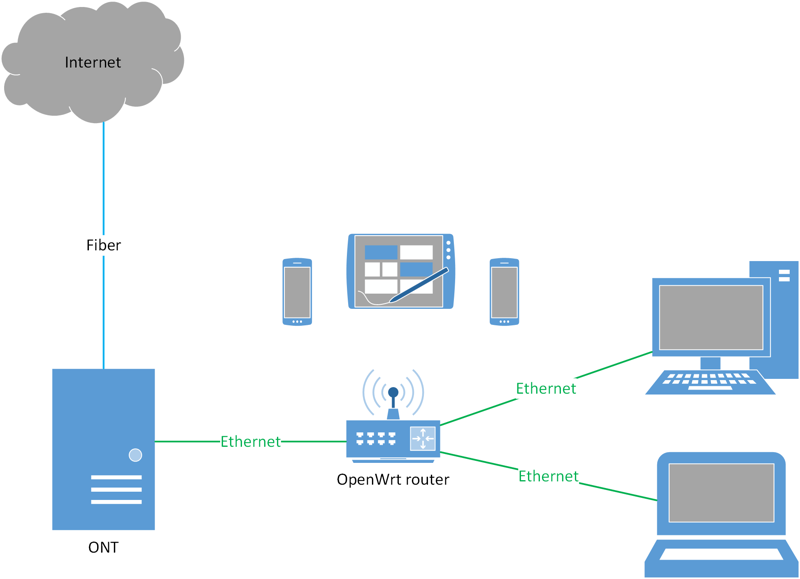
Currently, my setup looks like the diagram below.
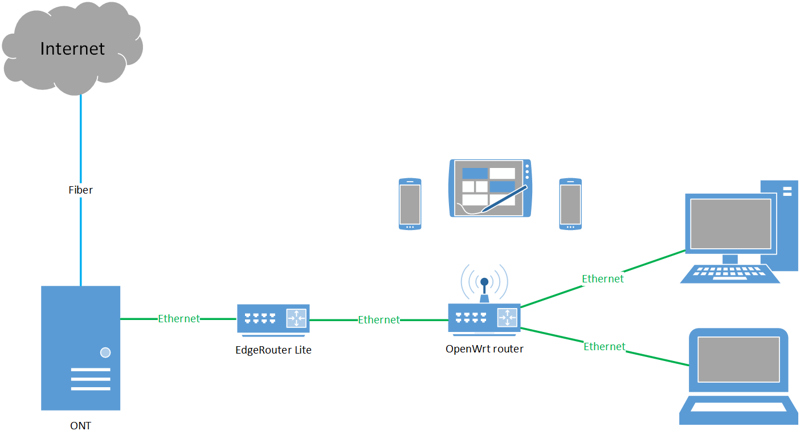
I plan on putting the ERL in front of the C7, and using the C7 as a switch and AP only (as shown below). Eventually, I’ll replace the C7 with a proper switch and AP.
Also, I’m not a network engineer. Do this at your own risk, I’m not responsible for anything you break. 🙃
Hardware
The ERL packs a dual-core 500MHz MIPS64 processor, 512MB DDR2 RAM, and 2GB of flash storage. In addition, it also supports hardware offload for the functions below. This means that the CPU can offload these tasks to a special chip, freeing up the CPU and greatly improving throughput.
- IPSec
- IPv4 forwarding
- IPv4 vlan
- IPv4 PPPoE
- IPv4 GRE
- IPv4 export
- IPv4 DPI
- IPv6 forwarding
- IPv6 vlan
- IPv6 PPPoE
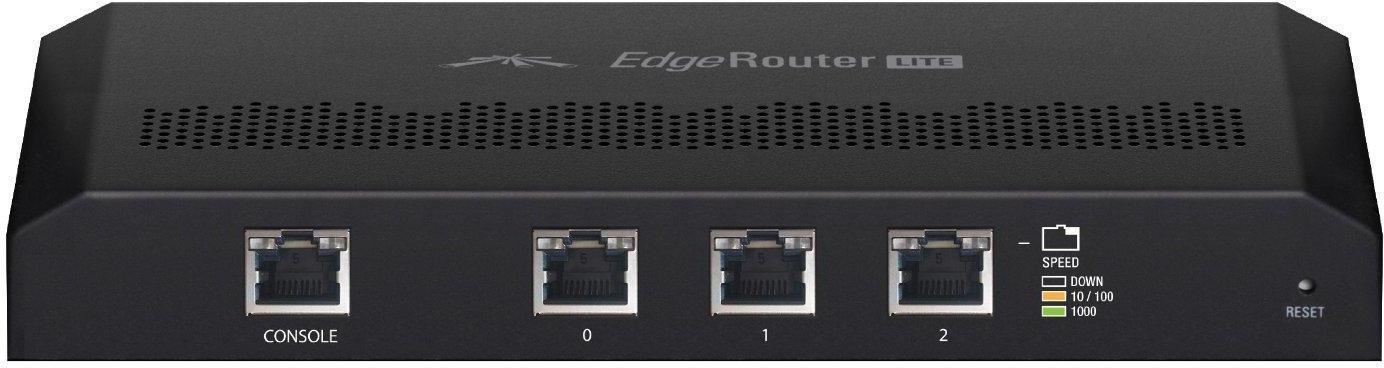
For this guide, I am configuring the ERL through the ethX ports over SSH, not via the console port. Because of this, I end up doing a good bit of connecting/disconnecting from my ERL. If you’d like to avoid this problem, pickup a console cable and adapter (or this combo cable).
My setup is going to use eth0 to connect to my WAN, and eth1 for my LAN. You could use eth2 for another LAN if needed. However, do not bridge the two LANs, as that will disable the hardware offload (see here and here). If you need more ports, you’ll need a separate switch.

Note - The original ERL (with angled corners) had storage issues and was prone to failure, the newer ERL (with square corners) does not suffer from this issue.
Software
EdgeOS is based on Vyatta Core 6.3, which is itself based on Debian. As a side-note, VyOS is also a fork of Vyatta, so most principles from VyOS will apply to EdgeOS as well. The EdgeOS command line (CLI) can be accessed one of three ways: SSH via an ethX port, a console port, or through the web interface. The CLI has two modes: operational mode and configuration mode (similar to vi’s normal and insert modes). By default, you are loaded into operational mode, used to show system settings. Operational mode is indicated by a dollar-sign prompt ($).
ubnt@ubnt:~$
Use the configure command to enter configuration mode, which is used to make configuration changes to the ERL. Configuration mode is indicated by a number sign prompt (#) and the word edit.
ubnt@ubnt:~$ configure
[edit]
ubnt@ubnt#
The CLI has context-sensitive tab completion only for commands, not for browsing around the filesystem. In addition, context-sensitive help is available with the ? command, with detailed help available with the ?? command.
When making changes, they are not active until committed. To see what changes you’ve made, but not commited, use the compare command.
compare
To undo uncommitted changes, use the discard command.
discard
To commit changes, use the commit command.
commit
Committed changes are not persistent across reboots. Use the save command to write the changes to the plain-text configuration file, which is available at /config/config.boot. Note - using ? reveals that save can also save the configuration to a SCP, FTP, or TFTP location.
save
To get back to operational mode, use exit.
exit
As far documentation is concerned, Ubiquiti’s documentation is pretty poor, but their forums and Reddit are the best places to get help. The old Vyatta Core 6.3 documents are very helpful as well. In addition, two important primers to have on-hand are the ERL quick-start guide and the EdgeOS user guide.
Initial setup
Firmware update
Before we connect to the router for the first time and start making changes, I recommend you download the latest firmware. Go to Ubiquiti’s download page for the ERL and download the latest firmware (v1.8.0 at the time of this writing).
Next, connect your PC to eth0 of the ERL with an ethernet cable, then give your PC a static IP address in the 192.168.1.x range (e.g., 192.168.1.2). The web GUI is available at https://192.168.1.1, but I’ll be trying to do most of my work through the CLI.
First, transfer the firmware file to the ERL (the default credentials are ubnt/ubnt).
scp ER-e100.v1.8.0.4853089.tar ubnt@192.168.1.1:~
Next, SSH into the ERL.
ssh ubnt@192.168.1.1
I recommend viewing the current version of the firmware (my ERL shipped with v1.2.0).
show version
Upload the system image.
add system image ~/ER-e100.v1.8.0.4853089.tar
Use the command below to show all the installed images.
show system image
You’ll then need to reboot to make the new image take effect.
reboot
Once you’re back up, use the command below to show the installed images (EdgeOS can store two images, should you need to revert). At this point, you should be booted into the latest image.
show system image
Just to be sure, verify the version you’re running.
show version
Optional - If you’re running low on space, you can use the two commands below to view image storage and delete the unused image.
show system image storage
delete system image
Set the hostname
Now that our firmware is updated, we can start making changes. I’m starting by changing the hostname.
configure
set system host-name <name>
commit
save
Note - Notice that I’m using configure to enter configuration mode, making my changes, then running commit and save. After that, you’ll need to type exit if you want to get back to operational mode.
Change timezone
The list of available time zones is available by navigating the files and directories under /usr/share/zoneinfo, should you need to update it.
configure
set system time-zone US/Eastern
commit
save
NTP
The ERL does not have a hardware clock, so it depends on NTP to synchronize time. You can verify the NTP settings below.
configure
show system ntp
The ERL will use a pool of Ubiquiti NTP servers by default.
Setup interfaces
First, configure the WAN interface on eth0. My provider (Verizon FiOS) distributes addresses via DHCP (as I imagine most fiber/cable providers in the US do), so my WAN interface will use DHCP.
configure
delete interfaces ethernet eth0 address 192.168.1.1/24
set interfaces ethernet eth0 address dhcp
set interfaces ethernet eth0 description "WAN"
set interfaces ethernet eth0 duplex auto
set interfaces ethernet eth0 speed auto
Next, configure the LAN interface on eth1. I’m using the 10.10.2.x IP range, specified in CIDR notation. I’m not a network engineer, so use a calculator to determine what you need (hint - /24 will provide 254 usable IP addresses).
set interfaces ethernet eth1 address 10.10.2.1/24
set interfaces ethernet eth1 description "LAN"
set interfaces ethernet eth1 duplex auto
set interfaces ethernet eth1 speed auto
commit
At this point, when you type commit, your SSH session will hang, since we just set eth0 to be a DHCP client. Change your PC’s static IP address to something in the 10.10.2.x range (e.g., 10.10.2.2), then move your ethernet cable over to eth1. SSH back into the ERL, and make sure you commit and save the changes you just made. This is where that console cable would come in handy…
configure
commit
save
Now, we need to setup a DHCP server on eth1. Pick a start and stop range, specify the router IP, DNS server, and lease time.
configure
set service dhcp-server disabled false
set service dhcp-server shared-network-name LAN authoritative enable
set service dhcp-server shared-network-name LAN subnet 10.10.2.0/24 start 10.10.2.100 stop 10.10.2.199
set service dhcp-server shared-network-name LAN subnet 10.10.2.0/24 default-router 10.10.2.1
set service dhcp-server shared-network-name LAN subnet 10.10.2.0/24 dns-server 10.10.2.1
set service dhcp-server shared-network-name LAN subnet 10.10.2.0/24 lease 86400
Here, we’ll tell DNS which interface to listen on and set a cache size. Then, we’ll tell DNSMasq to use the router itself (127.0.0.1) for DNS, and then forward DNS requests to my specified DNS servers (I’m using OpenNIC DNS servers). The options I’m using are standard DNSMasq options.
set service dns forwarding listen-on eth1
set service dns forwarding cache-size 400
set system name-server 127.0.0.1
set service dns forwarding name-server 50.116.40.226
set service dns forwarding name-server 107.170.95.180
set service dns forwarding options domain-needed
set service dns forwarding options bogus-priv
set service dns forwarding options all-servers
I’m also telling eth0 not to request DNS servers via DHCP, as per this post, because I want to use only OpenNIC servers.
set interfaces ethernet eth0 dhcp-options name-server no-update
commit
save
Now, change your PC’s static IP back to DHCP, disconnect from eth1, and reconnect to it. You should be getting an IP in the range you specified above. You can test your DNS servers here.
Setup firewall
At this point, our ERL can route, but we don’t have a firewall. To setup these rules, think of this from the router’s perspective. At a minimum, you need two sets of firewall rules: one for traffic coming from the internet destined for the LAN, and one for traffic coming from the internet destined for the ERL itself. If you’re more of a visual person, this is a great way to visualize these firewall rules.
We’ll start by setting some global options.
configure
set firewall all-ping enable
set firewall broadcast-ping disable
set firewall receive-redirects disable
set firewall ipv6-receive-redirects disable
set firewall ip-src-route disable
set firewall ipv6-src-route disable
set firewall log-martians enable
Now, create a firewall to protect the LAN. We’re saying the default action is to drop anything coming into our LAN, with the exception of already established sessions. In addition, we drop anything with an invalid state.
set firewall name WAN_IN default-action drop
set firewall name WAN_IN description "WAN to internal"
set firewall name WAN_IN enable-default-log
set firewall name WAN_IN rule 10 action accept
set firewall name WAN_IN rule 10 description "Allow established/related"
set firewall name WAN_IN rule 10 state established enable
set firewall name WAN_IN rule 10 state related enable
set firewall name WAN_IN rule 20 action drop
set firewall name WAN_IN rule 20 description "Drop invalid state"
set firewall name WAN_IN rule 20 state invalid enable
set firewall name WAN_IN rule 20 log enable
Then, a firewall to protect the ERL itself. Again, We’re saying the default action is to drop anything coming into our ERL, with the exception of already established sessions. We drop anything with an invalid state, and we also limit pings.
set firewall name WAN_LOCAL default-action drop
set firewall name WAN_LOCAL description "WAN to router"
set firewall name WAN_LOCAL enable-default-log
set firewall name WAN_LOCAL rule 10 action accept
set firewall name WAN_LOCAL rule 10 description "Allow established/related"
set firewall name WAN_LOCAL rule 10 state established enable
set firewall name WAN_LOCAL rule 10 state related enable
set firewall name WAN_LOCAL rule 20 action drop
set firewall name WAN_LOCAL rule 20 description "Drop invalid state"
set firewall name WAN_LOCAL rule 20 state invalid enable
set firewall name WAN_LOCAL rule 20 log enable
set firewall name WAN_LOCAL rule 30 action accept
set firewall name WAN_LOCAL rule 30 description "Limit pings"
set firewall name WAN_LOCAL rule 30 limit burst 1
set firewall name WAN_LOCAL rule 30 limit rate 50/minute
set firewall name WAN_LOCAL rule 30 log enable
set firewall name WAN_LOCAL rule 30 protocol icmp
Now, enable the firewall by applying it to our eth0 interface.
set interfaces ethernet eth0 firewall in name WAN_IN
set interfaces ethernet eth0 firewall local name WAN_LOCAL
commit
save
Setup NAT
Because of NAT, one external IP can map to many internal IPs. This allowed the extension of the use of IPv4, even though we were quickly running out of addresses. The rule below will change (masquerade) all traffic going out of eth0 to have its source address changed to the public address of eth0 (instead of staying at 10.10.2.x, where it would never get a return).
configure
set service nat rule 5000 description "Masquerade for WAN"
set service nat rule 5000 outbound-interface eth0
set service nat rule 5000 type masquerade
commit
save
That’s it! Technically, you should be able to get online with this configuration and be pretty safe!
Optional setup
Verify hardware offload
Verify hardware offload is working for the services you need.
show ubnt offload
Change password
I highly recommend changing the password of the default ubnt user (even if you disable password authentication via SSH).
configure
set system login user ubnt authentication plaintext-password <password_here>
commit
save
Ubiquiti also recommends creating a new user and removing the default ubnt user. I’m not going to cover that, but see this document for more details.
Setup SSH keys
I also highly recommend setting up SSH keys so you don’t need to use password authentication. Start by copying the key from your PC to the ERL.
scp ~/.ssh/id_rsa.pub ubnt@10.10.2.1:~/id_rsa.pub
Then, load the key and turn off password authentication.
configure
loadkey ubnt ~/id_rsa.pub
set service ssh disable-password-authentication
commit
save
Note - If you receive the error below when trying to load a key, make sure there are no spaces in the comment section of the key.
Not a valid key file format (see man sshd) at /opt/vyatta/sbin/vyatta-load-user-key.pl line 96, <$in> line 1.
Custom SSH banners
If you’d like, you can setup a SSH banner for pre-login and post-login.
configure
set system login banner pre-login '\n\n\n\tUNAUTHORIZED USE OF THIS SYSTEM\n\tIS STRICTLY PROHIBITED!\n\n\tPlease contact Logan Marchione for access\n\n\n\n'
set system login banner post-login '\n\n\n\tWelcome to EdgeRouter Lite\n\n\n\n'
commit
save
Note - The string \n is a newline, and \t is an indent.
Change SSH port
You can argue about security through obscurity, but I’m going to change the port SSH listens on. At the very least, it’ll help protect from scanners and bots.
configure
set service ssh port 1234
commit
save
Change GUI port
Again, changing this port is more security through obscurity.
configure
set service gui https-port 8443
commit
save
Change MAC
I’ve been using my own router with Verizon FiOS for a while, but for some reason, I can’t pull an IP from the ONT unless I’m cloning the MAC of the original Actiontec router. Until I get the time (i.e., willpower) to call Verizon, I’m going to choose to clone the MAC.
configure
set interfaces ethernet eth0 mac 00:00:00:00:00:00
commit
save
Dynamic DNS
I like to connect remotely via SSH and/or VPN to my router, so I use Dyn for my dynamic DNS service.
configure
set service dns dynamic interface eth0 service dyndns host-name <hostname.dyn.com>
set service dns dynamic interface eth0 service dyndns login <username>
set service dns dynamic interface eth0 service dyndns password <password_here>
commit
save
Then, trigger a manual update. EdgeOS will only update the dynamic service when your IP address actually changes.
update dns dynamic interface eth0
You can show the status with the command below.
show dns dynamic status
Remote SSH access
I like to connect back to my home via SSH, and will eventually setup a VPN. To allow SSH, I’ll need to open a port for SSH in the firewall.
configure
set firewall name WAN_LOCAL rule 40 action accept
set firewall name WAN_LOCAL rule 40 description "Allow SSH to router"
set firewall name WAN_LOCAL rule 40 destination port 1234
set firewall name WAN_LOCAL rule 40 log enable
set firewall name WAN_LOCAL rule 40 protocol tcp
commit
save
Remote GUI access
In my case, I want remote access to SSH, but I don’t want the GUI to be open to world. This will make it so it only listens for requests from the LAN, not the WAN.
configure
set service gui listen-address 10.10.2.1
commit
save
Static DHCP leases
I prefer to set static DHCP leases on the router, rather than configuring all my devices with a static IP. Use the syntax below to setup a static lease.
configure
set service dhcp-server shared-network-name LAN subnet 10.10.2.0/24 static-mapping client01 ip-address 10.10.2.10
set service dhcp-server shared-network-name LAN subnet 10.10.2.0/24 static-mapping client01 mac-address 00:00:00:00:00:00
commit
save
Note - It’s best practice to not use addresses inside the DHCP pool (mine is 10.10.2.100 - 10.10.2.199).
Hope this was helpful! I plan on configuring a VPN on this router in the near future.
-Logan
