
Hey! Listen! This post is part of a series on the Ubiquiti EdgeRouter Lite. Check them all out!
| Date | URL | Part |
|---|---|---|
| 2019-06-28 | Migrating away from the Ubiquiti EdgeRouter Lite | Migrated to a Netgate SG-1100 |
| 2019-02-03 | EdgeRouter CNAME records | Setup CNAME records |
| 2017-10-03 | Dyn DDNS on EdgeRouter | Setup DynDNS |
| 2017-04-25 | DuckDNS on EdgeRouter | Setup DuckDNS |
| 2017-01-08 | Ubiquiti EdgeRouter serial console settings | Serial console settings |
| 2016-11-29 | Ubiquiti UniFi controller setup on Raspberry Pi 3 | Install UniFi Controller |
| 2016-08-30 | EdgeRouter Lite Dnsmasq setup | Setup dnsmasq |
| 2016-06-13 | EdgeRouter Lite software upgrade | Firmware upgrade |
| 2016-05-12 | EdgeRouter Lite OpenVPN setup | OpenVPN server setup |
| 2016-04-29 | Ubiquiti EdgeRouter Lite setup | Initial setup |
Introduction
Ubiquiti just released the new v1.8.5 software for their EdgeMax devices, including the EdgeRouter Lite (ERL). I’ll be showing you how to install the new software via the CLI, which only takes a few minutes.
The software downloads are normally here, but since v1.8.5 was just released, it’s currently only available on the forums, here.
If you haven’t already, you can subscribe to the EdgeMax updates blog, located here. Ubiquiti will post all major updates here, so subscribing to the RSS feed is a good way to stay in the loop.
Backup configuration
It goes without saying that you need to backup your current configuration before you upgrade. The upgrade process is supposed to preserve your configuration, but I wouldn’t rely too much on that.
CLI
I prefer to use the CLI to backup my ERL. I use a similar script on all my devices, though slightly customized for each. On the ERL, it is saved under /config/scripts (since this directory is preserved during an upgrade). Essentially, it is just making a tar.gz file out of the /config directory.
#!/bin/bash

#Set variables, update as needed
BACKUP_FOLDER=/backup/backup
HOSTNAME=`uname -n`

#Make backup directory if it doesn't exist
mkdir -p ${BACKUP_FOLDER}

#Backup /config
tar -czf ${BACKUP_FOLDER}/${HOSTNAME}_$(date +%Y%m%d_%H%M)_config.tar.gz /config >/dev/null 2>&1

#Remove backups older than 7 days
find ${BACKUP_FOLDER} -name "*.gz" -type f -mtime +7 -exec rm {} \;

exit
This script runs on a weekly basis using the built-in scheduler (below), but you can run it manually to generate a backup.
 task backup_script {
     crontab-spec "0 5 * * 0"
     executable {
         path /config/scripts/generate_backups.sh
     }
 }
GUI
You can backup the configuration through the GUI as well as the CLI. Login to the web GUI, then click on the System tab at the bottom. Scroll down to Configuration Management & Device Maintenance, then under Back Up Config, download the configuration file.
Install new image
I recommend viewing the current version of the firmware first. This is also a good chance to double-check which hardware model you have, if you’re not 100% sure.
show version
You can also view all the images you have saved.
show system image
Since the ERL can only store two images at once, you’ll need to delete the old image (if you have one).
delete system image
Download the new system image.
add system image https://dl.ubnt.com/firmwares/edgemax/v1.8.5/ER-e100.v1.8.5.4884695.tar
Then, use the command below to show both installed images.
show system image
Reboot to load the new image.
reboot
Finally, verify you’re on the new version.
show version
Roll back (optional)
If something goes wrong, you can easily roll back the image to the older one.
set system image default-boot
Reboot to make it take effect.
reboot
Finally, verify you’re on the old version.
show version
GUI updates
The v1.8.5 software has a changelog that you should read. Below are the changes I made.
First, I used the new option to disable all old ciphers for the web GUI.
configure
set service gui older-ciphers disable
commit
save
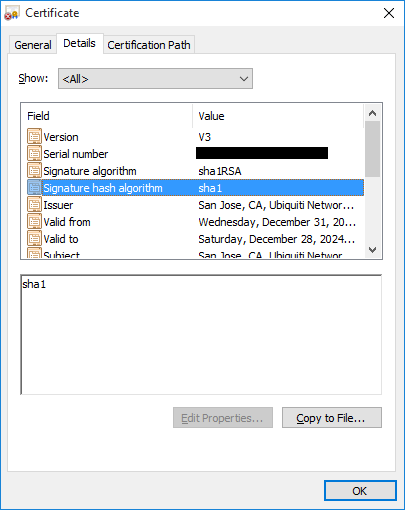
Next, I took advantage of the SHA256 hash suite in the v1.8.5 software to generate a new web GUI certificate. This is especially important if you allow GUI access from the WAN. The old certificate was SHA1.
Start by backing up the old certificate.
mv /etc/lighttpd/server.pem /etc/lighttpd/server.pem_old
Generate a new certificate.
touch /etc/lighttpd/server.pem
openssl req -new -x509 -newkey rsa:2048 -keyout /etc/lighttpd/server.pem -out /etc/lighttpd/server.pem -sha256 -days 3650 -nodes -passout pass:'' -subj "/C=US/CN=UBNT Router UI/O=Ubiquiti Networks/ST=CA/L=San Jose" >&/dev/null
chown root:root /etc/lighttpd/server.pem
chmod 400 /etc/lighttpd/server.pem
Then, restart the web server.
pgrep lighttpd | xargs kill
/usr/sbin/lighttpd -f /etc/lighttpd/lighttpd.conf
As it was pointed out to me, all you need to do is remove the old certificate and reboot.
sudo su -
rm /etc/lighttpd/server.pem
reboot
Verify your certificate is SHA256.

-Logan
