
Hey! Listen! This post is part of a series on the Ubiquiti EdgeRouter Lite. Check them all out!
| Date | URL | Part |
|---|---|---|
| 2019-06-28 | Migrating away from the Ubiquiti EdgeRouter Lite | Migrated to a Netgate SG-1100 |
| 2019-02-03 | EdgeRouter CNAME records | Setup CNAME records |
| 2017-10-03 | Dyn DDNS on EdgeRouter | Setup DynDNS |
| 2017-04-25 | DuckDNS on EdgeRouter | Setup DuckDNS |
| 2017-01-08 | Ubiquiti EdgeRouter serial console settings | Serial console settings |
| 2016-11-29 | Ubiquiti UniFi controller setup on Raspberry Pi 3 | Install UniFi Controller |
| 2016-08-30 | EdgeRouter Lite Dnsmasq setup | Setup dnsmasq |
| 2016-06-13 | EdgeRouter Lite software upgrade | Firmware upgrade |
| 2016-05-12 | EdgeRouter Lite OpenVPN setup | OpenVPN server setup |
| 2016-04-29 | Ubiquiti EdgeRouter Lite setup | Initial setup |
Introduction
In my last post, I setup the Ubiquiti EdgeRouter Lite (ERL) as a basic router and firewall. Is this post, I’ll be going over the setup of an OpenVPN server. In the past, I used an Archer C7 running OpenWrt to host OpenVPN, so I’ll be applying most of those principles again here.
VPN types
If you need a refresher on the different types of VPNs, see below.
| Software | Advantage | Disadvantage |
|---|---|---|
| PPTP |
|
|
| L2TP/IPSec |
|
|
| OpenVPN |
|
|
Split-tunnel vs full-tunnel
When setting up a VPN, you’ll have to choose whether to use split-tunnel or full-tunnel for the clients.
- Split-tunnel - Allows your local client to access resources on the remote server network (e.g., network shares, file servers, email servers, etc…). Regular internet traffic does not flow through the tunnel and is not encrypted.
- Full-tunnel - Allows your local client to access resources on the remote server network (e.g., network shares, file servers, email servers, etc…). Regular internet traffic does flow through the tunnel and is encrypted. However, this might cut your client off from local resources. Typically, clients will have to connect/disconnect based on which group of resources they want to access (local or remote).
I usually choose to go full-tunnel, since I’m usually trying to get access to resources at home and I’m not concerned about local resources. This is easy enough to change on each client by adding or removing one option.
Hardware acceleration
A big advantage of the ERL is that it allows you to offload some functions to hardware. One of these is the IPSec VPN, which greatly improves the throughput. Expect to get about 10Mbps (with one CPU at 100%) while using OpenVPN, and expect up to 150Mbps while using IPSec/L2TP with hardware offload enabled.
I’m choosing to use OpenVPN because it’s what I’m more familiar with. If the performance is really bad, I’ll switch to IPSec/L2TP.
OpenVPN security
By default, OpenVPN developers tend to favor compatibility and speed over security. That’s not necessarily a bad thing, but in this case, I’m going to be changing a few default options. OpenVPN defaults to the following:
- cipher - Blowfish in Cipher Block Chaining mode (BF-CBC)
- authentication digest - SHA1
OpenVPN themselves recommend AES-256 for more security. In addition, SHA1 is outdated, and shouldn’t be used if SHA2 is available. I’m going to be using the following:
- cipher - AES-256-CBC
- authentication digest - SHA256
For more security reading, check out the resources here, here, and here.
OpenVPN setup
We’re basically going to create our own Certificate Authority (CA) on the router and use it to sign certificates for authentication. This isn’t best-practice, since the CA should be on its own machine, but it will do for this situation.
Create CA
First, you’ll need to become root.
sudo su -
Next, move into the necessary directory and create a new CA certificate.
cd /usr/lib/ssl/misc/
./CA.sh -newca
Once this completes, you’ll have a new directory called demoCA. The two most important files in here are as follows:
- private/cakey.pem - This is the private key for your CA (keep this secret)
- cacert.pem - This the public key for your CA (you’ll be giving this out to your clients)
Create server certificate
Next, we’ll generate a public/private key for the server. The Common Name (CN) of your server certificate should be something unique (I used my dynamic DNS name).
./CA.sh -newreq
Once this completes, you’ll have two new files, as follows:
- newkey.pem - This is the private key for your server (keep this secret)
- newreq.pem - This is the unsigned public key of the server (this needs to be signed by your CA)
Now, sign the request.
./CA.sh -sign
You’ll have one more file, shown below.
- newcert.pem - This is the public key for your server
Move files
I recommend moving the important files to a directory where they won’t be wiped out during a firmware upgrade. In addition to moving the files, we’re also renaming them.
cp /usr/lib/ssl/misc/demoCA/cacert.pem /config/auth/
cp /usr/lib/ssl/misc/demoCA/private/cakey.pem /config/auth/
mv /usr/lib/ssl/misc/newcert.pem /config/auth/host.pem
mv /usr/lib/ssl/misc/newkey.pem /config/auth/host.key
DH parameters
Next, generate Diffie-Hellman (DH) parameters to ensure Perfect Forward Secrecy (PFS). Expect this to take 5-10 minutes with one CPU at 100%.
openssl dhparam -out /config/auth/dh2048.pem -2 2048
A good explanation of DH parameters and why you need them is located here.
Create user certificate(s)
Next, generate a request and sign it for a new user certificate. The Common Name (CN) of your user certificate should be something unique (I used my client’s host name).
./CA.sh -newreq
./CA.sh -sign
Move the new files into your preserved directory while renaming them.
mv newcert.pem /config/auth/client1.pem
mv newkey.pem /config/auth/client1.key
Repeat this as necessary for each client.
Decrypt keys
You’ll need to remove the password from the host and client(s) keys so that OpenVPN can run in interactive mode.
openssl rsa -in /config/auth/host.key -out /config/auth/host-decrypted.key
openssl rsa -in /config/auth/client1.key -out /config/auth/client1-decrypted.key
Repeat this as necessary for each client(s).
EdgeRouter setup
First, I would recommend exiting back to the normal ubnt user.
exit
whoami
The following steps were pretty straight-forward, since I’ve already setup an OpenVPN server on my Archer C7.
Create interface
Now, we’ll need to create a new interface for the VPN and set a few settings.
configure
set interfaces openvpn vtun0
set interfaces openvpn vtun0 description "OpenVPN server"
set interfaces openvpn vtun0 mode server
set interfaces openvpn vtun0 encryption aes256
set interfaces openvpn vtun0 hash sha256
set interfaces openvpn vtun0 server subnet 10.10.10.0/24
set interfaces openvpn vtun0 server push-route 10.10.2.0/24
set interfaces openvpn vtun0 server name-server 10.10.2.1
set interfaces openvpn vtun0 tls ca-cert-file /config/auth/cacert.pem
set interfaces openvpn vtun0 tls cert-file /config/auth/host.pem
set interfaces openvpn vtun0 tls key-file /config/auth/host-decrypted.key
set interfaces openvpn vtun0 tls dh-file /config/auth/dh2048.pem
set interfaces openvpn vtun0 openvpn-option "--port 1194"
set interfaces openvpn vtun0 openvpn-option --tls-server
set interfaces openvpn vtun0 openvpn-option "--comp-lzo yes"
set interfaces openvpn vtun0 openvpn-option --persist-key
set interfaces openvpn vtun0 openvpn-option --persist-tun
set interfaces openvpn vtun0 openvpn-option "--keepalive 10 120"
set interfaces openvpn vtun0 openvpn-option "--user nobody"
set interfaces openvpn vtun0 openvpn-option "--group nogroup"
commit
save
A few notes on these settings:
- The VPN subnet can’t be the same as your LAN subnet. In my case, my VPN subnet is 10.10.10.0/24 and my LAN subnet is 10.10.2.0/24.
- You’ll need to push a route from the VPN subnet to your LAN subnet.
- You’ll need to set a name server for the VPN subnet (I’m using my router, but you can use a public DNS server).
- The standard OpenVPN port is 1194, but setting it to 443 would make it almost indistinguishable from HTTPS traffic ;-)
- The rest of the settings are explained in the OpenVPN manuals.
Setup firewall
We’ll need to open a port in the firewall for OpenVPN. If you’re not using the standard port (1194), change it appropriately.
configure
set firewall name WAN_LOCAL rule 50 action accept
set firewall name WAN_LOCAL rule 50 description "OpenVPN"
set firewall name WAN_LOCAL rule 50 destination port 1194
set firewall name WAN_LOCAL rule 50 log enable
set firewall name WAN_LOCAL rule 50 protocol udp
commit
save
Set DNS
Tell DNS to listen for requests on the new vtun0 interface.
configure
set service dns forwarding listen-on vtun0
commit
save
Setup client configuration
The client configuration will vary from client-to-client, but the configuration below should work for Android phones or Linux clients. If you’re using Windows, you’re going to have a tougher time, because it needs some extra options.
echo "client" >> /config/auth/client1.ovpn
echo "dev tun" >> /config/auth/client1.ovpn
echo "proto udp" >> /config/auth/client1.ovpn
echo "remote yourhostname.dyndns.com 1194" >> /config/auth/client1.ovpn
echo "cipher AES-256-CBC" >> /config/auth/client1.ovpn
echo "auth SHA256" >> /config/auth/client1.ovpn
echo "resolv-retry infinite" >> /config/auth/client1.ovpn
echo "redirect-gateway def1" >> /config/auth/client1.ovpn
echo "nobind" >> /config/auth/client1.ovpn
echo "comp-lzo yes" >> /config/auth/client1.ovpn
echo "persist-key" >> /config/auth/client1.ovpn
echo "persist-tun" >> /config/auth/client1.ovpn
echo "user nobody" >> /config/auth/client1.ovpn
echo "group nogroup" >> /config/auth/client1.ovpn
echo "verb 3" >> /config/auth/client1.ovpn
echo "ca cacert.pem" >> /config/auth/client1.ovpn
echo "cert client1.pem" >> /config/auth/client1.ovpn
echo "key client1-decrypted.key" >> /config/auth/client1.ovpn
A few notes on these settings:
- Obviously, subsititue your dynamic DNS hostname and port as needed.
- To use full-tunnel, include the option redirect-gateway def1. To use split tunnel, leave it out.
- The rest of the settings are explained in the OpenVPN manuals.
Distribute keys
You’ll need to move the following files from the router, to your client(s). All four files should be saved in the same folder/location on your client.
- cacert.pem (CA certificate)
- client1.pem (client1 certificate)
- client1-decrypted.key (client1 key)
- client1.ovpn (client1 configuration)
You should use SFTP, SSH, or SCP to move the files to your client(s). DO NOT EMAIL THESE FILES TO YOURSELF!
Client setup
Android
In this case, I’m going to be using the official OpenVPN Android app.
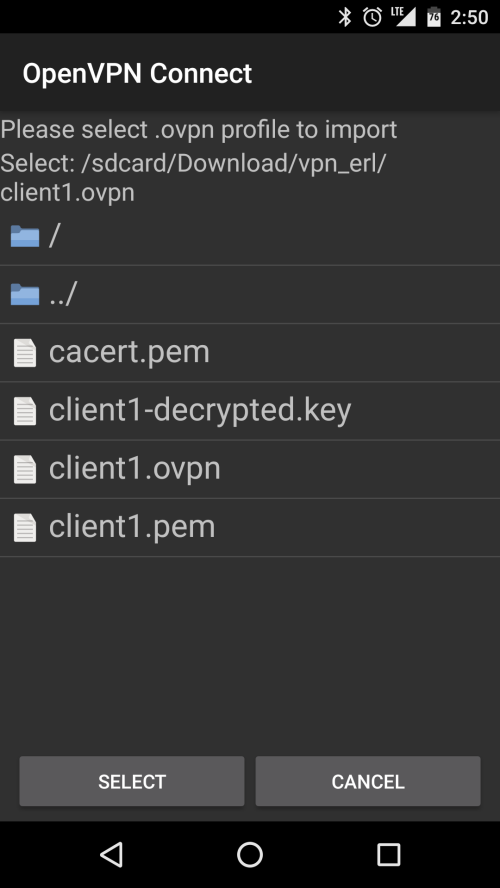
Once installed, tap on the Option button, then tap on Import, then tap on Import Profile from SD Card.


Browse to the client1.ovpn file and import it into the OpenVPN Connect app.
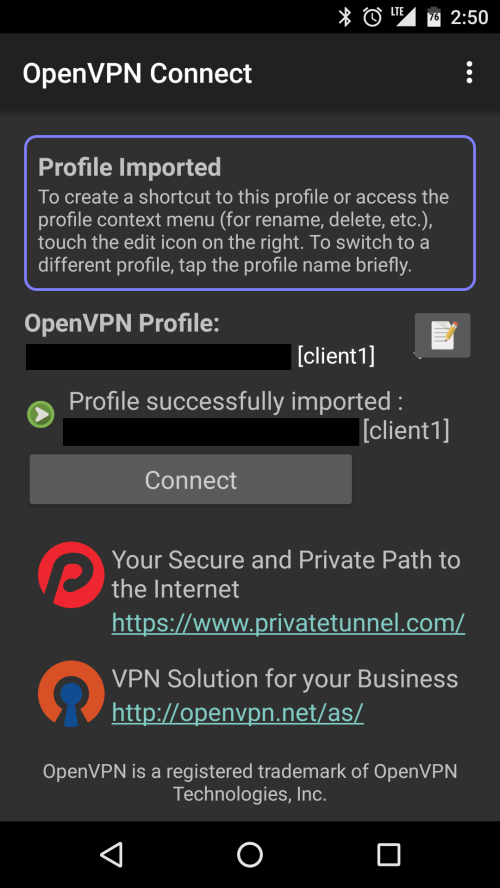
The profile should be imported successfully, and you should be able to see your server’s name. Click Connect to establish a connection.
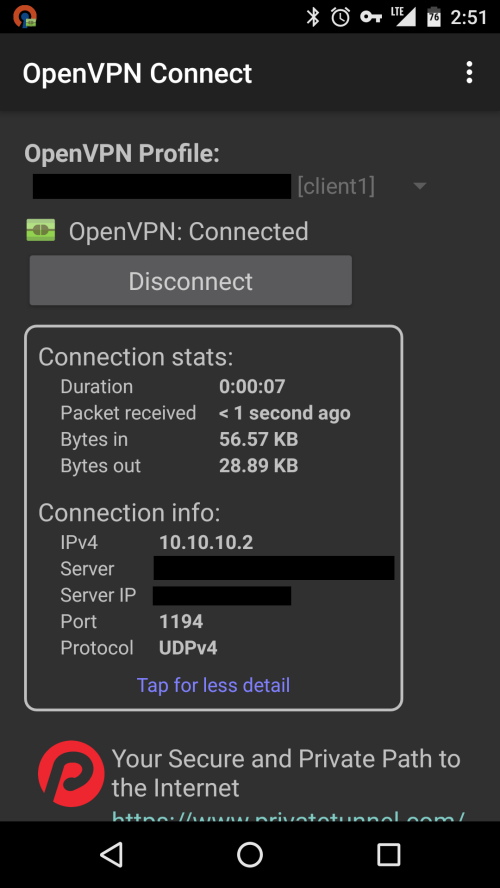
Verify your connection on the next screen.
iOS
In this case, I’m going to be using the official OpenVPN iOS app.
You should use iTunes to move the files to your iOS device, since emailing them is not secure. An example of how to transfer files with iTunes is shown here.
Windows 10
If you’re using a Windows client, check out Randy’s .ovpn file in the comments!
Commenter Chris was nice enough to email me a configuration for Windows 10, shown below. For certificate/key generation he used this guide instead of the built-in scripts.
Server
xxxxx@xxxxx# show interfaces openvpn vtun0
description "OpenVPN Server"
encryption aes256
hash sha256
mode server
openvpn-option "--port xxxx"
openvpn-option --tls-server
openvpn-option "--comp-lzo yes"
openvpn-option --persist-key
openvpn-option --persist-tun
openvpn-option "--keepalive 10 120"
openvpn-option "--user nobody"
openvpn-option "--group nogroup"
openvpn-option "--tls-auth /config/auth/ta.key 0"
openvpn-option "--tls-cipher TLS-DHE-RSA-WITH-AES-256-CBC-SHA"
server {
name-server 10.10.0.1
push-route 10.10.0.0/24
push-route 0.0.0.0/0
subnet 10.10.10.0/24
}
tls {
ca-cert-file /config/auth/ca-chain.cert.pem
cert-file /config/auth/openvpn.host.cert.pem
dh-file /config/auth/dh2048.pem
key-file /config/auth/openvpn.host.key.pem
}
Client (Win10)
pull
tls-client
dev tun
proto udp
remote xxx.xxx.xxx.xxx xxxx
cipher AES-256-CBC
tls-cipher TLS-DHE-RSA-WITH-AES-256-CBC-SHA
auth SHA256
resolv-retry infinite
redirect-gateway def1
nobind
comp-lzo yes
persist-key
persist-tun
verb 3
ca ca-chain.cert.pem
cert openvpn.client01.cert.pem
key openvpn.client01.key.pem
tls-auth ta.key 1
Verify connection
Try to browse a public site (e.g., www.google.com), then try to browse to your router’s IP (e.g., 10.10.2.1). If everything is setup correctly, both should load. You can also check your IP with an external tool, such as WhatIsMyIP, and you should see your router’s public IP. I’d also advise to check for DNS leaks (your DNS should be set to the DNS servers we set on the router).
Speedtest
On a Nexus 5 on AT&T LTE, I get 25.61Mbps down, and 23.37Mbps up.
When connected to the VPN while on the same LTE, I get 11.52Mbps down and 5.35Mbps up. Not great, but certainly not bad.
Backup CA
Thanks to commenter Axel for pointing this out. You should backup the entire /usr/lib/ssl/misc directory because it is wiped on a firmware upgrade, and you won’t be able to create any new certificates without creating a new CA from scratch.
cp -r /usr/lib/ssl/misc /config/
Then, after an upgrade, you can restore the misc directory from /config back to /usr/lib/ssl.
Let me know how you setup OpenVPN!
-Logan
