
Hey! Listen! This post is part of a series on my journey into K3s. Check them all out!
| Date | URL | Part |
|---|---|---|
| 2026-10-03 | Down the Talos rabbit hole | Trying out Talos Linux |
| 2022-12-07 | K3s cluster updates | Updates to the cluster build |
| 2022-03-29 | Kubernetes GUIs | Exploring Kubernetes GUIs |
| 2022-03-11 | K3s single-node cluster for noobs | Deploying K3s |
Introduction
I first setup my K3s single-node cluster in 2022. In early 2026, I moved my entire lab back to Docker Compose due to two main issues:
- Because it was a single-node cluster, there was no upgrade path for the underlying Debian operating system. The entire point of Kubernetes is to be able to throw nodes away for upgrades.
- Flux kept giving me issues during upgrades. It would leave my cluster in an errored state and unable to sync until I was able to fix it.
During this time, K3s itself performed amazingly well and I never had an issue with it or any of its bundled components.
In the meantime, I’ve been missing my Kubernetes cluster and simultaneously reading more about Talos Linux.
What is Talos?
Talos Linux is a minimal, immutable, API-driven version of Linux built specifically for Kubernetes. It has no shell, no package manager, no SSH. Just the Linux kernel and Kubernetes. It is designed to do one thing (run Kubernetes) and do it well. Because it is minimal and immutable, there is almost zero attack surface.
The entire operating system is declarative. You interact with it using talosctl just like you would interact with Kubernetes using kubectl. You can’t SSH into it and you can’t run shell scripts, so you have to work out what your workflows are before you install it.
Cluster setup
Unlike last time, I’m not running a single-node cluster. This cluster will have three nodes so that I can have quorum if a node goes down. I’m going to have three control plane nodes and also schedule pods on those nodes (so I won’t have separate worker nodes).
The high-level overview is that we need to get three machines booted from the Talos image where they sit in “maintenance mode” waiting for configuration to be passed to them over the network.
That configuration is generated on your local machine using YAML files (but in my case, I’m going to be using Terraform). You then use talosctl to apply the configuration and the machines install Talos and Kubernetes (and whatever else you have configured).
Planning - networking
Those three nodes will require three static IPs from my router (in my case, I’m setting three DHCP reservations). My Talos cluster will be called hydrogen and the nodes are named after the stable isotopes of hydrogen.
Talos also requires a floating virtual IP (VIP) for kubectl to use. This IP doesn’t live on any single node, instead, it floats between all nodes. If a single node goes down, you can still manage the cluster. This VIP is going to have a locally-administered MAC address in my router’s DHCP reservations (just so nothing else takes that IP). It is NOT assigned to any of the nodes.
| IP address | hostname | MAC address |
|---|---|---|
10.10.1.40 |
hydrogen |
02:00:00:00:00:00 |
10.10.1.41 |
protium |
MAC of machine 1 |
10.10.1.42 |
deuterium |
MAC of machine 2 |
10.10.1.43 |
tritium |
MAC of machine 3 |
Planning - Talos image
You can run Talos on bare metal, in the cloud, or on a Raspberry Pi. I’m going to be running it in Proxmox using three virtual machines.
Because Talos is immutable and also minimal, their install image isn’t one-size-fits-all and you can’t add things later. Instead, you use their Image Factory to specify what options you want and they build you a custom image. Below are the options I chose:
- Hardware Type =
Bare-metal Machine - Talos Linux Version =
v1.14.1 - Architecture =
amd64(with SecureBoot disabled) - Extensions
siderolabs/iscsi-toolsandsiderolabs/util-linux-toolsfor Longhorn supportsiderolabs/qemu-guest-agentfor the Proxmox Guest Agent
- Customization = I left all defaults
Those options result in this image schematic ID…
88d1f7a5c4f1d3aba7df787c448c1d3d008ed29cfb34af53fa0df4336a56040b
…and there is the link to the ISO that I’m going to upload to Proxmox.
When using the Image Factory, checksums, signatures, and SBOMs are only available to enterprise customers. That kind of sucks, but they need to make money somehow I guess 🤷.
Planning - VM setup
As I mentioned, I’m going to be creating three VMs in Proxmox. You can do this however you want (e.g., manually, API, Terraform, etc…), but here are the settings that I’m using. It’s worth noting that Talos has recommended settings listed here as well.
- OS = choose Talos ISO from Image Factory
- System settings
- Machine type =
q35 - BIOS =
UEFI, choose your EFI storage, then make surePre-Enroll keysis unchecked (to disable SecureBoot) - Qemu Agent = checked
- Machine type =
- Disk = choose your disk storage and set size to
50GiB - CPU
- Size = 1 core, 2 threads
- Type =
x86-64-v3
- Memory =
4096MiB - Network =
VirtIO
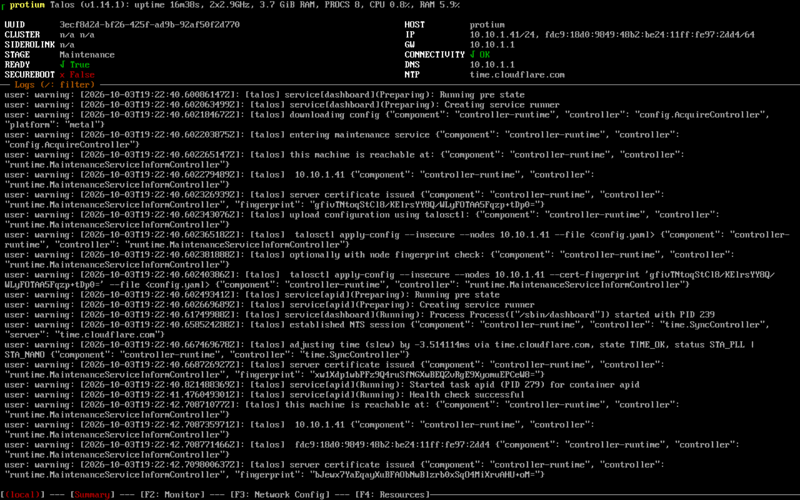
Start the VMs and you should see they are in maintenance mode, ready to receive their configuration.
Installation
Talos has a workflow for installing via talosctl, but I’m going to be using their Terraform provider (they also have some good Terraform examples here).
First, I installed the required tools on my desktop (I use Arch, btw).
sudo pacman -S talosctl kubectl
Then, I identified what disks I needed to specify when installing (in my case, it was sda for all three nodes).
talosctl -n 10.10.1.41 get disks --insecure
talosctl -n 10.10.1.42 get disks --insecure
talosctl -n 10.10.1.43 get disks --insecure
I also made note of which network interface the VIP should be assigned to. In my case, one of the VMs used ens18 while the other two used eth0 (not sure why).
talosctl -n 10.10.1.41 get links --insecure
talosctl -n 10.10.1.42 get links --insecure
talosctl -n 10.10.1.43 get links --insecure
That left me with this configuration that ultimately had to go into Terraform.
| IP address | hostname | MAC address | Disk | Network |
|---|---|---|---|---|
10.10.1.40 |
hydrogen |
02:00:00:00:00:00 |
N/A | N/A |
10.10.1.41 |
protium |
MAC of machine 1 |
sda |
ens18 |
10.10.1.42 |
deuterium |
MAC of machine 2 |
sda |
eth0 |
10.10.1.43 |
tritium |
MAC of machine 3 |
sda |
eth0 |
I won’t paste all the Terraform in-line here, just check my repo to see what it looks like. A couple things to note with the Terraform:
- When you run
terraform applyyou should see the console in the Proxmox web UI on the three nodes start to do work (screenshot below) - You can check the
variables.tffile to see the settings for each node (e.g., the hostname and disks used) - You can search
talos.tfto find theLinkAliasConfig. This is where I set the VIP on the link that has a Proxmox-prefixed MAC address (because some links were usingens18and some where usingeth0). This way, I didn’t have to specify which NIC to use on each node (it’s kind of like a wildcard). - I haven’t tested how to upgrade Talos or Kubernetes yet, or what to do when the Talos certificates expire
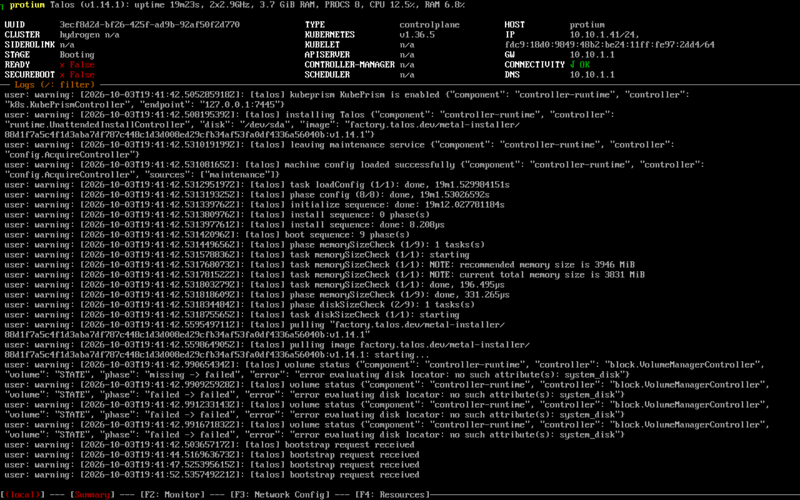
After about two minutes, I had a healthy cluster running.
> talosctl config info
Current context:     hydrogen
Nodes:               not defined
Endpoints:           10.10.1.41, 10.10.1.42, 10.10.1.43
Roles:               os:admin
Certificate expires: 1 year from now (2027-10-03)


> kubectl get nodes -o wide
NAME        STATUS   ROLES           AGE     VERSION   INTERNAL-IP   EXTERNAL-IP   OS-IMAGE          KERNEL-VERSION          CONTAINER-RUNTIME
deuterium   Ready    control-plane   2m52s   v1.36.5   10.10.1.42    <none>        Talos (v1.14.1)   6.18.51-talos (amd64)   containerd://2.3.5
protium     Ready    control-plane   2m50s   v1.36.5   10.10.1.41    <none>        Talos (v1.14.1)   6.18.51-talos (amd64)   containerd://2.3.5
tritium     Ready    control-plane   2m54s   v1.36.5   10.10.1.43    <none>        Talos (v1.14.1)   6.18.51-talos (amd64)   containerd://2.3.5


> kubectl get pods -A
NAMESPACE     NAME                                READY   STATUS    RESTARTS        AGE
kube-system   coredns-6cb54fb45c-5vqsj            1/1     Running   0               3m3s
kube-system   coredns-6cb54fb45c-9vf6m            1/1     Running   0               3m3s
kube-system   kube-apiserver-deuterium            1/1     Running   0               2m56s
kube-system   kube-apiserver-protium              1/1     Running   0               2m54s
kube-system   kube-apiserver-tritium              1/1     Running   0               2m56s
kube-system   kube-controller-manager-deuterium   1/1     Running   2 (3m17s ago)   2m56s
kube-system   kube-controller-manager-protium     1/1     Running   2 (3m16s ago)   2m54s
kube-system   kube-controller-manager-tritium     1/1     Running   2 (3m21s ago)   2m56s
kube-system   kube-flannel-b54lt                  1/1     Running   0               2m54s
kube-system   kube-flannel-t4g2d                  1/1     Running   0               2m56s
kube-system   kube-flannel-zf85q                  1/1     Running   0               2m58s
kube-system   kube-proxy-2f8wb                    1/1     Running   0               2m58s
kube-system   kube-proxy-9js4c                    1/1     Running   0               2m54s
kube-system   kube-proxy-qqnpb                    1/1     Running   0               2m56s
kube-system   kube-scheduler-deuterium            1/1     Running   2 (3m17s ago)   2m56s
kube-system   kube-scheduler-protium              1/1     Running   2 (3m17s ago)   2m54s
kube-system   kube-scheduler-tritium              1/1     Running   2 (3m19s ago)   2m56s
Conclusion
Talos’ parent company Sidero Labs was just acquired by Yardi, so it remains to be seen what happens to Talos. In the meantime, I’m going to try to get a few minimal things working in Talos (below) and do an upgrade cycle before I move any workloads to it.
- Ingress
- cert-manager
- Longhorn
- ArgoCD
-Logan
