
Hey! Listen! This post is part of a series on pfSense. Check them all out!
| Date | URL | Part |
|---|---|---|
| 2025-03-01 | pfSense on the OPNsense DEC740 | Migrated to the OPNsense DEC740 |
| 2019-08-25 | pfSense on the PC Engines APU2 | Migrated to a PC Engines APU2D4 |
| 2019-07-17 | My SG-1100 died | Migrated back the the EdgeRouter Lite |
| 2019-06-28 | Migrating away from the Ubiquiti EdgeRouter Lite | Migrated to a Netgate SG-1100 |
Introduction
My APU2 is five years old now and I notice that it runs slow when making changes in pfSense’s web interface. The CPU is an AMD GX-412TC (from 2014) and it’s running 4GB of DDR3 memory, so I guess that’s to be expected. Also, I only have 500/500Mbps internet, but would like to update to 1Gbps at some point, and I’m left wondering if the APU2 could keep up with that speed. I’ve seen this post about routing at 1Gbps on the APU2 hardware, but I’m also running pfBlockerNG and wondering if that would affect speed.
For something as critical as a router, I didn’t want to wait until it died to replace it. Thinking there would be a newer model, I went to the PC Engines website, only to see that they are ending production and closing their company 😢.
This was really disheartening, but I understand their decision given the circumstances. The APU2 was a great machine that would be hard to replace.
Hardware
I was looking for the following things in a replacement box:
- small (needs to fit in my mini-rack)
- x86 (to run pfSense)
- DDR4 memory (ECC if possible)
- fanless (one less thing to dust)
- Intel NICs
- M.2 storage
It’s easy to find all of that in cheap Chinese mini PCs on Amazon, except ECC support. Error correcting code (ECC) memory is special memory that has an extra chip on the RAM stick that is used for parity bits to detect and correct bit-flips in memory. It’s generally used on servers, and hardly ever used on consumer PCs (especially mini PCs). I was also trying to find something that was from a relatively well-known manufacturer that wouldn’t burn my house down. The Chinese mini PCs worry me, because they’re all no-name brands that disappear from Amazon after a few months (or provide no support if they don’t disappear).
Comparison
I must have looked at hundreds or thousands of mini PCs on obscure industrial and electronics distributor websites. Below are the devices that I found in my searching (the first one is the current APU2D4 that I have now).
| Make/Model | Specific model number | CPU | RAM | ECC | Storage | Ports | NICs | Price (main unit only) | Comments |
|---|---|---|---|---|---|---|---|---|---|
| PC Engines APU2 | APU2D4 | AMD GX-412TC (4c/4t, 6W) | 4GB DDR3-1333 (soldered) | Yes | 1x mSATA SSD | 3x RJ-45 | 3x Intel i210AT | $120 (2019) | This is the device I have now |
| Advantech FWA-1112VCL | FWA-1112VCL-2CA1S | Intel Atom C3338 (2c/2t, 8.5W) | 1x DDR4-1866 SO-DIMM slot (max 32GB) | Yes | 1x M.2 2280 SATA3 SSD | 6x RJ-45 | 1x Marvell 88E1543, 2x Intel i210AT | $482 | Unsure which NICs are connected to which ports |
| Deciso DEC700 Series | DEC740 | AMD Embedded Ryzen V1500B (4c/8t, 12W) | 4GB DDR4-2666 VLP UDIMM (max 32GB) | Supported (not default) | 128GB M.2 2280 NVMe SSD | 3x RJ-45, 2x 10G SFP+ | 3x Intel i210, 2x AMD Silicon | $847 | Unit supports, but does not ship with, ECC memory |
| Portwell ANS-9122-21 | AS1-3324 | Intel Atom C3436L (4c/4t, 10.75W) | 1x DDR4-1866 SO-DIMM slot (max 32GB) | Yes | 1x M.2 slot | 4x RJ-45 | ??? | ??? | |
| Broadcom AppNeta m50 | Custom fanless version of the AAEON FWS-2362 | Intel Atom C3558 (4c/4t, 16W) | 4GB DDR4 | Yes | 16GB mSATA SSD | 4x RJ-45 | 4x Intel X553 | ??? | This is only available as an eBay special |
| Nexcom DNA 141 | 10L00014100X0 | Intel Atom x7203C (2c/2t, 9W) | 1x DDR4-3200 SO-DIMM slot (max 32GB) | ??? (sales never replied) | 1x M.2 2242 | 4x RJ-45 | 4x Intel i226 | ??? | |
| Lanner NCA-1510 | NCA-1510A | Intel Atom C3558 (4c/4t, 16W) | 1x DDR4-2133 SO-DIMM slot (max 16GB) | Yes | 1x 2.5" bay | 6x RJ-45 | ??? | ??? | This is only available as an eBay special |
Below are devices that I looked at, but there was one reason or another that they didn’t make the cut…
- AAEON FWS-2277 (Celeron CPU, which means no ECC support)
- DFI EC800-AL (Atom CPUs, but no ECC support)
- GIGAIPC QBiX-EHLA6412-A1 (Celeron CPU, which means no ECC support)
- Jetway FBU03 (Celeron CPU, which means no ECC support)
- Polywell Nano-N305L4 (i3-N305 CPU, which means no ECC support)
- Portwell CAF-0100 (Too wide for a mini-rack, IB-ECC)
Purchase
The Nexcom DNA 141 would have made the perfect router (chef’s kiss), but I was unable to find a reseller/distributor. I reached out to Nexcom directly, but they informed me that they don’t sell to individuals. When I asked about a reseller/distributor in the US, they stopped replying 🤷.
I almost ended up purchasing a Lanner NCA-1510. Funny enough, the Lanner NCA-1510A is the OEM of the Netgate SG-5100, according to a few posts (here, here, here, and here).
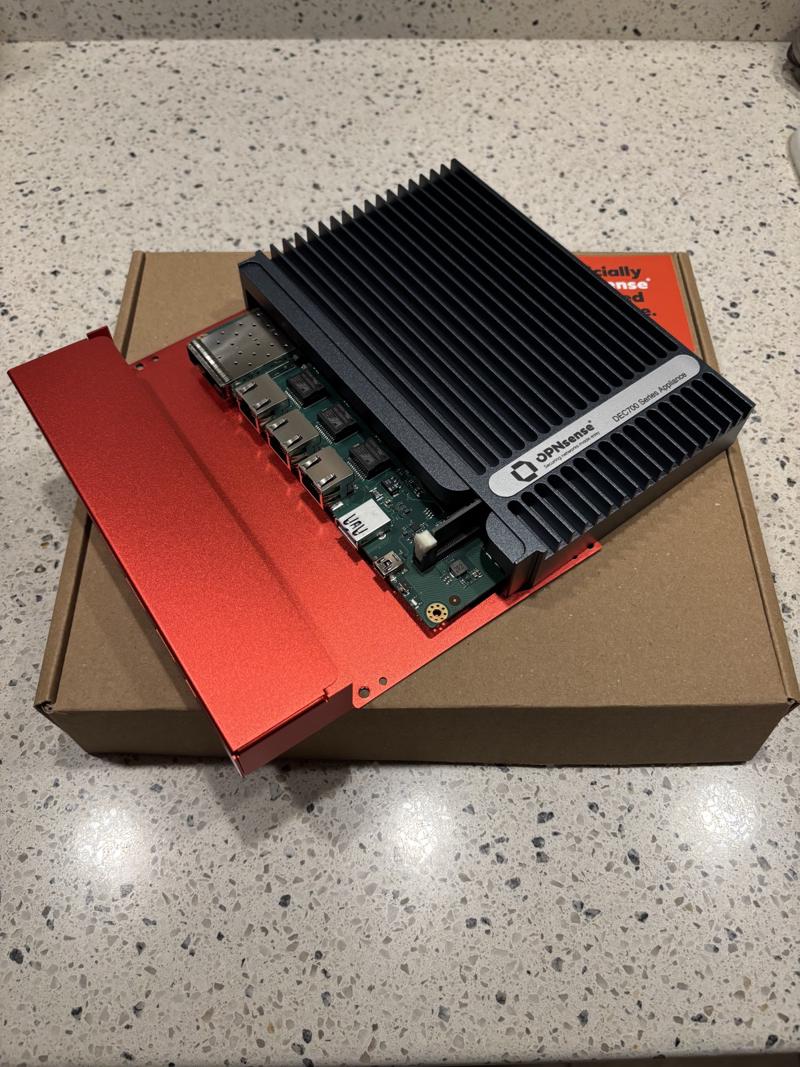
I ended up going with the Deciso DEC740, as it was the only one that had ECC memory in such a small footprint and it was easy to purchase as a non-business. To me, it’s the spritual successor to the APU2 (it’s almost the same size, same layout, but updated with modern hardware).
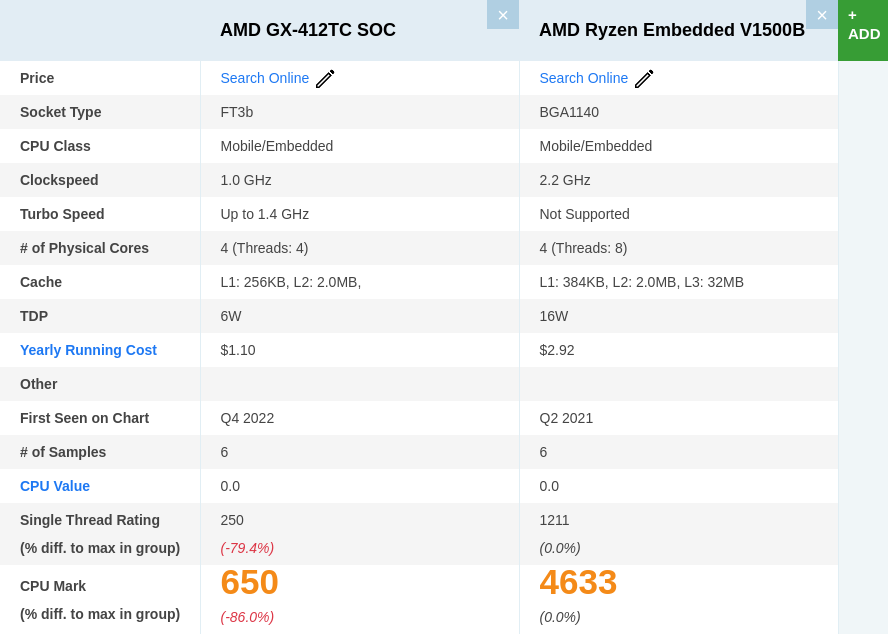
There is some really good information here and here about the DEC740 (the second link is an Archive.org link because the URL is currently returning a 404) and here about the Ryzen CPU. Based on this comparison, the CPU in the DEC740 should run rings around my APU2. Plus, this device has 2x 10Gbps SFP+ ports for future-proofing.
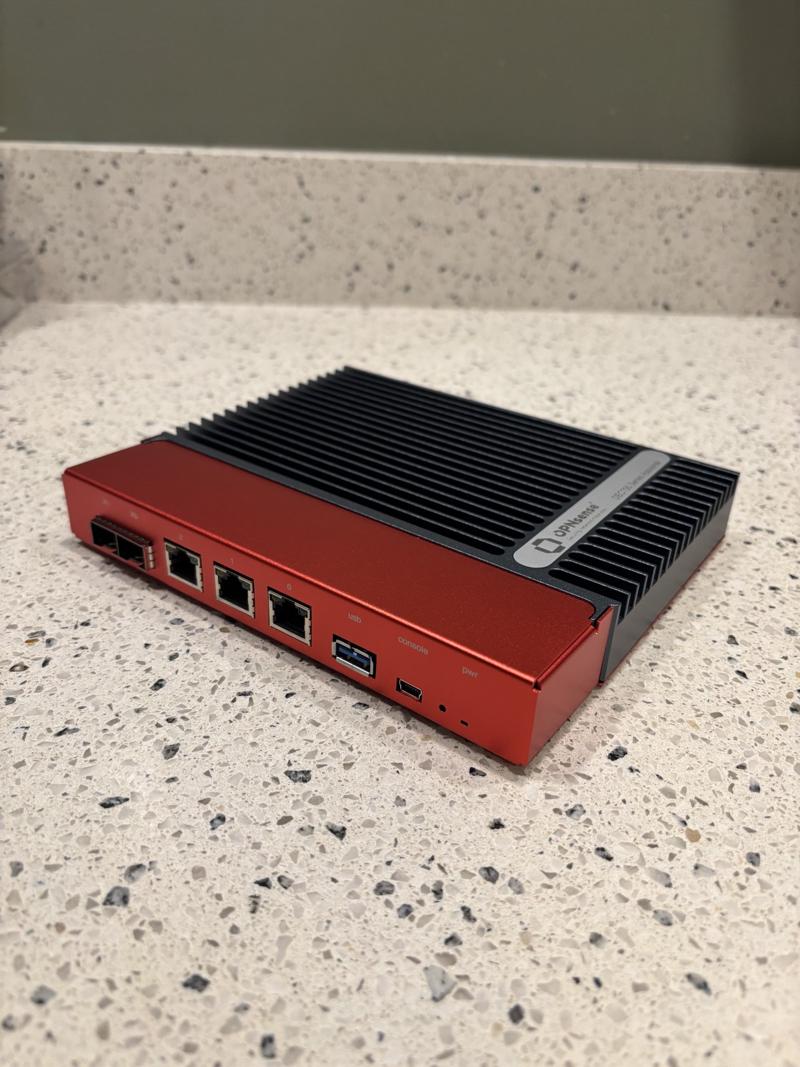
The DEC740 came from the Netherlands via FedEx and was in excellent shape when it arrived. The box included the DEC740, the US power adapter, and a mini-USB cable (for the serial port).
ECC RAM upgrade
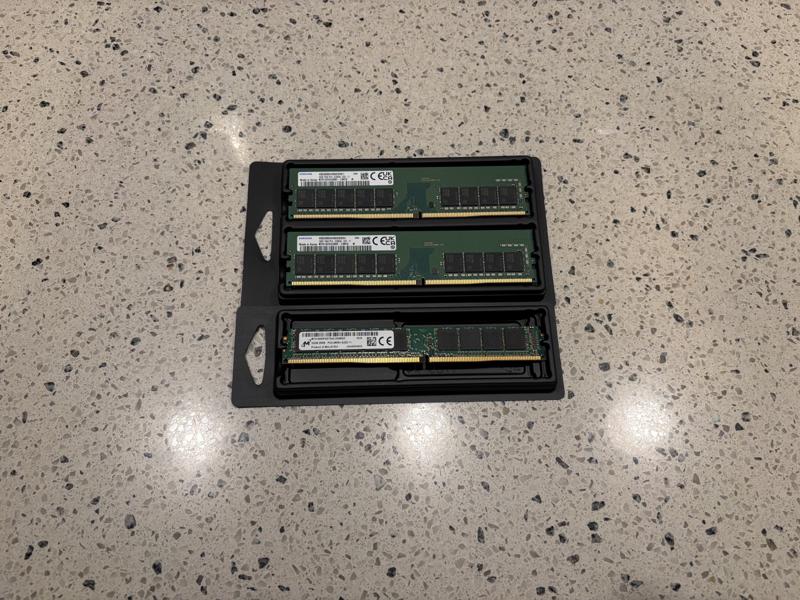
I also picked up a stick of 32GB DDR4 ECC UDIMM VLP (specifically model number MTA18ADF4G72AZ-2G6 from Memory.net) for $124. I would assume any ECC memory would work here, but it has to be UDIMM and it has to be Very Low Profile (VLP). I’ve never used VLP RAM before, so here is a picture comparing two sticks of regular DDR4 DIMMs (top) to a single DDR4 VLP DIMM (bottom).
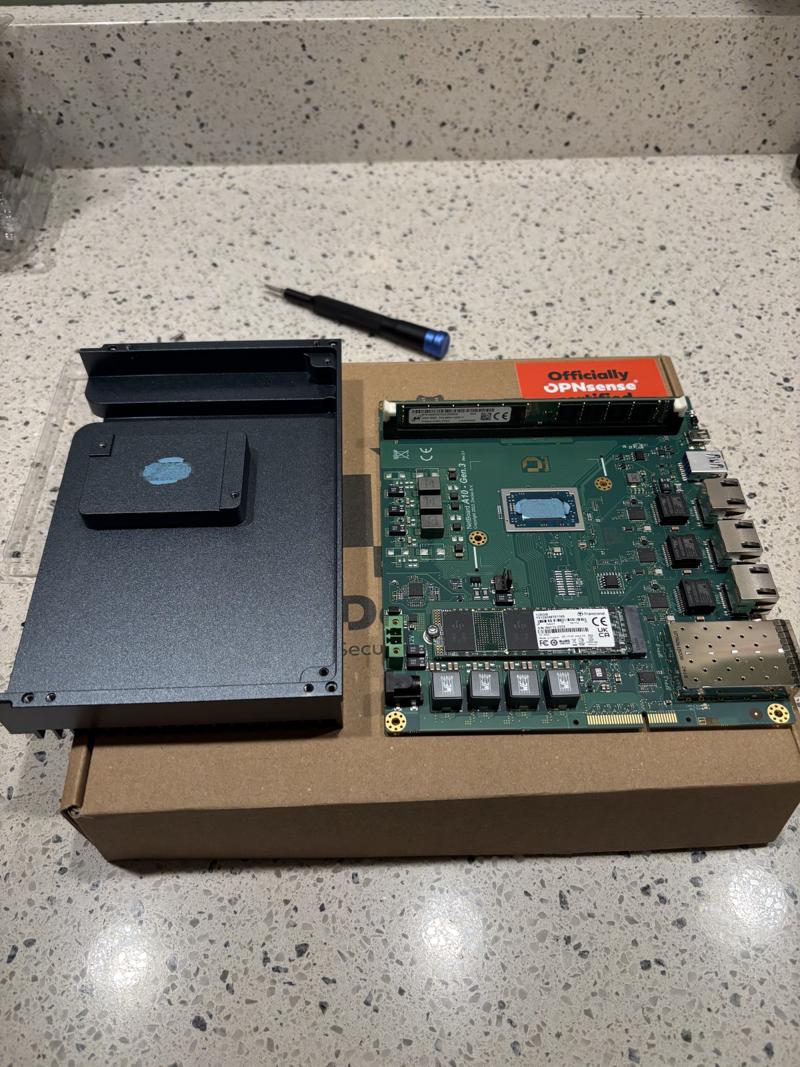
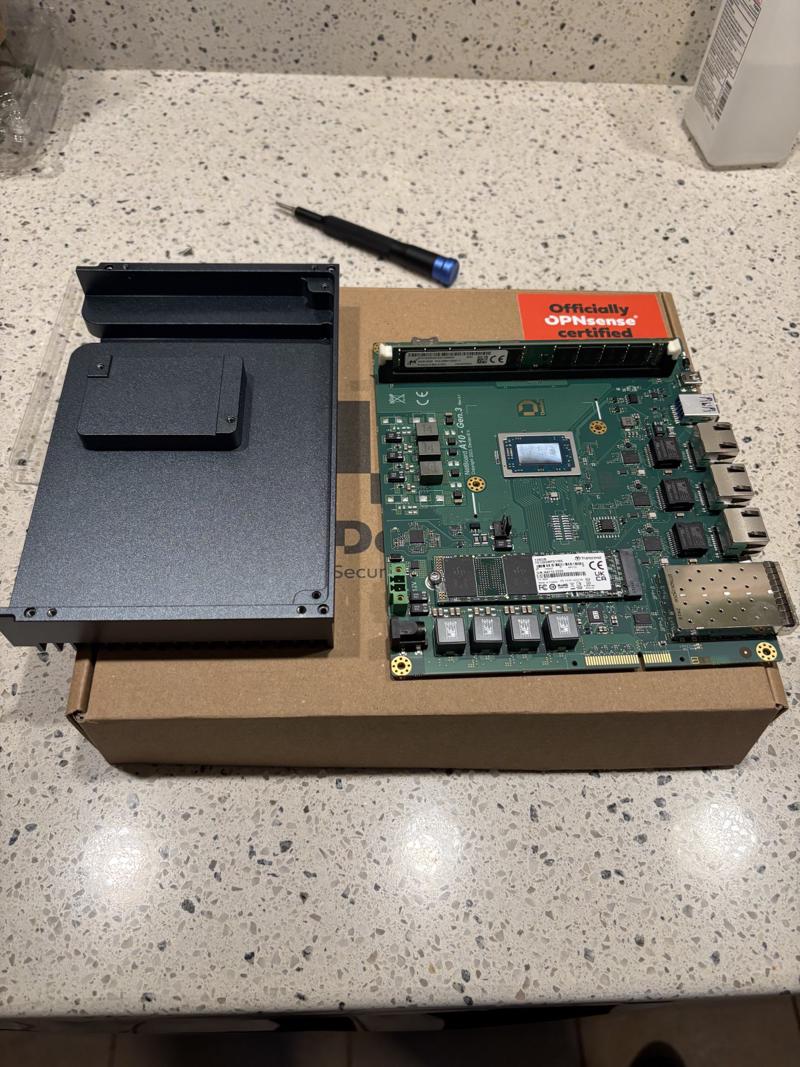
There are four Torx screws on the bottom of the unit (one with an unenforcable-in-the-USA “warranty void if removed” sticker). Then, the black heatsink part of the unit slides away from the front face.
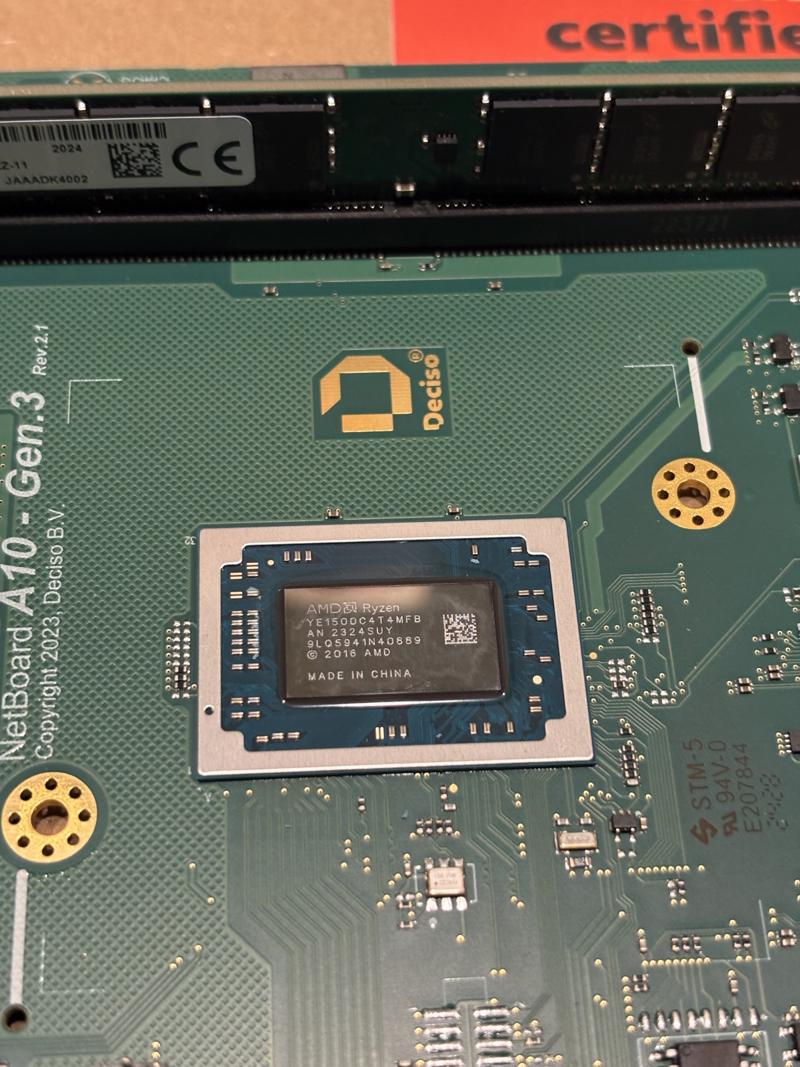
There are four more Torx screws holding the PCB onto the black heatsink. The SSD is a Transcend 128GB NVMe PCIe Gen3 x4 (TS128GMTE110S). I didn’t bother to replace this, since I ship my logs to Graylog, so they’re not stored on the SSD anyway. Just to note, the DEC740 comes pre-installed with OPNsense and they will email you a key for OPNsense Business Edition, if you ever need to reinstall.
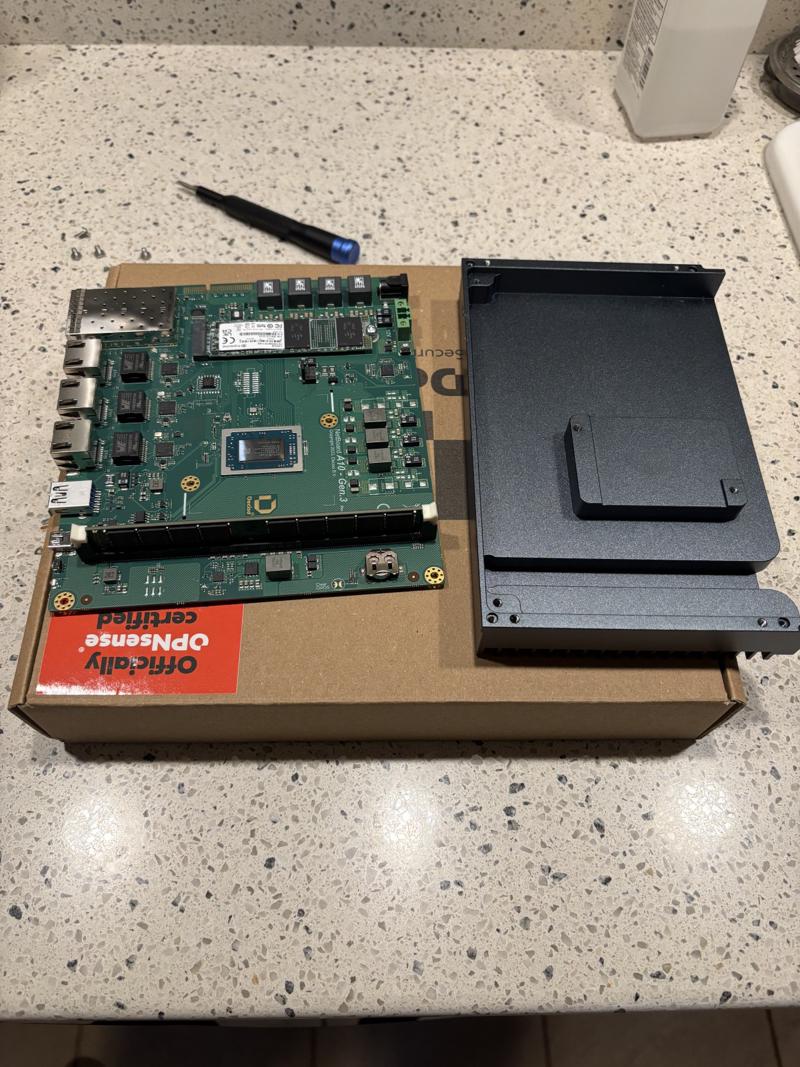
I upgraded the RAM, cleaned the old paste off with isopropyl, then re-pasted the CPU using Noctua NT-H2.
This is the view from the other side of the RAM stick (you can see the button-cell battery here for the BIOS).
Here is the die shot of the CPU.
Decisions
Did I pay over $800 for a router?!
Yes. My router is arguably the most important device on my network. It protects my network from the big, bad internet. I don’t mind paying for a product that can do that job silently, reliably, 24/7, now and 10 years into the future. If I amortize the $800 over 10 years, that’s only $80 per year (I spend more money per year on Chipotle).
Side note - This is a week of data from my Graylog instance. This is what my router is protecting me from.

Why pfSense?
I know that Netgate (the company that owns pfSense) has had some controversies:
- 2016: When OPNsense sense was forked from pfSense, Netgate purchased the domain OPNsense.com and setup a parody site to discredit OPNsense. OPNsense had to appeal to the World Intellectual Property Organization (WIPO) to get control of the domain.
- 2017: Netgate announced (here and here) that pfSense 2.5 would require AES-NI, then walked that back in 2019
- 2017: Netgate implemented a scary-looking popup disclaimer in order to use pfSense
- 2019: Netgate hired a developer to implement WireGuard for pfSense and then upstream the code to FreeBSD (side note - apparently the developer was slighty crazy). This was finished in 2020. In 2021, it was clear the code was not production-ready. Netgate gets defensive and is called out by the WireGuard developer himself. Netgate then has to do damage control.
- 2021: Netgate announced a closed-source version of pfSense called pfSense Plus (which gets more love and attention from Netgate than the open-source version)
- 2023: Netgate pushed homelabbers from a free Community Edition license to pfSense Plus (called Home+Lab edition), then changed their mind and started charging for the Home+Lab license
- 2024: Netgate locked the installer for pfSense CE (the free version) behind a login page
So, with all that said: why am I using pfSense?
To be honest, I just don’t care about any of the drama above because it doesn’t affect me. I don’t pay for pfSense (and wouldn’t with the way Netgate acts), so I don’t feel like I’m “supporting” their bad behavior. I’ll continue to use the free version of pfSense until they make it paid, or closed-source, then I’ll switch to OPNsense. But right now, I don’t feel like learning OPNsense and re-building my firewall from scratch (I just want to restore a backup and get on with life).
Pre-installation
Console settings
The serial adapter shows up as Exar Corp. XR21B1411 UART in Linux, and I verifed it connected to /dev/ttyUSB0 to by using sudo dmesg | grep tty. I tried to use screen to connect to it, but after a while, the characters on the screen would get misaligned and impossible to read.
screen /dev/ttyUSB0 115200
I ended up using tio, which worked great.
tio /dev/ttyUSB0
This was the BIOS that shipped with the DEC740. According to this page, it’s up-to-date.
BIOS Version : 05.38.09.0023-A10.30
BIOS Build Date : 05/01/2024
Processor Type : AMD Ryzen Embedded V1500B
System Memory Speed : 2400 MHz
At boot, you can press ESC once to enter the BIOS “Front Page” (you need to be very quick with this first ESC).
                                                           Front Page
  Front Page
/-------------------------------------------------------------------------------------+----------------------------------------\
|Continue                                                                             |This selection will direct the system   |
|>Boot Manager                                                                        |to continue to booting process          |
|>Device Management                                                                   |                                        |
|>Boot From File                                                                      |                                        |
|>Administer Secure Boot                                                              |                                        |
|>Setup Utility                                                                       |                                        |
|                                                                                     |                                        |
|                                                                                     |                                        |
|                                                                                     |                                        |
|                                                                                     |                                        |
|                                                                                     |                                        |
|                                                                                     |                                        |
|                                                                                     |                                        |
|                                                                                     |                                        |
|                                                                                     |                                        |
|                                                                                     |                                        |
|                                                                                     |                                        |
|                                                                                     |                                        |
|                                                                                     |                                        |
|                                                                                     |                                        |
|                                                                                     |                                        |
|                                                                                     |                                        |
|                                                                                     |                                        |
|                                                                                     |                                        |
|                                                                                     |                                        |
|                                                                                     |                                        |
|                                                                                     |                                        |
|                                                                                     |                                        |
|                                                                                     |                                        |
|                                                                                     |                                        |
|                                                                                     |                                        |
|                                                                                     |                                        |
|                                                                                     |                                        |
|                                                                                     |                                        |
\-------------------------------------------------------------------------------------+----------------------------------------/
 F1  Help                                                       Enter Select > SubMenu
 ^/v Select Item
BIOS settings
Enable ECC
At the Front Page, go to Setup Utility, then AMD CBS, then UMC Common Options, then DDR4 Common Options, then Common RAS, then ECC Configuration. Then, set the DRAM ECC Enable to Enabled.
                                                    InsydeH2O Setup Utility                                             Rev. 5.0
                                                  AMD CBS
/-------------------------------------------------------------------------------------+----------------------------------------\
|ECC Configuration                                                                    |Use this option to enable / disable     |
|                                                                                     |DRAM ECC. Auto will set ECC to enable.  |
|DRAM ECC Symbol Size                       <x8>                                      |                                        |
|DRAM ECC Enable                            <Auto>                                    |                                        |
|                                                                                     |                                        |
|                                                                                     |                                        |
|                                                                                     |                                        |
|                                                                                     |                                        |
|                                                                                     |                                        |
|                                                                                     |                                        |
|                                                                                     |                                        |
|                                                                                     |                                        |
|                                                                                     |                                        |
|                                                      /---------------\              |                                        |
|                                                      |DRAM ECC Enable|              |                                        |
|                                                      |---------------|              |                                        |
|                                                      |Disabled       |              |                                        |
|                                                      |Enabled        |              |                                        |
|                                                      |Auto           |              |                                        |
|                                                      \---------------/              |                                        |
|                                                                                     |                                        |
|                                                                                     |                                        |
|                                                                                     |                                        |
|                                                                                     |                                        |
|                                                                                     |                                        |
|                                                                                     |                                        |
|                                                                                     |                                        |
|                                                                                     |                                        |
|                                                                                     |                                        |
|                                                                                     |                                        |
|                                                                                     |                                        |
|                                                                                     |                                        |
|                                                                                     |                                        |
|                                                                                     |                                        |
\-------------------------------------------------------------------------------------+----------------------------------------/
 F1  Help                       ^/v Select Item                F5/F6 Change Values            F9  Setup Defaults
 Esc Exit                       </> Select Item                Enter Select > SubMenu         F10 Save and Exit
ECC error injection
At the Front Page, go to Setup Utility, then AMD CBS, then UMC Common Options, then DDR4 Common Options, then Common RAS. Then, set the Disable Memory Error Injection to False (since we want to test ECC memory errors).
                                                    InsydeH2O Setup Utility                                             Rev. 5.0
                                                  AMD CBS
/-------------------------------------------------------------------------------------+----------------------------------------\
|Common RAS                                                                           |True: UMC::CH::MiscCfg[DisErrInj]=1     |
|                                                                                     |                                        |
|Data Poisoning                             <Disabled>                                |                                        |
|>ECC Configuration                                                                   |                                        |
|Disable Memory Error Injection             <True>                                    |                                        |
|                                                                                     |                                        |
|                                                                                     |                                        |
|                                                                                     |                                        |
|                                                                                     |                                        |
|                                                                                     |                                        |
|                                                                                     |                                        |
|                                                                                     |                                        |
|                                                                                     |                                        |
|                                                                                     |                                        |
|                                               /------------------------------\      |                                        |
|                                               |Disable Memory Error Injection|      |                                        |
|                                               |------------------------------|      |                                        |
|                                               |False                         |      |                                        |
|                                               |True                          |      |                                        |
|                                               \------------------------------/      |                                        |
|                                                                                     |                                        |
|                                                                                     |                                        |
|                                                                                     |                                        |
|                                                                                     |                                        |
|                                                                                     |                                        |
|                                                                                     |                                        |
|                                                                                     |                                        |
|                                                                                     |                                        |
|                                                                                     |                                        |
|                                                                                     |                                        |
|                                                                                     |                                        |
|                                                                                     |                                        |
|                                                                                     |                                        |
|                                                                                     |                                        |
\-------------------------------------------------------------------------------------+----------------------------------------/
 F1  Help                       ^/v Select Item                F5/F6 Change Values            F9  Setup Defaults
 Esc Exit                       </> Select Item                Enter Select > SubMenu         F10 Save and Exit
Memory overclock
⚠️ WARNING ⚠️ The RAM I bought was 2666MHz, but was showing up as 2400MHz. I tried to overclock it to 2666MHz (below), but kept getting errors when running MemTest86 Pro. You may want to skip this part.
At the Front Page, go to Setup Utility, then AMD CBS, then UMC Common Options, then DDR4 Common Options, then DRAM Timing Configuration, then accept the warning, then set Memory Overclock Settings to Enabled.
                                                    InsydeH2O Setup Utility                                             Rev. 5.0
                                                  AMD CBS
/-------------------------------------------------------------------------------------+----------------------------------------\
|I Accept                                                                             |Memory Overclock Settings               |
|                                                                                     |                                        |
|Overclock                                  <Auto>                                    |                                        |
|                                                                                     |                                        |
|                                                                                     |                                        |
|                                                                                     |                                        |
|                                                                                     |                                        |
|                                                                                     |                                        |
|                                                                                     |                                        |
|                                                                                     |                                        |
|                                                                                     |                                        |
|                                                                                     |                                        |
|                                                                                     |                                        |
|                                                                                     |                                        |
|                                                         /---------\                 |                                        |
|                                                         |Overclock|                 |                                        |
|                                                         |---------|                 |                                        |
|                                                         |Auto     |                 |                                        |
|                                                         |Enabled  |                 |                                        |
|                                                         \---------/                 |                                        |
|                                                                                     |                                        |
|                                                                                     |                                        |
|                                                                                     |                                        |
|                                                                                     |                                        |
|                                                                                     |                                        |
|                                                                                     |                                        |
|                                                                                     |                                        |
|                                                                                     |                                        |
|                                                                                     |                                        |
|                                                                                     |                                        |
|                                                                                     |                                        |
|                                                                                     |                                        |
|                                                                                     |                                        |
|                                                                                     |                                        |
\-------------------------------------------------------------------------------------+----------------------------------------/
 F1  Help                       ^/v Select Item                F5/F6 Change Values            F9  Setup Defaults
 Esc Exit                       </> Select Item                Enter Select > SubMenu         F10 Save and Exit
Then, set the Memory Clock Speed to 1333MHz (since it’s DDR memory, this works out to 2666MHz).
                                                    InsydeH2O Setup Utility                                             Rev. 5.0
                                                  AMD CBS
/-------------------------------------------------------------------------------------+----------------------------------------\
|I Accept                                                                             |Set the memory clock frequency.         |
|                                                                                     |                                        |
|Overclock                                  <Enabled>                                 |                                        |
|Memory Clock Speed                         <Auto>                                    |                                        |
|Tcl                                        <Auto>                                    |                                        |
|Trcdrd                                     <Auto>                                    |                                        |
|Trcdwr                                     <Auto>    /------------------\            |                                        |
|Trp                                        <Auto>    |Memory Clock Speed|            |                                        |
|Tras                                       <Auto>    |------------------|            |                                        |
|Trc Ctrl                                   <Auto>    |Auto              |            |                                        |
|TrrdS                                      <Auto>    |667MHz            |            |                                        |
|TrrdL                                      <Auto>    |800MHz            |            |                                        |
|Tfaw Ctrl                                  <Auto>    |933MHz            |            |                                        |
|TwtrS                                      <Auto>    |1067MHz           |            |                                        |
|TwtrL                                      <Auto>    |1200MHz           |            |                                        |
|Twr Ctrl                                   <Auto>    |1333MHz           |            |                                        |
|Trcpage Ctrl                               <Auto>    |1400MHz           |            |                                        |
|TrdrdScL Ctrl                              <Auto>    |1467MHz           |            |                                        |
|TwrwrScL Ctrl                              <Auto>    |1533MHz           |            |                                        |
|Trfc Ctrl                                  <Auto>    |1600MHz           |            |                                        |
|Trfc2 Ctrl                                 <Auto>    |1667MHz           |            |                                        |
|Trfc4 Ctrl                                 <Auto>    |1733MHz           |            |                                        |
|Fail_CNT                                   [0x5]     |1800MHz           |            |                                        |
|ProcODT                                    <Auto>    |1867MHz           |            |                                        |
|Tcwl                                       <Auto>    |1933MHz           |            |                                        |
|Trtp                                       <Auto>    |2000MHz           |            |                                        |
|Tcke                                       <Auto>    \------------------/            |                                        |
|TrdrdSc                                    <Auto>                                    |                                        |
|TrdrdSd                                    <Auto>                                    |                                        |
|TrdrdDd                                    <Auto>                                    |                                        |
|TwrwrSc                                    <Auto>                                    |                                        |
|TwrwrSd                                    <Auto>                                    |                                        |
|TwrwrDd                                    <Auto>                                    |                                        |
|Trdwr                                      <Auto>                                    |                                        |
\-------------------------------------------------------------------------------------v----------------------------------------/
 F1  Help                       ^/v Select Item                F5/F6 Change Values            F9  Setup Defaults
 Esc Exit                       </> Select Item                Enter Select > SubMenu         F10 Save and Exit
Memory test
I always test my memory, but since this was ECC memory, I needed a program to test the ECC functionality. Apparently, MemTest86+ (the open-source tool), doesn’t support testing ECC yet. MemTest86 Pro (the closed-source tool) does support ECC injection, so that’s what I went with.
For reference, here is the MemTest86 Pro configuration file called mt86.cfg that I was using.
ECCPOLL=1
ECCINJECT=1
LANG=en-US
AUTOMODE=1
AUTOREPORT=1
AUTOREPORTFMT=HTML
EXITMODE=0
CONSOLEONLY=1
At the Front Page, go to Boot Manager. I was able to boot from a USB flash drive containing MemTest86 Pro and it started the test right away.
/------------------------------------------------------------------------------------------------------------------------------\
|                                                         Boot Manager                                                         |
\------------------------------------------------------------------------------------------------------------------------------/


  Boot Option Menu

  EFI Boot Devices
  EFI Hard Drive (I947122223-TS128GMTE110S)
  EFI USB Device 1 (Samsung Flash Drive)
  EFI USB Device (Samsung Flash Drive)
  Internal EFI Shell

  ^ and v to change option, ENTER to select an option, ESC to exit


/------------------------------------------------------------------------------------------------------------------------------\
| F1  Help                                                      ^/v   Select Item                                              |
| Esc Exit                                                      Enter Select > SubMenu                                         |
\------------------------------------------------------------------------------------------------------------------------------/
You will see errors in MemTest86 Pro, since it’s injecting ECC errors to test the ECC functionality. I left MemTest86 Pro to run for about 12 hours and came back to this (report below).
Link to MemTest86 Pro HTML report
Installing pfSense
Download the memstick installer for pfSense and write it to a USB flash drive. You can find links and instructions here, but the installer there is behind a login page (as I mentioned above), so you can get the pfSense-CE-memstick-serial-2.7.2-RELEASE-amd64.img.gz file directly from here.
At the Front Page, go to Boot Manager. I was able to boot from a USB flash drive containing the pfSense installer.
/------------------------------------------------------------------------------------------------------------------------------\
|                                                         Boot Manager                                                         |
\------------------------------------------------------------------------------------------------------------------------------/


  Boot Option Menu

  EFI Boot Devices
  EFI Hard Drive (I947122223-TS128GMTE110S)
  EFI USB Device (USB)
  Internal EFI Shell

  ^ and v to change option, ENTER to select an option, ESC to exit


/------------------------------------------------------------------------------------------------------------------------------\
| F1  Help                                                      ^/v   Select Item                                              |
| Esc Exit                                                      Enter Select > SubMenu                                         |
\------------------------------------------------------------------------------------------------------------------------------/
When you first see this menu, and it’s counting down from 3…2…1, you need to press ESC once. The reason is that the DEC740 uses different serial settings that are not in the pfSense 2.7.2 installer. See this post for details and this PR for eventually getting this added to FreeBSD upstream.
-          __
    _ __  / _|___  ___ _ __  ___  ___
   | '_ \| |_/ __|/ _ \ '_ \/ __|/ _ \
   | |_) |  _\__ \  __/ | | \__ \  __/
   | .__/|_| |___/\___|_| |_|___/\___|
   |_|


 +---------- Welcome to pfSense -----------+      __________________________
 |                                         |     /                       ___\
 |  1. Boot Multi user [Enter]             |    |                      /`
 |  2. Boot Single user                    |    |                     /    :-|
 |  3. Escape to loader prompt             |    |      _________  ___/    /_ |
 |  4. Reboot                              |    |    /` ____   / /__    ___/ |
 |  5. Cons: Dual (Serial primary)         |    |   /  /   /  /    /   /     |
 |                                         |    |  /  /___/  /    /   /      |
 |  Options:                               |    | /   ______/    /   /       |
 |  6. Kernel: default/kernel (1 of 1)     |    |/   /          /   /        |
 |  7. Boot Options                        |        /          /___/         |
 |                                         |       /                         |
 |                                         |      /_________________________/
 +-----------------------------------------+                                  |
Then, you’ll see the OK prompt.
Type '?' for a list of commands, 'help' for more detailed help.
OK
There, you can paste in these two commands.
set hw.uart.console="mm:0xfedc9000,rs:2"
boot
Go through the install process via the serial console. Once it’s done, reboot again, press ESC once, then enter the two commands above. Here, you’ll need to setup your interfaces and VLANs. Now, at the menu below, select 8 to enter the shell.
 0) Logout (SSH only)                  9) pfTop
 1) Assign Interfaces                 10) Filter Logs
 2) Set interface(s) IP address       11) Restart webConfigurator
 3) Reset webConfigurator password    12) PHP shell + pfSense tools
 4) Reset to factory defaults         13) Update from console
 5) Reboot system                     14) Disable Secure Shell (sshd)
 6) Halt system                       15) Restore recent configuration
 7) Ping host                         16) Restart PHP-FPM
 8) Shell

Enter an option:
Use vi to edit the /boot/loader.conf.local file to add these two lines.
console="efi"
hw.uart.console="mm:0xfedc9000,rs:2"
Reboot using the reboot command, and you should see pfSense boot normally, without having to edit your console settings again.
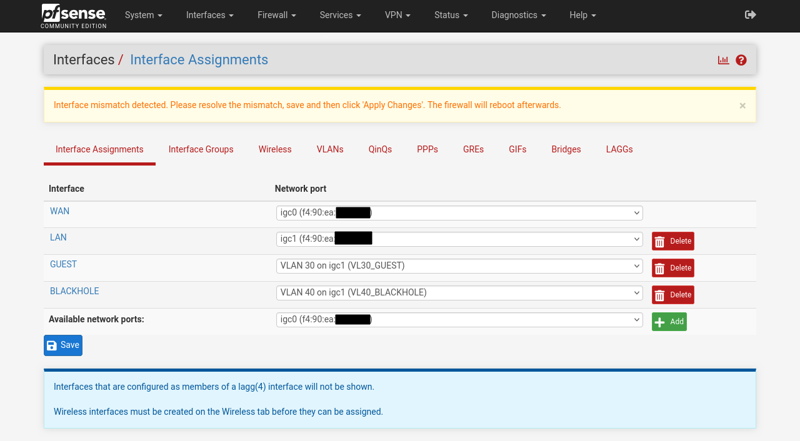
From here, you can connect an ethernet cable to your LAN interface and setup pfSense. If you’re curious, here is the info about the five on-board NICs. The three RJ-45 ports are Intel I226-V and the two SFP+ ports are from the AMD CPU.
igc0@pci0:2:0:0:        class=0x020000 rev=0x04 hdr=0x00 vendor=0x8086 device=0x125c subvendor=0x8086 subdevice=0x0000
    vendor     = 'Intel Corporation'
    device     = 'Ethernet Controller I226-V'
    class      = network
    subclass   = ethernet
igc1@pci0:3:0:0:        class=0x020000 rev=0x04 hdr=0x00 vendor=0x8086 device=0x125c subvendor=0x8086 subdevice=0x0000
    vendor     = 'Intel Corporation'
    device     = 'Ethernet Controller I226-V'
    class      = network
    subclass   = ethernet
igc2@pci0:4:0:0:        class=0x020000 rev=0x04 hdr=0x00 vendor=0x8086 device=0x125c subvendor=0x8086 subdevice=0x0000
    vendor     = 'Intel Corporation'
    device     = 'Ethernet Controller I226-V'
    class      = network
    subclass   = ethernet
ax0@pci0:6:0:1: class=0x020000 rev=0x00 hdr=0x00 vendor=0x1022 device=0x1458 subvendor=0x1022 subdevice=0x1458
    vendor     = 'Advanced Micro Devices, Inc. [AMD]'
    class      = network
    subclass   = ethernet
ax1@pci0:6:0:2: class=0x020000 rev=0x00 hdr=0x00 vendor=0x1022 device=0x1458 subvendor=0x1022 subdevice=0x1458
    vendor     = 'Advanced Micro Devices, Inc. [AMD]'
    class      = network
    subclass   = ethernet
I tried to backup my current pfSense config.xml file and place a copy onto the installation USB flash drive as per these instructions. That way, immediately after install, pfSense would restore my configuration file (saving me a step later). However, I couldn’t get this to work. I instead did a fresh install, and then restored my config.xml file from the web interface. Because my APU2 used the igb driver, and the DEC740 used igc, pfSense gave me a warning in the web interface to update my VLANs and interfaces, then I was able to reboot without issue. If you want to see more, Tom Lawrence has a great video talking about the process of restoring from a backup (both to the same hardware, and different hardware).
At that point, I was able to unplug the old APU2, plug in the DEC740, and everything was working (hardware cutovers never go this smoothly)!
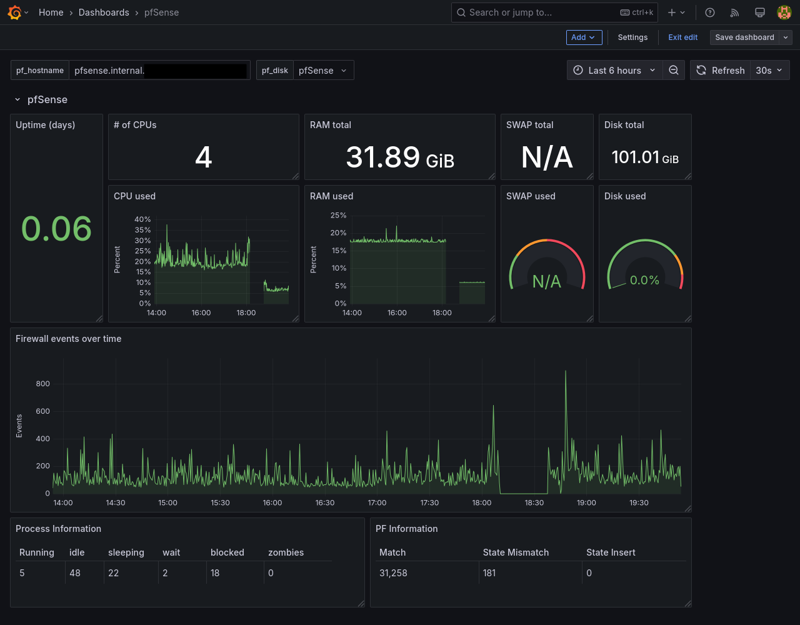
You can see the drop in CPU usage from around 20% on the APU2 to 5% on the DEC740.
Conclusion
I’ve been using the DEC740 for about a week now without any issues.
I don’t measure per-device power on my UPS, but the CPU on the APU2 had a TDP of 6W, while the CPU on the DEC740 has a TDP of 16W, so it does use more power (but not much more).
pfSense automatically picked up the AMD thermal sensor. The APU2 ran at around 50°C, while the DEC740 runs at around 44°C (the APU2 used a thermal pad instead of thermal paste, and the DEC740 has a heavy, metal heatsink).
I’m planning on calling Verizon to increase my FiOS plan to 1Gbps, so I’m looking forward to that day. I’m very happy with the DEC740 so far, and I’m hoping it will give my homelab 10 years of room to grow (now I just need some 10Gbps switches 😅).
-Logan
