
Hey! Listen! This post is part of a series on using OpenWrt. Check them all out!
| Date | URL | Part |
|---|---|---|
| 2024-02-06 | Beryl travel router with OpenWrt | OpenWrt revisited |
| 2016-04-28 | OpenWrt upgrade process | OpenWrt upgrade |
| 2015-08-26 | OpenWrt with OpenVPN server on TP-Link Archer C7 | Initial post |
| 2015-02-15 | OpenWrt with OpenVPN client on TP-Link TL-MR3020 | Initial post |
Introduction
I’m not going to spend any time talking about why you should be using a VPN, or how a VPN works. If you’re here, you know that already. If you need a refresher on the different types of VPNs, see below.
| Software | Advantage | Disadvantage |
|---|---|---|
| PPTP |
|
|
| L2TP/IPSec |
|
|
| OpenVPN |
|
|
Looking at my Piwik data, my most popular posts by far are the guides about setting up an OpenVPN client on a MR3020. After that, I receive the most questions about how to setup an OpenVPN server. Until now, I’ve been running a PPTP server on an e2000 running DD-WRT, because PPTP is easy to setup in DD-WRT (assuming you have the correct build). However, PPTP has its flaws (as shown above). I’ve also setup OpenVPN Access Server on Ubuntu Server, but that is for connecting to a VPS, not your home network (though, you could build the same setup in your home).
This tutorial is going to be about setting up your own OpenVPN server on OpenWrt. This setup is taken mainly from this guide.
Hardware
Since I’ve had luck with TP-Link in the past, I chose to use a TP-Link Archer C7 for my main router/OpenVPN server. I was looking for something that had dual-band technology (since the 2.4GHz spectrum is pretty crowded around my house), as well as 802.11ac technology (since it’s several times faster than 802.11n).
If you’re purchasing a C7, make sure it is hardware version 2.0. From the C7’s wiki page:
For the Archer C7 v1.x and WDR7500 v2.x, the 5GHz 802.11a/n/ac functionality is not supported, and likely will never be, since support for the AR1A (v1) variant of QCA9880 chip is not included in the open source ath10k driver. The Archer C7 v2.x uses the BR4A (v2) variant which is supported in ath10k.
Software
Obviously, I’m using OpenWrt again. In this case, I’m going to be using Chaos Calmer, even though it’s still on release candidate 3 and not a “stable” release yet. I’m choosing CC because LuCI for BB does not supporting configuring 802.11ac via the web.
When choosing a download for OpenWrt CC RC3 on the C7, be careful which one you choose. There is a download for v1 and v2, then a file for flashing from factory or from a previous release of OpenWrt.
- C7 v1 factory
- C7 v1 OpenWrt upgrade
- C7 v2 factory <–I’m using this file, since my C7 is v2 and on factory firmware
- C7 v2 OpenWrt upgrade
Install OpenWrt
I’m going to assume you’re running the factory firmware and want to install OpenWrt. If you haven’t already, make sure you check the MD5 hash of the file you downloaded.
Disconnect your PC from all wired and wireless networks, then connect the LAN port of the C7 to your PC. You should pull an IP in the 192.168.0.X range, so your C7’s IP should be 192.168.0.1. Open your browser, navigate to 192.168.0.1, and enter the username/password combination of admin/admin.
Once you’re logged into the router, go to System Tools, then Firmware Upgrade. Browse to your file and click Upgrade.

If you receive a message reading Please choose a file to upgrade!, you’ll need to rename the file to something shorter, like openwrt.bin.
Configure OpenWrt
Set a password
After the router reboots, you’ll need to login via telnet (since SSH is disabled, and LuCI isn’t installed in non-final releases of CC). Check your IP address and login via telnet, as shown below.
/home/logan
logan@arch
--> telnet 192.168.1.1
Trying 192.168.1.1...
Connected to 192.168.1.1.
Escape character is '^]'.
 === IMPORTANT ============================
  Use 'passwd' to set your login password
  this will disable telnet and enable SSH
 ------------------------------------------


BusyBox v1.23.2 (2015-06-18 21:35:30 CEST) built-in shell (ash)

  _______                     ________        __
 |       |.-----.-----.-----.|  |  |  |.----.|  |_
 |   -   ||  _  |  -__|     ||  |  |  ||   _||   _|
 |_______||   __|_____|__|__||________||__|  |____|
          |__| W I R E L E S S   F R E E D O M
 -----------------------------------------------------
 CHAOS CALMER (15.05-rc3, r46163)
 -----------------------------------------------------
  * 1 1/2 oz Gin            Shake with a glassful
  * 1/4 oz Triple Sec       of broken ice and pour
  * 3/4 oz Lime Juice       unstrained into a goblet.
  * 1 1/2 oz Orange Juice
  * 1 tsp. Grenadine Syrup
 -----------------------------------------------------
root@OpenWrt:/#
After you’re in through telnet, use passwd to change your password (which will enable SSH).
root@OpenWrt:/# passwd
Changing password for root
New password:
Retype password:
Password for root changed by root
Logout of telnet, then SSH in using root and the password you just set.
/home/logan
logan@arch
--> ssh root@192.168.1.1
root@192.168.1.1's password:


BusyBox v1.23.2 (2015-06-18 21:35:30 CEST) built-in shell (ash)

  _______                     ________        __
 |       |.-----.-----.-----.|  |  |  |.----.|  |_
 |   -   ||  _  |  -__|     ||  |  |  ||   _||   _|
 |_______||   __|_____|__|__||________||__|  |____|
          |__| W I R E L E S S   F R E E D O M
 -----------------------------------------------------
 CHAOS CALMER (15.05-rc3, r46163)
 -----------------------------------------------------
  * 1 1/2 oz Gin            Shake with a glassful
  * 1/4 oz Triple Sec       of broken ice and pour
  * 3/4 oz Lime Juice       unstrained into a goblet.
  * 1 1/2 oz Orange Juice
  * 1 tsp. Grenadine Syrup
 -----------------------------------------------------
root@OpenWrt:~#
After you’re in, we can start setting up OpenWrt. Most of these steps will be taken from my previous guides, as well as the OpenWrt basic config guide.
Setup NTP
The C7 doesn’t have a real-time clock or CMOS battery. Because of this, every time it loses power, the clock resets to a specific date. To circumvent this, we’re going to use NTP to get our time from the internet. You don’t have to setup NTP, but it makes troubleshooting easier when you’re looking at timestamped log files. Keep in mind, since the C7 is connected directly to your PC (not the internet), this won’t take effect until after we get it online.
First, set a hostname, zone name, and time zone for your router. The list of zone names/time zones can be found here. Make note of the tick marks around the zonename.
uci set system.@system[0].hostname="c7main"
uci set system.@system[0].zonename="America/New York"
uci set system.@system[0].timezone="EST5EDT,M3.2.0,M11.1.0"
uci commit system
Next, we’re going to enable the NTP client. I’m using US servers from the NTP Pool Project, but change your servers as needed. Again, don’t forget the tick marks.
uci set system.ntp="timeserver"
uci set system.ntp.enabled="1"
uci delete system.ntp.server
uci add_list system.ntp.server="0.us.pool.ntp.org"
uci add_list system.ntp.server="1.us.pool.ntp.org"
uci add_list system.ntp.server="2.us.pool.ntp.org"
uci add_list system.ntp.server="3.us.pool.ntp.org"
uci commit system
Set default IP
Next, we’re going to change the default IP of the router from 192.168.1.1 to 10.10.1.1 (or whatever scheme you want). Most devices ship with 192.168.1.1 as the default, but I like to change to a different subnet.
uci set network.lan.ipaddr="10.10.1.1"
uci commit network
You can also limit the number of addresses available in the DHCP pool (optional).
uci set dhcp.lan.start="10"
uci set dhcp.lan.limit="50"
uci commit dhcp
reboot
Verify internet access
At this point, plug your internet connection into the WAN port of the C7. Assuming it receives an IP from your modem via DHCP, you should be able to access the internet on a client PC, as well as ping websites through SSH. If you check the date with the date command, you should see the date/time are correct because of NTP.
Setup wireless
Next, I’m going to setup the wireless. However, I’m going to opt to configure the wireless from the web interface, also known as LuCI. I’m choosing to do this because the C7 has two radios and it’s easier to configure through LuCI than SSH. If I lose nerd-points in your eyes, I’m sorry.
Install LuCI
LuCI isn’t installed in non-final releases of CC, so we need to install it.
opkg update
opkg install luci luci-ssl
/etc/init.d/uhttpd start
/etc/init.d/uhttpd enable
After LuCI is installed, navigate to 10.10.1.1 in your browser, and enter the username/password combination you were using for SSH.
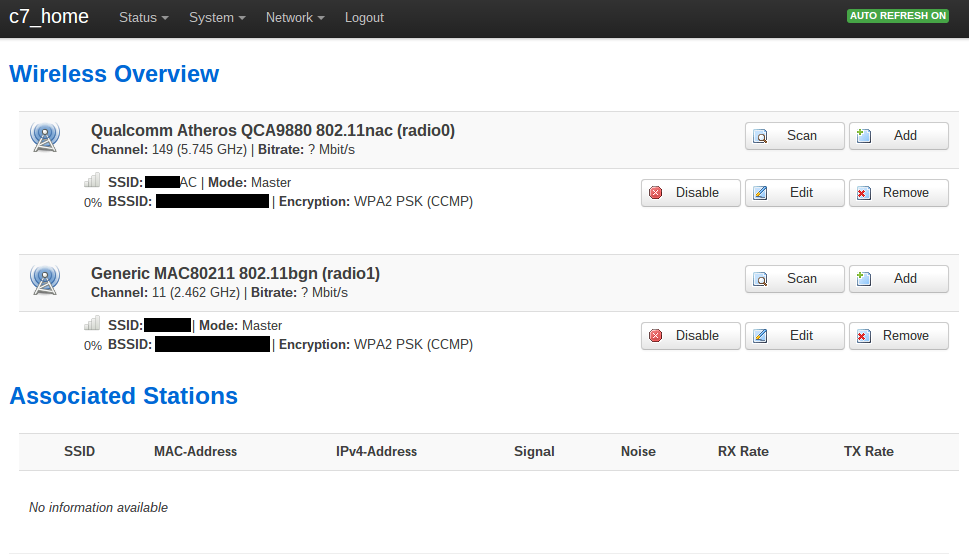
Create wireless network
Go to the Network dropdown, then select Wifi. Enable your radios as necessary. I enabled a 802.11n radio at 2.4GHz and a 802.11ac radio at 5GHz to test with. Press Save & Apply to continue.
Setup DDNS
First, we’ll need to setup dynamic DNS (DDNS). We’ll be running a server out of our house, and since our ISP regularly changes our IP address, we’ll never know when the address changes. Instead, we can run a small program on OpenWrt that will reach out to a DDNS provider, tell them what our IP address currently is, and associate it to a DNS name. This way, when setting up our OpenVPN clients, we’ll use the DDNS name, not our IP.
If you don’t have one already, you’ll need a DDNS provider. I’ve been a Dyn customer since before all the drama about discontinuing their free accounts. Make sure you choose a provider that is supported by OpenWrt. Once you choose a provider, you’ll need to register a DNS name with them.
You’ll also need the following info about your account:
- DDNS service name (as listed here, or in /usr/lib/ddns/services)
- Host name/domain
- Username
- Password (some providers offer an updater key instead of exposing your password)
- Interface you’ll be using to get DNS info (e.g., wan, wan6, lan, etc…)
Start by installing the necessary DDNS packages. If you want to configure DDNS via LuCI, you’ll need the package for that as well. I’m also installing two extra packages to make DDNS requests over SSL, as described here.
opkg update
opkg install ddns-scripts luci-app-ddns ca-certificates wget
I’m going to be configuring via command line, but you could perform the same steps in LuCI. Here, I’m using the IP of the eth0 interface to update my DDNS entry. Obviously, substitute your service/hostname/username/password as needed.
uci delete ddns.myddns_ipv4
uci delete ddns.myddns_ipv6
uci set ddns.myddns="service"
uci set ddns.myddns.service_name="ddnsprovider.com"
uci set ddns.myddns.domain="yournamehere.yourproviderhere.com"
uci set ddns.myddns.username="username"
uci set ddns.myddns.password="p@ssw0rd"
uci set ddns.myddns.interface="wan"
uci set ddns.myddns.ip_source="interface"
uci set ddns.myddns.ip_interface="eth0"
uci set ddns.myddns.enabled="1"
uci set ddns.myddns.use_https="1"
uci set ddns.myddns.cacert="/etc/ssl/certs"
uci commit ddns
When you’re finished, be sure to start and enable the DDNS client.
/etc/init.d/ddns start
/etc/init.d/ddns enable
Check your DDNS provider’s website to make sure your address is updating. If you’re having issues, run the command below to manually update your DDNS. It should give you some insight as to where the error is.
/usr/lib/ddns/dynamic_dns_updater.sh myddns
Setup OpenVPN
Install packages
Start by installing the necessary OpenVPN packages. If you want to configure OpenVPN via LuCI, you’ll need the package for that as well.
opkg update
opkg install openvpn-openssl openvpn-easy-rsa luci-app-openvpn openssh-sftp-server
It’s a good idea to move the /etc/easy-rsa directory to somewhere else, in case you do an upgrade and overwrite your files.
mkdir /etc/config/openvpn-config
mv /etc/easy-rsa/* /etc/config/openvpn-config/
rm -rf /etc/easy-rsa/
ln -s /etc/config/openvpn-config/ /etc/easy-rsa
rm /etc/config/openvpn_recipes
touch /etc/config/openvpn-config/client.ovpn
Create certificates
Next, we’re going to generate the certificates for the server and client(s). We need to start by editing a few lines in the /etc/easy-rsa/vars file.
Set the key size to at least 2048 bits. A key size of 4096 is preferred, but your client has to support it, plus it adds additional encryption overhead.
export KEY_SIZE=2048
Fill out the certificate info as necessary.
export KEY_COUNTRY="US"
export KEY_PROVINCE="CA"
export KEY_CITY="SanFrancisco"
export KEY_ORG="Fort-Funston"
export KEY_EMAIL="me@myhost.mydomain"
export KEY_OU="MyOrganizationalUnit"
Next, create your certificate authority, Diffie-Hellman parameters (this will take 40+ minutes), and certificates. If you want more client certificates, run the last command again, specifying a different name.
cd /etc/easy-rsa
source vars
clean-all
build-ca
build-dh
build-key-server c7
build-key-pkcs12 user1
Note - I’m choosing to use the PKCS12 format for the client certificates, since it combines the key and CA certificate into one file. Your client may want the two certificates to be separate.
Configure network/firewall
Next, we need to configure a new network interface and assign a firewall zone to it.
uci set network.vpn0="interface"
uci set network.vpn0.ifname="tun0"
uci set network.vpn0.proto="none"
uci set network.vpn0.auto="1"
uci commit network

uci add firewall rule
uci set firewall.@rule[-1].name="Allow-OpenVPN-Inbound"
uci set firewall.@rule[-1].target="ACCEPT"
uci set firewall.@rule[-1].src="wan"
uci set firewall.@rule[-1].proto="udp"
uci set firewall.@rule[-1].dest_port="1194"
uci add firewall zone
uci set firewall.@zone[-1].name="vpn"
uci set firewall.@zone[-1].input="ACCEPT"
uci set firewall.@zone[-1].forward="ACCEPT"
uci set firewall.@zone[-1].output="ACCEPT"
uci set firewall.@zone[-1].masq="1"
uci set firewall.@zone[-1].network="vpn0"
uci add firewall forwarding
uci set firewall.@forwarding[-1].src="vpn"
uci set firewall.@forwarding[-1].dest="wan"
uci add firewall forwarding
uci set firewall.@forwarding[-1].src="vpn"
uci set firewall.@forwarding[-1].dest="lan"
uci commit firewall

/etc/init.d/network reload
/etc/init.d/firewall reload
Enable packet forwarding
We also need to check if packet forwarding is enabled (it should be by default).
cat /proc/sys/net/ipv4/ip_forward
If it is not enabled, edit the file above and set the value to 1.
OpenVPN server config
Here, we’re going to be configuring the OpenVPN server. See the comments in the commands below for more information.
touch /etc/config/openvpn
uci delete openvpn.sample_server
uci delete openvpn.sample_client


#set and enable vpn
uci set openvpn.myvpn="openvpn"
uci set openvpn.myvpn.enabled="1"

#specify TUN vs. TAP (if you're not sure, you want TUN)
uci set openvpn.myvpn.dev="tun"

#specify port to use (default is 1194)
uci set openvpn.myvpn.port="1194"

#specify protocol to use (default is UDP)
uci set openvpn.myvpn.proto="udp"

#specify to use compression
uci set openvpn.myvpn.comp_lzo="yes"

#logging
uci set openvpn.myvpn.status="/var/log/openvpn_status.log"
uci set openvpn.myvpn.log="/tmp/openvpn.log"
uci set openvpn.myvpn.verb="3"
uci set openvpn.myvpn.mute="5"

#ping every 10 seconds, assume not responding after 120 seconds
uci set openvpn.myvpn.keepalive="10 120"

#keep key and tunnel persistent across restarts
uci set openvpn.myvpn.persist_key="1"
uci set openvpn.myvpn.persist_tun="1"

#set user and group to less-privileged account (UNIX/Linux only)
uci set openvpn.myvpn.user="nobody"
uci set openvpn.myvpn.group="nogroup"

#certificate information
uci set openvpn.myvpn.ca="/etc/easy-rsa/keys/ca.crt"
uci set openvpn.myvpn.cert="/etc/easy-rsa/keys/c7.crt"
uci set openvpn.myvpn.key="/etc/easy-rsa/keys/c7.key"
uci set openvpn.myvpn.dh="/etc/easy-rsa/keys/dh2048.pem"

#server settings
uci set openvpn.myvpn.mode="server"
uci set openvpn.myvpn.tls_server="1"
uci set openvpn.myvpn.server="10.8.0.0 255.255.255.0"

#specify topology to use
uci set openvpn.myvpn.topology="subnet"

#specify gateway to use
uci set openvpn.myvpn.route_gateway="dhcp"

#allow clients to "see" one another
uci set openvpn.myvpn.client_to_client="1"

#options to push to clients
uci add_list openvpn.myvpn.push="comp-lzo yes"
#keep key and tunnel persistent across restarts
uci add_list openvpn.myvpn.push="persist-key"
uci add_list openvpn.myvpn.push="persist-tun"
#set user and group to less-privileged account (UNIX/Linux only)
uci add_list openvpn.myvpn.push="user nobody"
uci add_list openvpn.myvpn.push="user nogroup"
#specify topology to use
uci add_list openvpn.myvpn.push="topology subnet"
#specify gateway to use
uci add_list openvpn.myvpn.push="route-gateway dhcp"
#redirect ALL traffic through the VPN server (this is IMPORTANT if you don't trust your local network)
uci add_list openvpn.myvpn.push="redirect-gateway def1"
#push a local route to your clients (allow your clients to access the server's network)
uci add_list openvpn.myvpn.push="route 10.10.1.0 255.255.255.0"
#push DNS to your clients (this is IMPORTANT if you don't trust your local network)
uci add_list openvpn.myvpn.push="dhcp-option DNS 107.170.95.180"
uci add_list openvpn.myvpn.push="dhcp-option DNS 50.116.40.226"
uci commit openvpn
Be sure to start and enable the OpenVPN server.
/etc/init.d/openvpn start
/etc/init.d/openvpn enable
Next, look at the logfile at /tmp/openvpn.log. With any luck, you should see Initialization Sequence Completed, showing that your OpenVPN server is up!
root@c7main:/etc/config/openvpn-config/keys# cat /tmp/openvpn.log
Thu Aug 20 20:49:02 2015 OpenVPN 2.3.6 mips-openwrt-linux-gnu [SSL (OpenSSL)] [LZO] [EPOLL] [MH] [IPv6] built on Jun 18 2015
Thu Aug 20 20:49:02 2015 library versions: OpenSSL 1.0.2d 9 Jul 2015, LZO 2.08
Thu Aug 20 20:49:03 2015 Diffie-Hellman initialized with 2048 bit key
Thu Aug 20 20:49:03 2015 Socket Buffers: R=[163840->131072] S=[163840->131072]
Thu Aug 20 20:49:03 2015 TUN/TAP device tun0 opened
Thu Aug 20 20:49:03 2015 TUN/TAP TX queue length set to 100
Thu Aug 20 20:49:03 2015 do_ifconfig, tt->ipv6=0, tt->did_ifconfig_ipv6_setup=0
Thu Aug 20 20:49:03 2015 /sbin/ifconfig tun0 10.8.0.1 netmask 255.255.255.0 mtu 1500 broadcast 10.8.0.255
Thu Aug 20 20:49:03 2015 GID set to nogroup
Thu Aug 20 20:49:03 2015 UID set to nobody
Thu Aug 20 20:49:03 2015 UDPv4 link local (bound): [undef]
Thu Aug 20 20:49:03 2015 UDPv4 link remote: [undef]
Thu Aug 20 20:49:03 2015 MULTI: multi_init called, r=256 v=256
Thu Aug 20 20:49:03 2015 IFCONFIG POOL: base=10.8.0.2 size=252, ipv6=0
Thu Aug 20 20:49:03 2015 Initialization Sequence Completed
OpenVPN client config
Edit the OpenVPN client configuration file at /etc/config/openvpn-config/client.ovpn. I’m purposely keeping the client configuration file as thin as possible, so that most settings can be setup on the server and pushed to clients.
#specify TUN vs. TAP (if you're not sure, you want TUN)
dev tun

#specify protocol to use (default is UDP)
proto udp

#Certificate information
ca   ca.crt
cert user1.crt
key  user1.key

#client settings
client
remote-cert-tls server
remote YOUR_DNS_ENTRY_OR_IP 1194
Distribute keys
You’ll need to move the following files from the router, to your client(s). All four files should be saved in the same folder/location on your client.
- CA certificate (ca.crt)
- client certificate (user1.crt)
- client keyfile (user1.key)
- client config file (client.ovpn)
You can use SFTP, SSH, or copy them to a USB drive. You could email them, but I would advise against it (since the key isn’t encrypted).
Configure OpenVPN client
In this case, I’m going to be using the official OpenVPN Android app, but there are also clients for iOS, Windows, Mac, and Linux.
Once installed, tap on the Option button, then tap on Import, then tap on Import Profile from SD Card.


Browse to the client.ovpn file and import it into the OpenVPN Connect app.

The profile should be imported successfully, and you should be able to see your server’s name or IP. Click Connect to establish a connection.

Verify your connection on the next screen.

Verify connection
Try to browse a public site (e.g., www.google.com), then try to browse to your router’s IP (e.g., 10.10.1.1). If everything is setup correctly, both should load. You can also check your IP with an external tool, such as WhatIsMyIP, and you should see your OpenWrt router’s public IP. I’d also advise to check for DNS leaks (your DNS should be set to the DNS servers we pushed to the clients).
Let me know how your setup went!
-Logan
