
Hey! Listen! This post is part of a series on using OpenWrt. Check them all out!
| Date | URL | Part |
|---|---|---|
| 2026-05-23 | A dead-simple OpenWrt setup on the Flint 2 | OpenWrt simple setup |
| 2024-02-06 | Beryl travel router with OpenWrt | OpenWrt revisited |
| 2016-04-28 | OpenWrt upgrade process | OpenWrt upgrade |
| 2015-08-26 | OpenWrt with OpenVPN server on TP-Link Archer C7 | Initial post |
| 2015-02-15 | OpenWrt with OpenVPN client on TP-Link TL-MR3020 | Initial post |
Update: Multiple posts
Originally, this series consisted of three posts with basically the same content, but small improvements each time. The original links are below:
- Revision 1
- Revision 2
- Revision 3 (this post)
I have since re-directed all the links to this page, since revision 1 and revision 2 were obsoleted by revision 3. I just wanted to keep the links alive on the internet.
Introduction
A few months ago, the team at OpenWrt released version 14.07 of OpenWrt, called Barrier Breaker. I’m going to be installing Barrier Breaker on my MR3020 and setting up an OpenVPN client. If you don’t know the difference between PPTP/IPSec/OpenVPN, IVPN has a great comparison chart.
The “why”
Before we get started, I need to get up on my soapbox and say a few things. If you’re not using a VPN, you should be. VPNs aren’t just for hackers, thieves, or people doing illegal things (you wouldn’t download a car, would you?). VPNs are great for:
- Adding a layer of security to your browsing (VPNs encrypt everything!)
- Securely connecting two routers to create one large network over the internet (businesses do this all the time)
- Students/employees connecting back to their university/office to work remotely (again, a common practice)
- Circumventing geoblocking (i.e., content blocked based on your physical location)
- Watch Netflix from outside the US
- Watch BBC iPlayer from outside the UK
- FREEDOM OF SPEECH! Use a VPN to circumvent government restrictions put on the internet (e.g., China, Iran, North Korea, etc…)
But, I digress. VPNs are great. If you don’t have one, get one. Personally, I like using Private Internet Access (I’m not compensated, just a happy customer). If you don’t know where to start, TorrentFreak has a great article on which VPN services take your anonymity seriously (newsflash, PIA is at the top of their list).
The “how”
My plan for this router is to use it when I travel. I plan on plugging it into the Ethernet port in a hotel (or my house/friend’s house/Airbnb host) and having it broadcast a wireless network. Since the router is an OpenVPN client, any devices that join that wireless network will be VPNed into PIA’s servers. Eventually, when I install OpenVPN on my home router, I can route my connection back home. It’s probably easier illustrated than explained, as below.

There are a few advantages to this setup, as opposed to installing the OpenVPN client on each device:
- Devices that don’t support OpenVPN can be protected (XBox, Roku, etc…)
- Multiple machines (phone, laptop, Roku, etc…) can share one VPN connection
- You can switch between an insecure wireless network (home/friend’s house/hotel) and a secure wireless network (OpenWrt) whenever needed
Ready? Let’s get started!
Install OpenWrt
I’m going to assume you’re already running Attitude Adjustment (AA) and want to upgrade to Barrier Breaker (BB).
Disconnect your PC from all wired and wireless networks, then connect your MR3020 to your PC. Because of the way I have this router setup from my previous post (eth0 is a DHCP client, not server), I’m going to connect to the WiFi network it’s broadcasting. I checked my IP, opened my browser, and navigated to 10.80.1.1 (your address will be 192.168.1.1 as stock). I then logged in with the username and password I had set before.
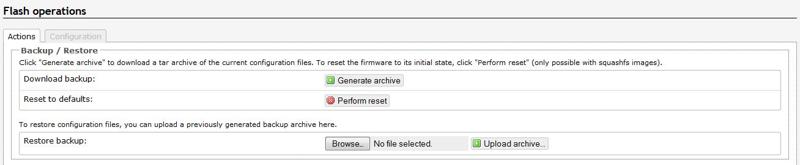
Once you’re logged into OpenWrt, go to the System tab, then the Backup/Flash Firmware tab. At this point, it’s a good idea to make a backup of your config by pressing Generate Archive.
As-of this writing, the OpenWrt wiki page for the MR3020 doesn’t list BB as the newest firmware. There are two options for the BB download: a file for the factory firmware, and a file for upgrading. We’ll choose the upgrade.
Back at your router, under Flash new firmware image, make sure Keep settings is checked to keep your current settings. I’m going to uncheck this, since I want to start from scratch. Browse to your downloaded firmware, and press Flash image to upgrade it.

Verify the checksum, and press Proceed to continue.

Wait a few minutes and the router will reboot. Check your IP again after it’s back up, as mine had changed since I erased my settings.

At this point, my MR3020 is running stock BB and I’m going to reconfigure it from scratch. Since the wireless network was wiped out, I’m going to reconnect with Ethernet.
Configure OpenWrt
From here, the OpenWrt wiki page recommends going through the basic configuration for any OpenWrt installation. I’m going to be combining some of the basic configuration with my configuration for the VPN client.
Navigate to 192.168.1.1 in your browser and you’ll be greeted by LuCI, the web interface for OpenWrt. OpenWrt recently switched to the Unified Configuration Interface, also known as UCI. The UCI is basically a collection of easy-to-read configuration files that are all centrally located, making OpenWrt much easier to configure. What’s nice about LuCI is that it reads/writes from/to the UCI files. Any changes you make in LuCI are reflected in the UCI files, and vice versa, meaning you can configure the MR3020 from the web interface, or from the command line.
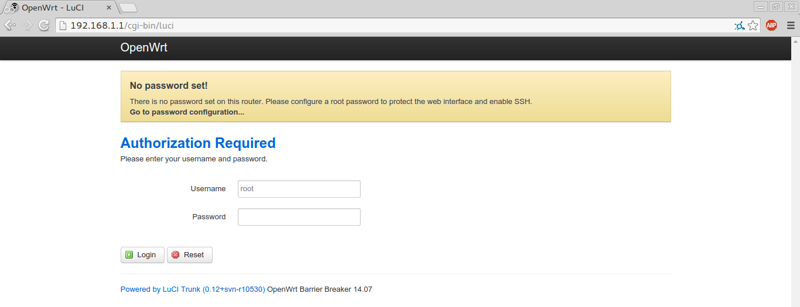
Anyway, moving on. Leave the username as “root” and the password field empty. Press Login to continue.
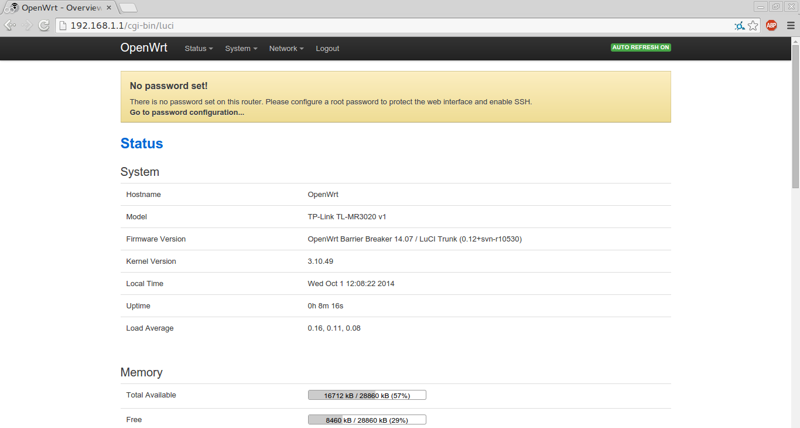
Set a password
From the main status screen, we’re going to set a root password by using the link in the yellow box at the top of the page. If you haven’t noticed, LuCI is a lot easier on the eyes in BB than AA.
Here, you can (and should) set a root password, as well as setup SSH access (which we’ll need later). Press Save & Apply to continue.

Look for Password successfully changed! at the top of the screen.

Verify SSH access by using PuTTY or another SSH client.
[logan@Arch ~]$ ssh root@192.168.1.1
root@192.168.1.1's password:


BusyBox v1.22.1 (2014-09-20 22:01:35 CEST) built-in shell (ash)
Enter 'help' for a list of built-in commands.

  _______                     ________        __
 |       |.-----.-----.-----.|  |  |  |.----.|  |_
 |   -   ||  _  |  -__|     ||  |  |  ||   _||   _|
 |_______||   __|_____|__|__||________||__|  |____|
          |__| W I R E L E S S   F R E E D O M
 -----------------------------------------------------
 BARRIER BREAKER (14.07, r42625)
 -----------------------------------------------------
  * 1/2 oz Galliano         Pour all ingredients into
  * 4 oz cold Coffee        an irish coffee mug filled
  * 1 1/2 oz Dark Rum       with crushed ice. Stir.
  * 2 tsp. Creme de Cacao
 -----------------------------------------------------
root@OpenWrt:~#
Setup NTP
The MR3020 doesn’t have a real-time clock or CMOS battery. Because of this, every time it loses power, the clock resets to October 1st. To circumvent this, we’re going to use NTP to get our time from the internet. You don’t have to setup NTP, but it makes troubleshooting easier when you’re looking at timestamped log files. Keep in mind, since the MR3020 is connected directly to your PC (not the internet), this won’t take effect until after we get it online. Don’t freak out if it’s not working right away.
First, set a hostname, zone name, and time zone for your router. The list of zone names/time zones can be found here. Make note of the tick marks around the zonename.
uci set system.@system[0].hostname=mr3020_home
uci set system.@system[0].zonename='America/New York'
uci set system.@system[0].timezone=EST5EDT,M3.2.0,M11.1.0
uci commit system
Next, we’re going to enable the NTP client. I’m using US servers from the NTP Pool Project, but change your servers as needed. Again, don’t forget the tick marks.
uci set system.ntp=timeserver
uci set system.ntp.enabled=1
uci delete system.ntp.server
uci add_list system.ntp.server='0.us.pool.ntp.org'
uci add_list system.ntp.server='1.us.pool.ntp.org'
uci add_list system.ntp.server='2.us.pool.ntp.org'
uci add_list system.ntp.server='3.us.pool.ntp.org'
uci commit system
Set default IP
Next, we’re going to change the default IP of the router from 192.168.1.1 to 10.80.1.1 (or whatever scheme you want). Most devices ship with 192.168.1.1 as the default, and since we’re going to be double-NATed, we can’t have two identical IPs on the same network.
uci set network.lan.ipaddr=10.80.1.1
uci commit network
You can also limit the number of addresses available in the DHCP pool (optional).
uci set dhcp.lan.start=10
uci set dhcp.lan.limit=20
uci commit dhcp
/etc/init.d/network restart
Log back into the web interface at the new address using your new root password.
Create wireless network
We need to create a wireless network for the MR3020 to broadcast. Eventually, we’re going to turn off LAN access on the Ethernet port, and we’ll need a way to connect to the router locally.
Start by enabling wireless. At this point, you should be able to see the default OpenWrt network from a device.
uci delete wireless.radio0.disabled
uci commit wireless
/etc/init.d/network restart
Once enabled, setup your network as needed (name, channel, etc…).
uci set wireless.radio0.channel=11
uci set wireless.radio0.txpower=18
uci set wireless.radio0.country=US
uci set wireless.@wifi-iface[0].ssid='Aw yiss'
uci commit wireless
You should secure your network and choose a strong password (preferably WPA2-PSK with AES). Remember, this device may be a direct link back to your home network. Even if you have a strong VPN password, a weak WiFi password with weak encryption (e.g., WEP) could compromise your network.
uci set wireless.@wifi-iface[0].encryption='psk2+ccmp'
uci set wireless.@wifi-iface[0].key='wirelesspasswordgoeshere'
uci commit wireless
/etc/init.d/network restart
At this point, you should disconnect the Ethernet cable from the MR3020 and connect to the WiFi network we just setup. Normally, it’s not recommended to configure routers over wireless, but since we’re not going to be transferring files or upgrading firmware, we should be ok.
Setup WAN interface
We need the MR3020 to request an IP address from another router when it is plugged in. For this, we’ll need to make a new interface that will act as a DHCP client. Name the interface something like WAN, with the protocol being set to DHCP client, covering the eth0 interface.
uci set network.WAN=interface
uci set network.WAN.proto=dhcp
uci set network.WAN.ifname=eth0
uci commit network
On the next screen, under Common Configuration, go to the Firewall Settings tab and select WAN. Press Save & Apply to continue.
uci set firewall.@zone[1].network='wan wan6 WAN'
uci commit firewall
/etc/init.d/network restart
/etc/init.d/firewall restart
Unbridge LAN interfaces
By default, the wired and wireless interfaces are bridged. I want them to be separate, so that I can plug the wired interface into another router and use the wireless interface to broadcast a network. Essentially, I making it so that only another router can use the Ethernet port, and only clients can use the wireless network.
uci delete network.lan.ifname
uci delete network.lan.type
uci commit network
/etc/init.d/network restart
If you don’t unbridge the interfaces, you’ve basically just created a wireless AP for the other router.
Verify internet access
At this point, plug your MR3020 into a LAN port on your other router, and connect your PC to the MR3020’s wireless network. It doesn’t matter what IP your MR3020 gets from the other router, as your PC should see the MR3020 as 10.80.1.1 (or whatever your made it).
You should be able to access the internet, as well as ping websites through SSH. In addition, go to the Status dropdown, then select Overview to make sure your Local Time field is updated with the correct time, now that we’re on the internet.
Congratulations, you are now double-NATed.
Configure extroot
Before we get started, we need to make some space for OpenVPN. The MR3020 only has 4MB of flash. After OpenWrt is installed, we’re only left with about 400KB, which won’t be enough for the 600KB+ of OpenSSL libraries we’ll need, in addition to other packages that will make life easier.
root@OpenWrt:~# df -h
Filesystem                Size      Used Available Use% Mounted on
rootfs                  640.0K    228.0K    412.0K  36% /
/dev/root                 2.3M      2.3M         0 100% /rom
tmpfs                    14.1M    448.0K     13.7M   3% /tmp
/dev/mtdblock3          640.0K    228.0K    412.0K  36% /overlay
overlayfs:/overlay      640.0K    228.0K    412.0K  36% /
tmpfs                   512.0K         0    512.0K   0% /dev
There are two ways around this:
- ExtRoot, which can either extend or move the root filesystem to a USB flash drive
- Build a custom image of OpenWrt from scratch, leaving out unnecessary packages
My first instinct was to build a custom image, leaving out PPP. However, after a few hours of trying and multiple images, it still didn’t give me the space I needed. The only way to get OpenVPN on the MR3020 would be to leave LuCI out of the image, and I’m not willing to give that up.
That leaves me with using a USB flash drive to extend or move the filesystem. Thankfully, setting up ExtRoot is pretty easy, and we won’t need a huge flash drive since we’re only after a few extra MB. I picked up this flash drive since it’s small.
Start by reading the theory on ExtRoot, then go over the how-to guide. You need to decide whether you’ll be using external overlay (also called pivot-overlay) or external root (also called pivot-root). Essentially, external overlay extends the root filesystem to include the flash drive, while external root copies the root filesystem to the flash drive, then boots from the flash drive. External root has a couple advantages (that I can see):
- You can boot from multiple flash drives, each with a different config (one flash drive with a config for home, another with a config for traveling, etc…)
- If the flash drive dies, OpenWrt still boots from the internal root filesystem (without all your configs)
In this guide, I’m going to be using external root.
Since my flash drive is 8GB, I’m going to give 1GB to OpenWrt and use the rest for a SAMBA share. Any device connected to my router will have access to the other ~6.5GB share. Get stared by formatting your flash drive with two ext4 partitions. I did this on my machine using GParted, but if you’re running Windows you can use this to format the drive. In this case, /dev/sda1 is 1GB and /dev/sda2 is the remaining ~6.5GB.
Next, SSH into your router, and install a few packages. You’ll need to install the kmod-fs package for the type of filesystem that you’re using (e.g., kmod-fs-ext4, kmod-fs-ext3, kmod-fs-btrfs, etc…)
opkg update
opkg install block-mount kmod-usb-storage kmod-fs-ext4
There’s a good chance your kernel modules didn’t load. If that’s the case, reboot your router and then plug in your flash drive.
kmod: failed to insert /lib/modules/3.10.49/sd_mod.ko
Configuring kmod-usb-storage.
Configuring kmod-crypto-hash.
Configuring kmod-lib-crc16.
Configuring block-mount.
Configuring kmod-fs-ext4.
kmod: failed to insert /lib/modules/3.10.49/ext4.ko
Find the name of your flash drive with the block info command. Mine was /dev/sda. Notice there are two partitions on the drive.
root@mr3020_home:~# block info
/dev/mtdblock2: UUID="20ad40ea-d33a421e-785b7d2d-ada99230" VERSION="4.0" TYPE="squashfs"
/dev/mtdblock3: TYPE="jffs2"
/dev/sda1: UUID="bf19ec66-8d6a-40d7-b366-f99f48cced33" NAME="EXT_JOURNAL" VERSION="1.0" TYPE="ext4"
/dev/sda2: UUID="5ca298db-53d6-406c-9db3-344c2e5ebae8" NAME="EXT_JOURNAL" VERSION="1.0" TYPE="ext4"
Create two directories and mount /dev/sda1 and /dev/sda2 on them.
mkdir /mnt/batman
mount /dev/sda1 /mnt/batman
mkdir /mnt/network
chmod -R 777 /mnt/network
mount /dev/sda2 /mnt/network
Now, copy the router’s internal flash to the flash drive. Obviously, replace /mnt/batman with whatever mount point you’re using.
mkdir -p /tmp/cproot
mount --bind / /tmp/cproot
tar -C /tmp/cproot -cvf - . | tar -C /mnt/batman -xf -
umount /tmp/cproot
Your flash drive now has a copy of the router’s root filesystem on it (so don’t lose it). However, the router will still boot from its internal memory, so we need to change that by editing the /etc/config/fstab file. In addition to that, we’re also creating an extra entry for our SAMBA fileshare.
cat >> /etc/config/fstab << EOF
config 'mount'
        option target        /
        option device        /dev/sda1
        option fstype        ext4
        option options       rw,sync
        option enabled       1
        option enabled_fsck  0

config 'mount'
        option target        /mnt/network
        option device        /dev/sda2
        option fstype        ext4
        option options       rw,sync
        option enabled       1
        option enabled_fsck  1
EOF
Reboot your router. When it starts up, check your mount points and you should see that /dev/sda1 has been mounted on /, while /dev/sda2 has been mounted on /mnt/network.
root@mr3020_home:~# mount
rootfs on / type rootfs (rw)
/dev/root on /rom type squashfs (ro,noatime)
proc on /proc type proc (rw,noatime)
sysfs on /sys type sysfs (rw,noatime)
tmpfs on /tmp type tmpfs (rw,nosuid,nodev,noatime)
/dev/sda1 on / type ext4 (rw,relatime,data=ordered)
tmpfs on /dev type tmpfs (rw,relatime,size=512k,mode=755)
devpts on /dev/pts type devpts (rw,relatime,mode=600)
/dev/sda2 on /mnt/network type ext4 (rw,sync,relatime,data=ordered)
debugfs on /sys/kernel/debug type debugfs (rw,noatime)
If you check your space again, you’ll see that your root filesystem is now larger, and you have a second partition for SAMBA.
root@mr3020_home:~# df -h
Filesystem                Size      Used Available Use% Mounted on
rootfs                  975.9M     10.5M    898.2M   1% /
/dev/root                 2.3M      2.3M         0 100% /rom
tmpfs                    14.1M    360.0K     13.7M   2% /tmp
/dev/sda1               975.9M     10.5M    898.2M   1% /
tmpfs                   512.0K         0    512.0K   0% /dev
/dev/sda2                 6.2G     14.5M      5.9G   0% /mnt/network

Setup VPN
Now we need to install the OpenVPN client and configure it. The VPN termination point is going to be one of PIA’s servers, but it could be any OpenVPN server. You should read OpenWrt’s VPN overview, as well the OpenVPN beginner’s guide and the client guide.
First, we’ll need to install a couple packages: openvpn-openssl for obvious reasons, the real version of wget to downlad the configuration files from PIA, and unzip to unzip the downloaded files. This is easiest done by connecting through SSH and running the commands below.
opkg update
opkg install openvpn-openssl wget unzip
mv /etc/config/openvpn /etc/config/openvpn_old
Unfortunately, there is no LuCI package for OpenVPN in BB, like there is in AA. As-of this writing, the package luci-app-openvpn is marked as broken. There appears to be a package for Chaos Calmer, located here, but I don’t think that will work in BB. That means we’re doing everything from the command line, which isn’t as intimidating as it may sound. Plus, since LuCI runs from the UCI files, we’ll be able to see some of our changes in LuCI when we log back in.
We’ll need to create a new interface for the VPN by using the commands below. Name the network interface whatever you’d like, and name the physical (even though it’s virtual) interface tun0.
cat >> /etc/config/network << EOF
config interface 'PIA_VPN'
    option proto 'none'
    option ifname 'tun0'
EOF
/etc/init.d/network restart
Download the OpenVPN configuration files from PIA.
cd /etc/openvpn
wget --no-check-certificate https://www.privateinternetaccess.com/openvpn/openvpn.zip
unzip openvpn.zip
rm openvpn.zip
Now, we need to edit each .ovpn file in /etc/openvpn to include your username and password. However, it’s a pain editing every file manually. Instead, we’ll create a single file that stores your login credentials. The file I created is called authuser. Substitute your username and password, obviously.
cat >> /etc/openvpn/authuser << EOF
PIA_USERNAME
PIA_PASSWORD
EOF
However, now we’ll have to go back and edit each .ovpn file to look for the authuser file, which is still too much work for me. If you look at each .ovpn file, you’ll see the only difference between them is the server address. What if we created a generic .ovpn connection file which omitted the server address (and port), but specified to use the authuser file? We could pass the server address and port as an option in our command to start the VPN connection.
Create the file with the command below. See how we removed the line for the server/port, and added a line for the authuser file and auth-nocache options?
cat >> /etc/openvpn/piageneric.ovpn << EOF
client
dev tun
proto udp
resolv-retry infinite
nobind
persist-key
persist-tun
ca ca.crt
tls-client
remote-cert-tls server
auth-user-pass authuser
auth-nocache
comp-lzo
verb 1
reneg-sec 0
crl-verify crl.pem
keepalive 10 120
EOF
To compare, this is the US East.ovpn file…
client
dev tun
proto udp
remote us-east.privateinternetaccess.com 1194
resolv-retry infinite
nobind
persist-key
persist-tun
ca ca.crt
tls-client
remote-cert-tls server
auth-user-pass
comp-lzo
verb 1
reneg-sec 0
crl-verify crl.pem
Now, we need to create a new firewall zone for this VPN connection. This is actually the same config as the WAN zone, but it’s easier to make a new zone in case we need to change anything in the future. Name the firewall zone, and substitute the network interface name you created above. We’ll also be forwarding LAN traffic to the VPN.
cat >> /etc/config/firewall << EOF
config zone
    option name 'VPN_FW'
    option input 'REJECT'
    option output 'ACCEPT'
    option forward 'REJECT'
    option masq '1'
    option mtu_fix '1'
    option network 'PIA_VPN'

config forwarding
        option dest 'VPN_FW'
        option src 'lan'
EOF
/etc/init.d/network restart
/etc/init.d/firewall restart
If you’d like, you can login to LuCI and see the new network interface, physical interface tun0, and firewall zone. Back on the command line, use the following command to start the VPN. Specify your generic configuration file and choose a server from PIA, as well as a port number.
openvpn --cd /etc/openvpn --config /etc/openvpn/piageneric.ovpn --remote us-east.privateinternetaccess.com 1194
If everything went well, you should see something like below, ending in Initialization Sequence Completed. If not, you did something wrong. Check your logs and start looking here.
root@mr3020_home:~# openvpn --cd /etc/openvpn --config /etc/openvpn/piag
eneric.ovpn --remote us-east.privateinternetaccess.com 1194
Sat Jan 24 13:16:20 2015 OpenVPN 2.3.6 mips-openwrt-linux-gnu [SSL (OpenSSL)] [LZO] [EPOLL] [MH] [IPv6] built on Jan  6 2015
Sat Jan 24 13:16:20 2015 library versions: OpenSSL 1.0.1k 8 Jan 2015, LZO 2.08
Sat Jan 24 13:16:20 2015 WARNING: file 'authuser' is group or others accessible
Sat Jan 24 13:16:20 2015 UDPv4 link local: [undef]
Sat Jan 24 13:16:20 2015 UDPv4 link remote: [AF_INET]64.237.51.174:1194
Sat Jan 24 13:16:21 2015 [Private Internet Access] Peer Connection Initiated with [AF_INET]64.237.51.174:1194
Sat Jan 24 13:16:24 2015 TUN/TAP device tun0 opened
Sat Jan 24 13:16:24 2015 do_ifconfig, tt->ipv6=0, tt->did_ifconfig_ipv6_setup=0
Sat Jan 24 13:16:24 2015 /sbin/ifconfig tun0 10.121.1.6 pointopoint 10.121.1.5 mtu 1500
Sat Jan 24 13:16:24 2015 Initialization Sequence Completed
Check ifconfig to see if you have a tunnel interface. If you do, that’s good!
tun0      Link encap:UNSPEC  HWaddr 00-00-00-00-00-00-00-00-00-00-00-00-00-00-00-00
          inet addr:10.121.1.6  P-t-P:10.121.1.5  Mask:255.255.255.255
          UP POINTOPOINT RUNNING NOARP MULTICAST  MTU:1500  Metric:1
          RX packets:78 errors:0 dropped:0 overruns:0 frame:0
          TX packets:102 errors:0 dropped:0 overruns:0 carrier:0
          collisions:0 txqueuelen:100
          RX bytes:10371 (10.1 KiB)  TX bytes:83342 (81.3 KiB)
Next, try to get on the internet. If you can’t, there’s a good chance it’s a DNS issue. To resolve this, we’ll set our DNS servers on this connection to use PIA’s DNS servers. It looks like we can set the DNS servers for a specific interface, so we’ll add them for the LAN interface.
uci add_list dhcp.lan.dhcp_option="6,209.222.18.222,209.222.18.218"
uci commit dhcp
/etc/init.d/network restart
Now we should have DNS working, and since we’re using PIA VPN and PIA DNS servers, we shouldn’t have any DNS leaks either. After all, what’s the point of a VPN if your DNS leaks?
Restart your VPN connection and try it again! Check your IP with an external tool, like WhatIsMyIP, both on your local wireless network, as well as the OpenWrt network. You should see the difference, meaning you are successfully connected!
Before (on my local network)…

After (VPNed in)…

Now is a good time to check for DNS leaks while on the VPN. Basically, we’re looking to make sure the server giving us our IP address is also providing DNS. If it’s not, then your ISP probably providing DNS, and they’re able to see every DNS request you make.

Note - Commenter Ben found that his DNS was still leaking when set on the LAN interface. He suggested setting it on the WAN interface, as seen in the comments.
Run at startup
If you’d like your VPN connection to run at startup, edit the /etc/rc.local file. Paste your connection string before exit 0. The ampersand tells OpenWrt not to output anything to the screen.
Before…
# Put your custom commands here that should be executed once
# the system init finished. By default this file does nothing.

exit 0
After…
# Put your custom commands here that should be executed once
# the system init finished. By default this file does nothing.
openvpn --cd /etc/openvpn --config /etc/openvpn/piageneric.ovpn --remote us-east.privateinternetaccess.com 1194 &
exit 0
Setup SAMBA
Next, we need to setup the SAMBA share by installing the SAMBA packages. You’ll need to search opkg for the correct version of SAMBA server.
opkg update
opkg list | grep -i samba
opkg install luci-app-samba samba36-server
/etc/init.d/samba enable
/etc/init.d/samba start
rm /tmp/luci-indexcache
Following the last step of this guide (thanks to commenter Ben for sending this in!), go to the Services dropdown, then select Network Shares. Under Samba, select a hostname.

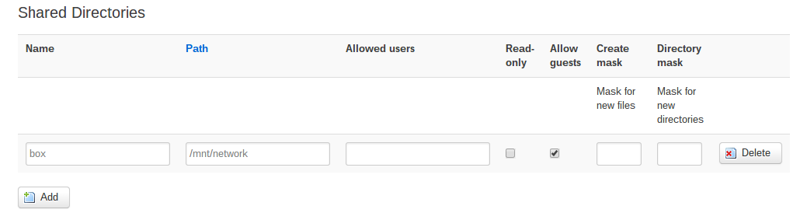
Then, under Shared Directories, select Add. Here, specify a share name and path (in our case, /mnt/network), and select Allow guests. If you don’t want guest access, you’ll need to setup users as described here. Press Save & Apply to continue.
Connect to your router’s wireless network, then, in your file manager (assuming you’re using Linux, since this is a ext4 SAMBA share), navigate to your share name (e.g., smb://openwrt/box/).
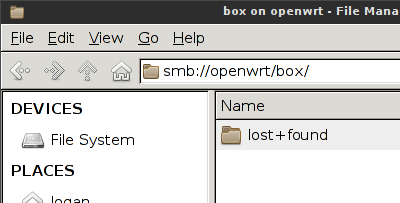
Note - Your distro may not have a SAMBA client installed. On Arch Linux, I needed the smbclient and gvfs-smb packages.
Setup alerting scripts
The whole point of this build was to create a connection that is always on and safe for you to use. But, what if the VPN tunnel goes down? You’d still be able to pass traffic, but it would be over the regular internet, not the encrypted VPN connection. There are a couple ways around this, including putting a route in that denies traffic when not on the VPN, as well as setting up alerting scripts to let you know when the tunnel goes down. Here, I’ll be doing the latter.
On the The OpenVPN 2.3 man page, there are options called --up and --down, which as they sound, run scripts when the VPN tunnel comes up or goes down. Basically, we’re going to create a script to email us when the tunnel comes up, and another script that will run when the tunnel goes down, but we still have internet access. Obviously, if the tunnel goes down as a result of the router being powered off or the WAN connection dying, the email isn’t going to work. We’re also going to implement a third script that will run out of root’s crontab to check for VPN connection status every 10 minutes.
Setup email
First, we need to install msmtp.
opkg update
opkg install msmtp
If it’s not set already, you need to set the msmtp config file to be R/W for your account only. It won’t function otherwise.
chmod 600 /etc/msmtprc
cp -p /etc/msmtprc /etc/msmtprc_old
We need an external STMP server that we can use to route messages through. Luckily, Google provides one for free if you have a Gmail account. Obviously, I would advise against using your primary Gmail account for this. Setting up a dedicated Gmail account just for this application only takes a few minutes and is worth it, in my opinion. Google’s SMTP settings are here, we’ll need them later.
Next, we’re going to edit the config file at /etc/msmtprc to include our information. There is some pretty good documentation for msmtp over at SourceForge, so I won’t bother going over all the options below. Substitute your new Gmail username and password below.
Before…
# Example for a system wide configuration file

# A system wide configuration file is optional.
# If it exists, it usually defines a default account.
# This allows msmtp to be used like /usr/sbin/sendmail.
account default

# The SMTP smarthost.
host mailhub.oursite.example

# Construct envelope-from addresses of the form "user@oursite.example".
#auto_from on
#maildomain oursite.example

# Use TLS.
#tls on
#tls_trust_file /etc/ssl/certs/ca-certificates.crt

# Syslog logging with facility LOG_MAIL instead of the default LOG_USER.
syslog LOG_MAIL
After…
account        default
tls            on
tls_certcheck  off
logfile        /etc/openvpn/msmtp.log

auto_from      on
auth           on
host           smtp.gmail.com
protocol       smtp
port           587
user           your_gmail_address@gmail.com
password       your_gmail_password

syslog         LOG_MAIL
Next, create three scripts in your /etc/openvpn folder and set permissions on them.
touch /etc/openvpn/vpndown.sh
touch /etc/openvpn/vpnup.sh
touch /etc/openvpn/vpncheck.sh
chmod 700 /etc/openvpn/vpndown.sh
chmod 700 /etc/openvpn/vpnup.sh
chmod 700 /etc/openvpn/vpncheck.sh
vpndown.sh
The only difference between the vpnup.sh script and vpndown.sh script are the words UP and DOWN in the STATUS variable in each script. Replace your recipients as needed.
#!/bin/ash
#2015-01-24
#Logan Marchione

STATUS=DOWN
HOSTNAME=`uci get system.@system[0].hostname`
RECIPIENT="recipient@address.com"
DAY=`date "+%A"`
DATE=`date "+%Y-%m-%d"`
TIME=`date "+%H:%M:%S"`

EMAIL='Subject: VPN '$STATUS' on '$HOSTNAME'
From: OpenWrt Monitor

As of '$DAY', '$DATE' at '$TIME' the VPN tunnel on '$HOSTNAME' is '$STATUS'.'

echo "$EMAIL" | msmtp -t $RECIPIENT
vpnup.sh
The only difference between the vpnup.sh script and vpndown.sh script are the words UP and DOWN in the STATUS variable in each script. Replace your recipients as needed.
#!/bin/ash
#2015-01-24
#Logan Marchione

STATUS=UP
HOSTNAME=`uci get system.@system[0].hostname`
RECIPIENT="recipient@address.com"
DAY=`date "+%A"`
DATE=`date "+%Y-%m-%d"`
TIME=`date "+%H:%M:%S"`

EMAIL='Subject: VPN '$STATUS' on '$HOSTNAME'
From: OpenWrt Monitor

As of '$DAY', '$DATE' at '$TIME' the VPN tunnel on '$HOSTNAME' is '$STATUS'.'

echo "$EMAIL" | msmtp -t $RECIPIENT
Now, edit the /etc/openvpn/piageneric.ovpn file. Here, we’ve added the up and down options and specified the appropriate scripts. We’ve also added the up-restart option, which allows scripts to be called for restarts as well as initial program start. Finally, I’ve set script-security level to 2, which allows calling of built-in executables and user-defined scripts.
client
dev tun
proto udp
resolv-retry infinite
nobind
persist-key
persist-tun
ca ca.crt
tls-client
remote-cert-tls server
auth-user-pass authuser
auth-nocache
comp-lzo
verb 1
up vpnup.sh
down vpndown.sh
script-security 2
up-restart
reneg-sec 0
crl-verify crl.pem
keepalive 10 120
vpncheck.sh
This script calls ifconfig and looks for an adapter called tun0. If your adapter name is different, replace it as needed. Replace the line that starts the VPN manually (the same command we used earlier) with your connection string.
#!/bin/ash
#2015-01-24
#Logan Marchione

RESULT=`ifconfig | awk '/^tun0/ {print $1;}'`
DATETIME=`date "+%Y-%m-%d %H:%M:%S"`

if [ "$RESULT" == tun0 ]
then
	echo "$DATETIME - No restart needed" >> vpncheck.log&
else
	echo "$DATETIME - Restart needed, see below" >> vpncheck.log&
	openvpn --cd /etc/openvpn --config piageneric.ovpn --remote us-east.privateinternetaccess.com 1194 >> vpncheck.log&
fi
The vpncheck.sh script will need to run on a schedule, and for that, we’ll be using cron. First, we need to make a file for root’s crontab and then start crontab.
touch /etc/crontabs/root
/etc/init.d/cron start
/etc/init.d/cron enable
If you check logs…
logread
…you should see that cron was started.
Sat Jan 24 14:17:04 2015 cron.info crond[1526]: crond: crond (busybox 1.22.1) started, log level 5
Then, add your entry to crontab. Use the schedule below to setup your job.
#Crontab Schedule
# +---------------- minute (0 - 59) *=all
# |  +------------- hour (0 - 23) *=all
# |  |  +---------- day of month (1 - 31) *=all
# |  |  |  +------- month (1 - 12) *=all
# |  |  |  |  +---- day of week (0 - 6) (Sunday=0) *=all
# |  |  |  |  |
# *  *  *  *  * command to be executed
# -- -- -- -- - ---------------------------------
# 00 12 *  *  * some_command        # will run some_command at 12:00 (noon) daily

#Run VPN check to check for tunnel up/down
10 * * * * /etc/openvpn/vpncheck.sh > /etc/openvpn/vpncheck.log
Finally, restart cron for the changes to take effect.
/etc/init.d/cron restart
Once everything is updated, reboot your MR3020 one final time.
Test alerting scripts
vpndown.sh
Assuming your VPN is already up, use ps | grep openvpn to find and kill the OpenVPN process ID.
root@mr3020_home:~# ps | grep openvpn
  911 root      3436 S    openvpn --cd /etc/openvpn --config /etc/openvpn/piageneric.ovpn --remote us-east.privateinternetaccess.com 1194
root@mr3020_home:~# kill 911
root@mr3020_home:~# ps | grep openvpn
 1380 root      1356 S    grep openvpn
After you kill it, grep again and you should see that OpenVPN isn’t running. In a minute or so, you should you get an email alerting you that the VPN tunnel is down.

vpnup.sh
Now, start the VPN manually (using the same command we used earlier to test).
openvpn --cd /etc/openvpn --config /etc/openvpn/piageneric.ovpn --remote us-east.privateinternetaccess.com 1194 &
Here, you’ll see the output from OpenVPN starting, and you should see the script vpnup.sh running.
root@mr3020_home:~# openvpn --cd /etc/openvpn --config /etc/openvpn/piag
eneric.ovpn --remote us-east.privateinternetaccess.com 1194 &
root@mr3020_home:~# Sat Jan 24 13:56:03 2015 OpenVPN 2.3.6 mips-openwrt-linux-gnu [SSL (OpenSSL)] [LZO] [EPOLL] [MH] [IPv6] built on Jan  6 2015
Sat Jan 24 13:56:03 2015 library versions: OpenSSL 1.0.1k 8 Jan 2015, LZO 2.08
Sat Jan 24 13:56:03 2015 WARNING: file 'authuser' is group or others accessible
Sat Jan 24 13:56:03 2015 NOTE: the current --script-security setting may allow this configuration to call user-defined scripts
Sat Jan 24 13:56:03 2015 UDPv4 link local: [undef]
Sat Jan 24 13:56:03 2015 UDPv4 link remote: [AF_INET]64.237.52.133:1194
Sat Jan 24 13:56:05 2015 [Private Internet Access] Peer Connection Initiated with [AF_INET]64.237.52.133:1194
Sat Jan 24 13:56:08 2015 TUN/TAP device tun0 opened
Sat Jan 24 13:56:08 2015 do_ifconfig, tt->ipv6=0, tt->did_ifconfig_ipv6_setup=0
Sat Jan 24 13:56:08 2015 /sbin/ifconfig tun0 10.150.1.10 pointopoint 10.150.1.9 mtu 1500
Sat Jan 24 13:56:08 2015 vpnup.sh tun0 1500 1542 10.150.1.10 10.150.1.9 init
Sat Jan 24 13:56:12 2015 Initialization Sequence Completed
Again, in a minute or so, you should you get an email alerting you that the VPN tunnel is up.

vpncheck.sh
This is easy to test. Kill your OpenVPN process and wait until the vpncheck.sh script runs out of crontab. Then, you should see your tunnel come back up and get an email about it.
Extras
Backup your config
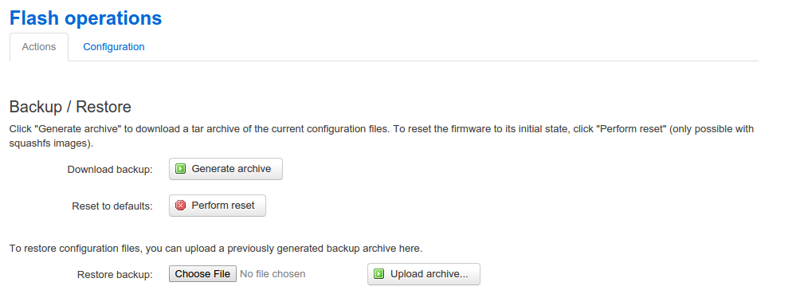
You did all this work, don’t lose it. Go to the System dropdown, then select Backup/Flash Firmware and press Generate Archive to download a backup of all your configuration files. I don’t believe this backs up custom scripts/files, so keep that in mind.
Failsafe mode
At some point during this build, you’ll probably break something and lock yourself out of your router. Thankfully, you’re not left with a paper-weight. OpenWrt includes a failsafe mode that will let you telnet to your router. Steps for the MR3020 are below.
- Power off your MR3020 and connect it to your PC via Ethernet
- Set your PC’s IP to 192.168.1.2 with a subnet of 255.255.255.0 and a gatway of 192.168.1.1
- Plug in the power to the MR3020
- When the WPS button starts to flash, slide the switch labeled 3G/4G/WISP/AP back and forth really fast. At this point, the WPS button will start blinking faster than it was before. You are in failsafe mode.
- Connect to the router via telnet and you should see that you are in failsafe mode.
logan@fedora20 ~$ telnet 192.168.1.1
Trying 192.168.1.1...
Connected to 192.168.1.1.
Escape character is '^]'.
 === IMPORTANT ============================
  Use 'passwd' to set your login password
  this will disable telnet and enable SSH
 ------------------------------------------


BusyBox v1.22.1 (2014-09-20 22:01:35 CEST) built-in shell (ash)
Enter 'help' for a list of built-in commands.

  _______                     ________        __
 |       |.-----.-----.-----.|  |  |  |.----.|  |_
 |   -   ||  _  |  -__|     ||  |  |  ||   _||   _|
 |_______||   __|_____|__|__||________||__|  |____|
          |__| W I R E L E S S   F R E E D O M
 -----------------------------------------------------
 BARRIER BREAKER (14.07, r42625)
 -----------------------------------------------------
  * 1/2 oz Galliano         Pour all ingredients into
  * 4 oz cold Coffee        an irish coffee mug filled
  * 1 1/2 oz Dark Rum       with crushed ice. Stir.
  * 2 tsp. Creme de Cacao
 -----------------------------------------------------
- Now, you should be able to change your password by entering passwd, but you may get an error about the filesystem being read-only, like below.
passwd: /etc/passwd: Read-only file system
passwd: can't update password file /etc/passwd
-
If that happens, enter mount_root, then try the passwd command again. At this point, you should be able to SSH into the MR3020.
-
If you installed too many packages and filled up the filesystem, you can wipe it and do a factory reset with the command below.
firstboot
- Reboot the router, as below.
reboot -f
-
Try to SSH in. If it doesn’t work (mine didn’t), telnet in again, set your password again, and then try SSH again.
-
If you want to transfer a new firmware file to the router, you can do that with the SCP utility on your PC.
scp /path/to/file.bin root@192.168.1.1:/path/to/file.bin
- Then, flash the new firmware file with the command below.
sysupgrade -v /path/to/file.bin
HTTPS Support
Out of the box, LuCI does not support HTTPS. For that, you’ll need a couple packages.
opkg update
opkg install luci-ssl uhttpd-mod-tls
First, backup the original /etc/config/uhttpd file. Then, edit the file to change your certificate settings as needed.
cp -p /etc/config/uhttpd /etc/config/uhttpd_old
vi /etc/config/uhttpd
Before…
config cert 'px5g'
        option days '730'
        option bits '1024'
        option country 'DE'
        option state 'Berlin'
        option location 'Berlin'
        option commonname 'OpenWrt'
After…
config cert 'px5g'
        option days '730'
        option bits '2048'
        option country 'US'
        option state 'Pennsylvania'
        option location 'Pennsylvania'
        option commonname '10.80.1.1'
Once you have your certificate setup, restart the webserver.
/etc/init.d/uhttpd restart
You should see a message similar to the one below.
Generating RSA private key, 2048 bit long modulus
Generating selfsigned certificate with subject 'C=US;ST=Pennsylvania;L=Pennsylvania;CN=10.80.1.1;' and validity 20141021000526-20161020000526
If you navigate to /etc, you should see a certificate and a key file.
-rw-r--r-- 1 root     root           828 Oct 20 20:50 /etc/uhttpd.crt
-rw-r--r-- 1 root     root          1192 Oct 20 20:50 /etc/uhttpd.key
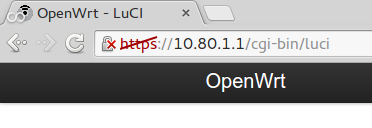
Open your browser, and instead of going to http://10.80.1.1, go to https://10.80.1.1. If you get a scary looking error message, that’s ok. Click Advanced.
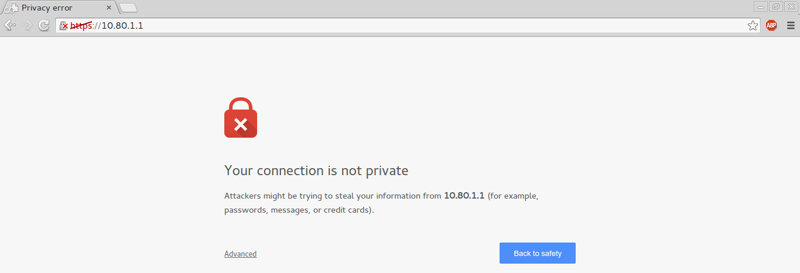
Then, proceed to your site.
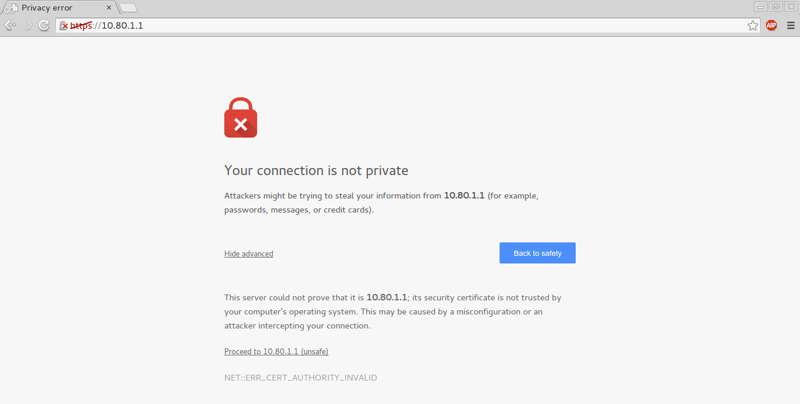
In the URL bar, you’ll still probably see some intimidating red error message.
Upon further inspection, we can see this error is because the certificate wasn’t generated by a trusted CA (Thawte, Symatec, etc…).

If you inspect the actual certificate, you can see it’s the certificate we created, so you know it can be trusted.

That’s it! I’ll be tweaking this guide as I go, but let me know if anything is incorrect or missing. Also, a couple useful posts and sources I used when stuck are located here, here, and here.
-Logan
Comments
Old comments from WordPress (rev1)
