Introduction
With the winter weather, we’ve been having brownouts and power losses more frequently. I wanted to purchase a UPS to protect my equipment from this, but I also wanted to receive alerts when the power goes out, and possibly shutdown equipment. For this, I need an Uninterruptible Power Supply (UPS) and a computer to monitor it with.
Hardware
As you guessed by now, I’m going to be using my Raspberry Pi to monitor the UPS. I’m using the Raspberry Pi because it is a low power device, it is always on (hosting a webserver, Unifi controller, and a few other things), and can be run off the UPS it is monitoring.
The UPS I’m using is a CyberPower CP1500PFCLCD, specifically, this one. A crucial factor in choosing a UPS is whether you need Pure Sine Wave or Simulated Sine Wave. This decision is based off of the type of power supply in the equipment you’re protecting. Power supplies that use Active Power Factor Correction (Active PFC) typically require Pure Sine Wave, which is shown on the left. Simulated Sine Wave, shown on the right, mimics Pure Sine Wave and is typically cheaper. However, during a switchover to battery power, Simulated Sine Wave has a momentary gap in power (shown in the red circle). During this time, no power is being sent, and Active PFC power supplies may shutdown (which defeats the purpose of the UPS in the first place). In my case, I was happy to be safe instead of sorry, and went for the Pure Sine Wave UPS.


Disclaimer - I am not an electrical engineer ;-)
Software
I need some way to monitor the status of the UPS and act on it if a certain threshold is reached. CyberPower provides software called PowerPanel Personal that runs on Windows, Mac, and Linux. However, it has its limits and cannot be used with anything other than CyberPower devices. Instead, I’m going to be using the Network UPS Tools (NUT) suite. NUT has many advantages over vendor-specific software:
- Open source, all available on GitHub
- Supports serial, USB, and network monitoring
- Supports Windows, Mac, Linux, Unix, BSD, etc…
- Implements a client/server architecture
Configuration
The NUT suite consists of three components:
- driver - connects to and communicates with the UPS
- server - monitors the UPS status
- client - sends/receives information from the server
The NUT suite offers a variety of configurations. In my case, I’m using the “simple” configuration, also known as standalone. It consists of one UPS and one computer which runs the driver, server, and client. This is the minimum setup needed.

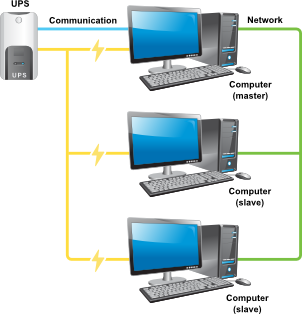
However, you can setup a more advanced configuration consisting of a “master” computer that runs the driver, server, and client, but also have clients running on one or more separate “slave” computers. With this configuration, the master shuts down last, giving the slaves time to shutdown first.
Driver setup
First, connect your UPS to your Raspberry Pi via the included USB cable. Verify you can see it with lsusb.
--> lsusb
Bus 001 Device 005: ID 0764:0501 Cyber Power System, Inc. CP1500 AVR UPS
Next, we need to install the NUT suite. Just a warning, the systemd service will fail to start until we make a configuration file.
sudo apt-get update && sudo apt-get install nut nut-client nut-server
Over on NUT’s compatibility database, you can see which driver to use for the CP1500PFCLCD (in my case, it was usbhid-ups). Edit the configuration file at /etc/nut/ups.conf and add the following information at the bottom. The friendly name (e.g., cyberpower1) must be one word, no spaces.
[cyberpower1]
        driver = usbhid-ups
        port = auto
        desc = "CyberPower CP1500PFCLCD"
Now, start the driver service (this is the same as running upsdrvctl start) and check the status. If it doesn’t start (mine didn’t), a quick reboot will solve the problem.
sudo systemctl start nut-driver
sudo systemctl status nut-driver
You should see something like this when checking the status.
Feb 09 22:05:00 rpi01 upsdrvctl[962]: Using subdriver: CyberPower HID 0.3
Feb 09 22:05:00 rpi01 upsdrvctl[962]: Network UPS Tools - Generic HID driver 0.38 (2.7.2)
Feb 09 22:05:00 rpi01 upsdrvctl[962]: USB communication driver 0.32
Feb 09 22:05:01 rpi01 upsdrvctl[962]: Network UPS Tools - UPS driver controller 2.7.2
Feb 09 22:05:01 rpi01 usbhid-ups[964]: Startup successful
Server setup
Next, we’ll setup the server. Edit the configuration file at /etc/nut/upsd.conf and add a LISTEN directive.
LISTEN 127.0.0.1 3493
Now, we need to add users to access the server. Edit the configuration file at /etc/nut/upsd.users. Here, I’m adding an admin user and a master user.
[admin]
        password = admin1
        actions = SET
        instcmds = ALL
[upsmon_local]
        password  = local1
        upsmon master
Next, we need to set the server to run. Edit the configuration file at /etc/nut/nut.conf to set the mode.
MODE=standalone
Finally, start the server service (this is the same as running upsd) and check the status.
sudo systemctl start nut-server
sudo systemctl status nut-server
You can test the connection via localhost (replace cyberpower1 with the friendly name of your UPS).
sudo upsc cyberpower1@localhost
If it worked, you should see something like this.
Init SSL without certificate database
battery.charge: 100
battery.charge.low: 10
battery.charge.warning: 20
battery.mfr.date: CPSlocalhost
battery.runtime: 9450
battery.runtime.low: 300
battery.type: PbAcid
battery.voltage: 16.0
battery.voltage.nominal: 24
device.mfr: CPS
device.model: CP1500PFCLCD
device.serial: 000000000000
device.type: ups
driver.name: usbhid-ups
driver.parameter.pollfreq: 30
driver.parameter.pollinterval: 2
driver.parameter.port: auto
driver.version: 2.7.2
driver.version.data: CyberPower HID 0.3
driver.version.internal: 0.38
input.transfer.high: 139
input.transfer.low: 88
input.voltage: 119.0
input.voltage.nominal: 120
output.voltage: 136.0
ups.beeper.status: disabled
ups.delay.shutdown: 20
ups.delay.start: 30
ups.load: 2
ups.mfr: CPS
ups.model: CP1500PFCLCD
ups.productid: 0501
ups.realpower.nominal: 900
ups.serial: 000000000000
ups.status: OL
ups.test.result: No test initiated
ups.timer.shutdown: -60
ups.timer.start: -60
ups.vendorid: 0764
Client setup
Since I’m using the standalone setup, I can make all my connections on localhost. Edit the configuration file at /etc/nut/upsmon.conf and add the connection string, using the master user you created earlier.
MONITOR cyberpower1@localhost 1 upsmon_local local1 master
Ensure your ownership and permissions are correct.
sudo chown root:nut /etc/nut/*
sudo chmod 640 /etc/nut/*
Then, start the client service (this is the same as running upsmon) and check the status.
sudo systemctl start nut-monitor
sudo systemctl status nut-monitor
You can test the connection via localhost (replace cyberpower1 with the friendly name of your UPS).
sudo upsc cyberpower1@localhost
Web monitoring (Nginx)
Assuming you have Nginx installed, you can monitor NUT from the master client via a browser. It’s easier to do this with Apache, but I prefer Nginx. However, unlike Apache, Nginx doesn’t have built in support for executing CGI scripts, so a helper application is needed to handle dynamic content. In this case, that package is fcgiwrap.
sudo apt-get update && sudo apt-get install nut-cgi fcgiwrap
Edit the configuration file at /etc/nut/hosts.conf and add the following line (replace cyberpower1 with the friendly name of your UPS).
MONITOR cyberpower1@localhost "CyberPower CP1500PFCLCD"
Then, add the necessary location to your Nginx configuration file (this will obviously vary a bit for everyone).
server {
...
        location /nut {
        alias /usr/share/nut/www/;
        try_files $uri $uri/ /index.html;
        }

        location /cgi-bin/ {
                gzip off;
                root /usr/lib;

                include fastcgi_params;
                fastcgi_pass unix:/var/run/fcgiwrap.socket;
                fastcgi_param SCRIPT_FILENAME  $document_root$fastcgi_script_name;
        }
...
}
Change ownership of the CGI files and start/restart the necessary services.
sudo chmod 644 /etc/nut/hosts.conf
sudo chmod 644 /etc/nut/*.html
sudo chown www-data:www-data /usr/lib/cgi-bin/nut/*.cgi
sudo systemctl restart fcgiwrap.service
sudo systemctl restart fcgiwrap.socket
sudo systemctl restart nginx
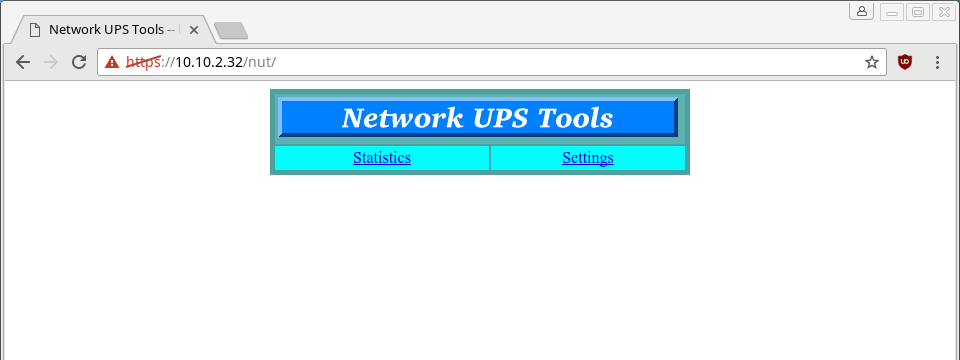
Then, visit your stats page at http://<your_IP>/nut

If you want to visit the settings/admin page, you will need to edit the configuration file at /etc/nut/upsset.conf and uncomment the line below. You can then login with the admin username/password we set earlier.
###I_HAVE_SECURED_MY_CGI_DIRECTORY
Email alerting
Email setup
Because most ISPs block port 25 (SMTP), we need an external STMP server that we can use to route messages through. Luckily, Google provides one for free if you have a Gmail account. Google’s SMTP settings are here, we’ll need them later. A few protips for this:
- Obviously, I would advise against using your primary Gmail account for this. Setting up a dedicated Gmail account just for this application only takes a few minutes and is worth it, in my opinion.
- If you use 2FA, use an app password instead of your Gmail password.
- You will also need to Allow less secure apps in your Settings.
Start by installing msmtp, a send-only SMTP server that will relay email through Gmail. I chose msmtp over sSMTP because msmtp has sendmail compatibility and sSMTP hasn’t been updated since 2011.
sudo apt-get update && sudo apt-get install msmtp
Next, we’re going to edit the configuration file at /etc/msmtprc to include our information. Substitute your new Gmail username and password below.
# Accounts will inherit settings from this section
defaults
auth            on
tls             on
tls_certcheck   on
tls_trust_file  /etc/ssl/certs/ca-certificates.crt

account   default
host      smtp.gmail.com
protocol  smtp
port      587
from      your_email@gmail.com
user      your_email@gmail.com
password  your_app_password
Send a test email to yourself to make sure it works.
printf "Subject: Test Mail\n\nThis is a test mail" | msmtp email@domain.com
Alerting setup
Edit the configuration file at /etc/nut/upsmon.conf and add the following information. Adjust your alerts accordingly.
NOTIFYCMD /etc/nut/notifycmd.sh
NOTIFYFLAG ONLINE     SYSLOG+WALL+EXEC
NOTIFYFLAG ONBATT     SYSLOG+WALL+EXEC
NOTIFYFLAG LOWBATT    SYSLOG+WALL+EXEC
NOTIFYFLAG FSD        SYSLOG+WALL+EXEC
NOTIFYFLAG COMMOK     SYSLOG+WALL+EXEC
NOTIFYFLAG COMMBAD    SYSLOG+WALL+EXEC
NOTIFYFLAG SHUTDOWN   SYSLOG+WALL+EXEC
NOTIFYFLAG REPLBATT   SYSLOG+WALL+EXEC
NOTIFYFLAG NOCOMM     SYSLOG+WALL+EXEC
NOTIFYFLAG NOPARENT   SYSLOG+WALL
Next, create the script at /etc/nut/notifycmd.sh.
sudo touch /etc/nut/notifycmd.sh
sudo chown root:nut /etc/nut/*
sudo chmod 755 /etc/nut/notifycmd.sh
Then, edit it as necessary.
#!/bin/bash
EMAIL='email@domain.com'
printf "Subject: NUT ALERT: $NOTIFYTYPE\n\nUPS: $UPSNAME\r\nAlert type: $NOTIFYTYPE" | msmtp $EMAIL
Finally, cycle the services.
sudo systemctl restart nut-driver
sudo systemctl restart nut-server
sudo systemctl restart nut-monitor
Testing
Test your email alerts by unplugging the USB cable from the Raspberry Pi and plugging it back in. This action will trigger the COMMBAD and COMMOK flags, which we’ve set to write to the syslog, wall, and execute our script.
You can check the syslog, as shown below.
grep ups /var/log/syslog
You should get a message on any SSH sessions you have open, since we specified to use a wall message.
Broadcast message from nut@rpi01 (somewhere) (Fri Feb 24 21:59:16                                                                     2017):

Communications with UPS cyberpower1@localhost lost


Broadcast message from nut@rpi01 (somewhere) (Fri Feb 24 21:59:21                                                                     2017):

Communications with UPS cyberpower1@localhost established
You should also get an email for each action.

Caveat
In our setup, upsmon calls our script directly, every time an event takes place.
----------       ------------------------
| upsmon | ----> | calls your CMDSCRIPT |
----------       ------------------------
The main caveat with this setup is that you may get a notification storm. If the weather is bad and the power goes in and out repeatedly, you’ll get a notification for each event. To mitigate this, NUT has another program called upssched that can call our script, after a specific interval has passed.
----------       ------------------       ------------------------
| upsmon | ----> | calls upssched | ----> | calls your CMDSCRIPT |
----------       ------------------       ------------------------
Using upssched, we can call our script after the UPS has been on battery for 30 seconds, instead of right away. Then, if the power goes back on in 20 seconds, you can cancel the timer. I haven’t set this up yet, but I’m working on it.
Tweaks
After a few days, I noticed I was receiving constant storms of COMMBAD/NOCOMM/COMMOK, even though the power wasn’t going out. After some Google-ing, I stumbled across this article with a solution (copied out below).
Edit the configuration file at /etc/nut/ups.conf and add a poll interval.
[cyberpower1]
 driver = usbhid-ups
 port = auto
 desc = "CyberPower CP1500PFCLCD"
 pollinterval = 15
Edit the configuration file at /etc/nut/upsmon.conf and add DEADTIME.
DEADTIME 25
Edit the configuration file at /etc/nut/upsd.conf and add MAXAGE.
MAXAGE 25
Finally, cycle the services.
sudo systemctl restart nut-driver
sudo systemctl restart nut-server
sudo systemctl restart nut-monitor
Apache
Because I didn’t have Apache instructions, someone was nice enough to email me an Apache configuration for this. Thanks Kara!
<VirtualHost *:80>
      Alias /nut /usr/share/nut/www
      ScriptAlias /cgi-bin /usr/lib/cgi-bin
      <Directory "/usr/lib/cgi-bin">
            AddHandler cgi-script .py
            AllowOverride None
            Options +ExecCGI -MultiViews +SymLinksIfOwnerMatch
            Order allow,deny
            Allow from all
      </Directory>
</VirtualHost>
Let me know how this works for you!
-Logan
