
Introduction
Put on your tinfoil hats, boys and girls! Today, we’re talking about security, encryption, and GPG!
PGP vs OpenPGP vs GPG
PGP
Pretty Good Privacy (PGP) was a program created to encrypt/decrypt data in 1991 by Phil Zimmermann. Zimmermann formed PGP Incorporated, which was acquired serveral times and is now owned by Symantec.
Fun fact - in 1993 the US government charged Zimmerman with “munitions export without a license”. At the time, cryptography systems with keys over 40 bits were considered a weapon, and since PGP used 128 bit keys, Zimmerman was in violation of the law. However, Zimmerman was able to circumvent this by publishing the entire source code of PGP in a physical book (that could be scanned with OCR and recompiled into source code), since the export of books was protected by the First Amendment. Today, PGP is no longer considered a weapon, but still cannot be exported to a specific list of individuals/countries.
OpenPGP
Because of PGP’s importance, Zimmermann decided that an open standard needed to be created so that others could write/use code that would interact with PGP. In 1997, Zimmermann proposed to the Internet Engineering Task Force (IEFT) the standard called OpenPGP. The current standard is RFC 4880. Today, any programs that use the OpenPGP standard (like PGP and GPG) will be cross-compatible.
GPG
GNU Privacy Guard (GnuPG or GPG), now part the GNU Project, was created by Werner Koch in 1997. It was designed to be an open source, OpenPGP compatible version of PGP. GPG became the de facto standard encryption software, powering almost all of the underlying encryption software that world and web depended on. However, since its creation, it has been maintained almost single-handedly by Koch, who relied only on donations and limited funding from the German government. In fact, Koch only earned an average of about $25k per year working full time on GPG, all while supporting a wife and daughter. In February 2015, ProPublica published an article outlining Koch’s labor of love with GPG. After the article went viral, Koch received over $137k in donations from users, $60k from the Linux Foundation, and recurring donations of $50k per year from both Facebook and Stripe. With the money, Koch was able to hire a full-time developer and continue work on GPG.
Public vs private keys
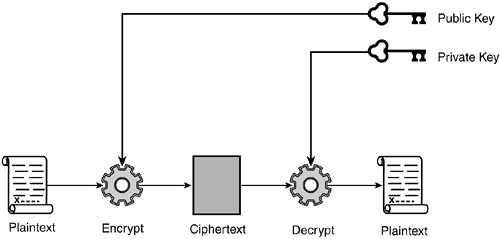
This is a very quick lesson in public key cryptography, which is used by PGP and GPG. You first generate a public and private key using a program on your computer. These keys are mathematically related, but you cannot derive one from the other. You should make your public key public (anyone can see it), but keep your private key private (only you can see it).
You can encrypt a message with either key, then decrypt it with the other. The choice of which to use depends on the scenario, as seen below.
Encryption
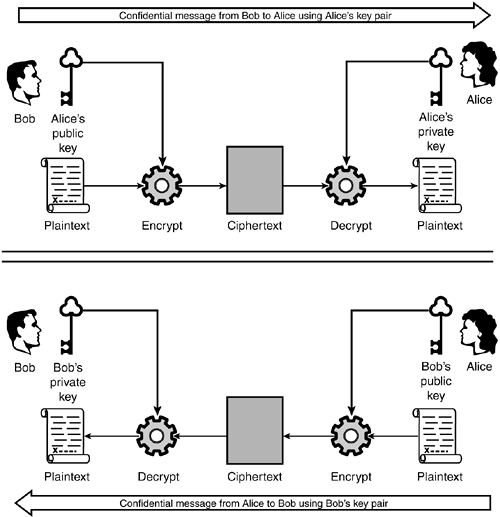
If you want to send an encrypted message to someone, you would encrypt it using their public key. When they receive the message, it can only be decrypted by their private key.
In the example below, you can see that in order for Alice to receive a message from Bob, Bob must encrypt it using Alice’s public key. Then, only Alice can decrypt it, since she is the only one with access to her private key.
Verification/digital signature
If someone wants to verify a message is coming from you, and hasn’t been tampered with, encrypt a message with your private key.

When they receive the message, it can only be decrypted by your public key. This proves you are who you say you are and that the message hasn’t been tampered with.
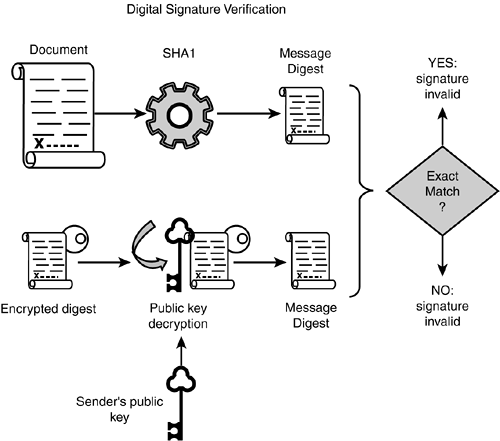
Note - In the image above, the outcome of “Exact Match?” for “Yes” should not read invalid. Thanks to commenter XiaoKe for pointing that out!
Install GPG
There are three main branches of GPG:
- Classic - Currently on version 1.4. It is usually built on older Unix systems, has almost no dependencies, but is very limited in features.
- Stable - Currently on version 2.0. It is modular, and supports OpenPGP, S/MIME, and SSH.
- Modern - Currently on version 2.1. It is the newest version, supports elliptic-curve cryptography, and will eventually replace the Stable branch.
In Arch Linux, you can install GPG with the command below.
sudo pacman -S gnupg
The gnupg package will also install pinentry, a collection of simple PIN or passphrase entry dialog boxes which GPG uses.
Note - In Arch Linux, the executable can be called from the command line with gpg, but some distributions will require you to use gpg2 instead.
Important!
You can replace your-key-id in this document with your short key ID, long key ID, fingerprint, or email address. GPG is pretty flexible in allowing this, and I usually use my email for this option.
You may also see --armor in various GPG commands. Normally, GPG output is binary and can be corrupted by other programs (e.g., email clients, word processors, etc..). To circumvent this, you can use --armor to create ASCII-armor encrypted output that can be safely used by other programs.
Generate a key pair
Using GPG, generate a key using the command below.
gpg --gen-key
Alternately, you can use the extended version of --gen-key, which uses a wizard to guide you through the process, offering non-standard options. This is the option I’ll be using.
gpg --full-gen-key
First, select what type of key you want. Typically, you’ll want option 1 (RSA and RSA).
Second, specify the key size. The default is 2048 bits, but I’m going to specify 4096 bits. There is some discussion about whether anything larger than 2048 bits is more secure.
Third, choose an expiration date. I’m going to choose a key that does not expire.
Now, GPG will construct your identity. Enter your full name, email address, and a comment (optional). Verify your information, then create a password to protect your keys. It goes without saying, but PROTECT THIS PASSWORD AND KEYFILES!
Generate a revocation certificate
I highly recommend you generate an revocation certificate. This is used in the event that your key is lost, stolen, or somehow compromised. This should be done in advance, do not wait until after your key has been compromised.
gpg --gen-revoke --output=RevocationCertificate.asc your-key-id
This key should be protected as well as your GPG keys, since anyone who has access to key can essentially render your key obsolete (then impersonate you with a new key). Some users recommend printing this key as a backup fail-safe, since it is relatively short, and can be manually retyped if needed.
Generating a key fingerprint
A key fingerprint is a 40 character, SHA-1 hashed version of your key. This is used to quickly verify a key, since it’s quicker than checking the entire key (which could be thousands of characters long). You can find your key fingerprint with the command below.
gpg --fingerprint your-key-id
Using a key fingerprint
Having a key fingerprint doesn’t mean anything by itself, but it does help to identify yourself. For example, I can publish my public key and fingerprint on this blog, but how can you trust that its really my key? You may know me personally, you may have watched me publish it, but what if you don’t?
Take the following scenario as an example. You could import my public key (from a keyserver or a file), generate a fingerprint of that key, then either call/email/IM/meet me and have me read back my fingerprint, generated from my private key. If the fingerprint you generated is the same as the fingerprint I’m reading you, then you can at least assume I have control of the key (whether or not I acquired it genuinely is yet to be determined).
Export your public key
A public key is no good if no one knows about it. You should try to publish your public key and fingerprint anywhere possible, including a domain/site you control (blog, Facebook, Twitter etc…).
Manually
Use the command below to export your public key.
gpg --armor --export your-key-id
When published, your key should look something like this (below is my public key). The --BEGIN-- and --END-- stanzas are part of the key, do not forget them!
-----BEGIN PGP PUBLIC KEY BLOCK-----
Version: GnuPG v2

mQINBFaDTpoBEACsRFbwH6qQGfpScwGjf5K5pK6Wbp4w+lK0GZBfWDc3jN4DqhhE
pPUITT7zv5qazJEqZL17QM5ZgYxwuC5DYqrdOxUrM8H0n01OqaxP60ajE8DPjt5r
dSS9o8M7WyEWn7hW28+POkPKY4+R/8A1DiH8dHYeHvx6S7LlETNDgyi0UmRA8gCL
Dsbywd9cCX3wNTNBH2/dlUuHL33TlQZ5EQdER6rb8o1QtBaHieApFbcsGBQpNJ2x
7tDhheLCO0ybW2HrllW9oqvSU9EiiAlaEQG3NvVo31fEWyT9Rj4Lucdsp8yWinJj
j3RiWxCRtXITE5DkBPNd8MbPaAmF2x3nOsTNjaCHuajfC5p6XfX+9fhyqLmihwpt
B8cGh3Et8QQov7mfG44rp2jf9i1Ba0Ghgc6yRrCx2+0fRiajD1kUVt0LcrEVIHL1
5/IJuVs3L6VfjWOtkEcBUNEvTN4X9migPsmymggPDQ0PTbs2ne8S5T/lZxtNHC+z
qF5xjK3AULS2jIGzwML2BfiLZy2UvJQ4qYEwEJAc7N8PtXaspomGjTAPoh+QSDmR
ZtesX53sUwHncA2KZbkqxUAFXlrZ4nJK3a3pKasv5FirvPTng4bV4gd6EjZXpgRi
zO0ap/+g+9Ebs+ecH2gZaKk6se3XuAxRCD8Yu/KwYZNCJmjWEFFriiAEkQARAQAB
tCpMb2dhbiBNYXJjaGlvbmUgPGxvZ2FuQGxvZ2FubWFyY2hpb25lLmNvbT6JAjcE
EwEIACEFAlaDTpoCGwMFCwkIBwIGFQgJCgsCBBYCAwECHgECF4AACgkQt62lSxyM
SycrLg//VVDsGiwwTBmwGTQU5ciJQjeUtjusJvjIga4H9VLOrLRiSljWG02queoE
cihx1Dtvo3bR/tyXFMt6LCqlpbP+iBLnIyOzMwJfsWQvyqQOVRI/2mX+VVOxfbO2
6RvNQuK+GFayLXtV2QNeyOLKbASjAJ7PUB3q5sh3uhwy8Cs5haLu5G99vXIWoVDV
mtluW97bamK8udA6TMlqVb4+r9wE9cMxeiQeH6lhnuvRospTUI4D4+zAf1kPvOWS
RAe85waCuLiqqkmIVaoOkcSw3Ml76mRT9LkxtSQKDr3rPV70kS1pmovxrn2uXRt2
ok1iN2R4duRs3K/fhlTIXS+sU8Qa2PdQq4Rq9+G2y2xG3TiPYQwKpnD6/H/4fboB
yWLyYT8agBxyEPAtk6+hgSbivSPUuhyAncYKdJrDjKsjB0dNHBegAqSv5vdyhWxx
q39+QC0WiRWfYZQ2h9UYq9nfui+bjlX9gPXs2GpRE71BBImG4Mq2/GzNhwVeqflj
TBQShblWoI/1MLQHF7Ek+n6UuxXp5QY077VVV4ioy1T949zBOxf2l9Bf+RERf5VU
RkDxSfJBBLECDf3SA4zrat2HxDRBv1ZSFLmPKBlBN5ehLRJWL21OKO/4EYfHBwYS
hUDv2XKmTohZ+WP/4y5BXdrkaXsCguSKIjRl8wohpBJjFwxbhMS5Ag0EVoNOmgEQ
AKrDlvQi6pugG2WmtMe2QJmL1yAcsUiexVFYcgUd3uFsWCHNQGOSp/XgH2Pqx4ae
XjwozdlosT2t2WHzbyH7iAb4YW2mx212NEVQOi4b38MXlnDK8ZuGXVKSDq+Tflss
VXkeNtAVK4dqLKxAqWymq23Ug7NObwLOmfwwnuJuad8QtFVTKS1PamrWWtYUlCNx
6GFNFDSei0nqYQJYtkymu33+jB3CDnfp4eOJczlNCQr9qyjRPx0wz/wFrEvYBD4r
iO9nK8PEvoMOCIjrdvroucC63BuIG/11BJHb6hTxHQXCh8BFmSX0qpXVXsALNoH8
jcrUtM8NBi1kagpT8dhXRdjlmLR6Zkr+pB7sTFFGjMFPiAYZNt+mtyhIdxB/+VAe
r3zOJqow+amQpsNGyOrDR/bcFDWZn6xOdxIlsR+RzJnEdNRToTBzcp4AqtA4ZMRO
otr1ztJMdHiQrnJRsZn2j7qlbYtVhlAua1DKQwiZRJH7s4FRujCZvrQ2a6i+i51v
ASZOlQ2wahCex+vAosRLJSdQNTFm2mmDNmQ5PoB1Lbor0ZwE9Dh0CmCIEqnTQmw5
941OkdW0ZUmjetfEzG4QoVYiaNiOZXxzFxlR9BLM2Wl+cg6fFJDWaybQ3vy5y3qJ
7YR8X86qNqdkphQ7uMC9TQ5F8iouFZX+284bYFwRsaVrABEBAAGJAh8EGAEIAAkF
AlaDTpoCGwwACgkQt62lSxyMSycc/w//X4adPpGg1odzc7qDiAVPqJv2lh/11Hir
LLMHubRGhSEtLrXpBY0uWgm3mRRHwYR8cWmdQRF2GQuBKn8SSDWfwRgplrlFsXuY
xQ3xFWQ3h5USY1Y+6yMcc0VZ5l7jRiW8gw6sspACloSDpzQk/nLKC7+A3b7AGZGv
N4MIadphedrjGjsIZtQJ6DC/sZjEhBZUgqxcI5qaBUtrnlA3QCUYsa1JYGSFu8oq
sPBruqgr02X8oYsWGvz4iM8cgyEl49PxXMLAGgJ4HghlSCRHdIOGQ4/kUACjtC+b
oReZ3dKwT2iqv6saMer5I2Pl4qf0+Y5w/SMPYvWV0tCz3vwr+IdWcWEOfzCwhxEe
AP6bLL1wBol3x5bzilZ/ORN5wsVV67PR+asjWFZGdb2S6kedJ4e3kvPrgJa/JEI3
YYupeId3puY2ByCUzRDG0+57rR87LbxeS6fsbvTyDmlvOEHxujW7YeEHib6YeG12
tStAAPg2ql6IK7PKDjDoK1YqKN+IW4w+UDJFh89urEokmkuZKMX4RBgPSb37XEw0
ufbIngA6+BlNugzpQnfxcWMz31gZSjmwjDZjtVKTuM9mPZvgP7XB0gU4WzjffpsI
HhCOLGsimhprq2DqnjzxKMTcDu5tOOBvjtCtaTDxhPF7O6UboWQXvogzcb9iYaWL
CiNrh1avYNQ=
=ujqp
-----END PGP PUBLIC KEY BLOCK-----
To a keyserver
Start by finding the 8 character hexadecimal ID of your key, using the command below. The hex-id will be the same as the last 8 characters of your key fingerprint as well.
gpg --list-keys your-key-id
Now, upload your key to a keyserver. You’ll need to use your hex-id, not your your-key-id, as we’ve been using in this guide.
gpg --send-keys --keyserver pgp.mit.edu hex-id
Note - The major keyservers mirror one another, so once you upload to one, they’ll eventually all be in sync.
Import a key
To trust other users, you’ll need to import their keys.
Manually
Use the command below to import a key from a file.
gpg --import filename
From a keyserver
Before we being, keep in mind that importing a key from a keyserver does not guarantee the key belongs to the user (e.g., look at all the entries for Richard Stallman).
First, start by searching for a key on a keyserver.
gpg --search-keys --keyserver pgp.mit.edu their-key-id
Then, import the key using the command below.
gpg --recv-keys --keyserver pgp.mit.edu their-key-id
A note on short key IDs
When publishing your GPG information, you typically publish the entire public key, as well as the fingerprint, long key ID, and short key ID.
It is highly recommended to NOT use the short key ID or long key ID when importing/exporting/publishing your GPG information. Instead, use the full 40 character fingerprint. Using a GPU, anyone can generate a key with a duplicate short key ID. More resources are available here, here, here, and a guide to publishing your information effectively is here.
Signing keys
Web of trust
Before we discuss signing keys, we need to understand the web of trust (WOT). The WOT is a concept used to establish the authenticity of a public key with an individual owner. It is the decentralized version of the centralized public key infrastructure (PKI) commonly used by certificate authorities when creating SSL certificates.
Signing
Signing a key is your way of telling the world that you believe the key belongs to the name and email contained inside it.
First, you’ll have to import the key of the other user (either manually or from a keyserver). Next, you’ll need to sign their key.
gpg --sign-key their-key-id
After you’ve signed their key, you should export it.
gpg --export --armor their-key-id
Send them the output, and have them import it into GPG on their machine. They can then publish their updated key on a keyserver to show the world that you trust their key.
This is how the web is created and expands. If someone trusts you, and they see you’ve trusted this user, they will be more likely to trust that user as well. The more users that trust each other’s keys, the more of a “web of trust” that is created.
Key signing party
The WOT wouldn’t be very useful, however, if the web wasn’t large. Imagine you have a key pair, but don’t know anyone else who uses GPG. Who would sign your keys? Fortunately, events called key signing parties exist where users gather to verify each other’s identities and exchange fingerprints of public keys printed on paper (users are often warned not to bring a computer). After the party, users sign the keys they received, upload them to keyservers, then download their newly signed public key as well. A few resources on the etiquette and procedures of key signing parties are located here, here, and here. Two site for generating paper fingerprint slips are located here and here.
Manually encrypting
You MUST specify a recipient when encrypting files, including yourself! If you want only yourself to decrypt a file, you must specify only yourself as a recipient. If you want only another user to decrypt a file, you must specify only another user as a recipient. If you do not specify a recipient, no one will be able to decrypt your file (not even you)!
To manually encrypt a message, start by saving the message to a file. Then, encrypt the file for email, using the command below.
gpg --encrypt --sign --armor --recipient your-key-id --recipient their-key-id filename
You can copy/paste the ASCII output into the body of the email/forum/etc…
Note - When GPG encrypts/decrypts a file, it usually leaves the original file intact. Be sure to securely delete this file (sdelete on Windows, shred on Linux).
Files
Encrypting files is similar to encrypting emails.
gpg --encrypt --sign --recipient your-key-id filename
The resulting file will be named filename.gpg.
Note - When GPG encrypts/decrypts a file, it usually leaves the original file intact. Be sure to securely delete this file (sdelete on Windows, shred on Linux).
Manually decrypting
Use the command below to decrypt a file/message.
gpg --output filename --decrypt filename.gpg
Note - When GPG encrypts/decrypts a file, it usually leaves the original file intact. Be sure to securely delete this file (sdelete on Windows, shred on Linux).
Basic key management
List all keys on your system.
gpg --list-keys
Updates all keys downloaded from a keyserver.
gpg --refresh-keys --keyserver pgp.mit.edu
List all signatures on a particular key
gpg --list-sigs your-key-id
Automated tools
As you have learned by now, GPG is difficult and cumbersome to use on the command line. However, there are a number of GUI tools that make using GPG a little easier.
Desktop email
- Evolution - An email client that provides email, calendar, and contacts, with GPG integration
- Claws Mail - An email client that provides email with GPG integration.
- Enigmail - A plugin that brings GPG integration to Thunderbird.
- GpgOL - A plugin that brings GPG integration to 32bit versions of Outlook. Part of Gpg4win.
The Free Software Foundation has a great guide to configuring Enigmail on Thunderbird. I won’t bother going over the same setup here.
Webmail
For webmail, Mailvelope is the most popular (still actively developed) way to encrypt email. It offers plugins for Firefox and Chrome, and integrates with Gmail, Yahoo! Mail, Outlook.com, and more. It can also create/manage/delete/import/export GPG keys, without GPG needing to be installed (it relies on OpenPGP.js).
Again, Mailvelope offers a great guide to installation and configuration, so I won’t bother repeating it here.
Files
Encrypting files on your local machine is made easier with the tools below.
- GPG Desktop - Brings GUI for encrypting files to Windows.
- Gpg4win - Suite of components that bring a GUI for encrypting files to Windows.
- GPG Tools - Suite of components that bring a GUI for encrypting files/email to Mac OS X and Apple Mail.
- GPA - Official GPG GUI client for Linux.
- Seahorse - Suite of components and plugins that bring GUI to various GNOME applications.
Let me know how you use GPG!
-Logan
